As the fall semester of most colleges and universities comes to a close, you may be taking a good hard look at your grades for the semester and wondering how you could have done better. If you are early in your college career, you may not yet have learned the best ways to maximize your time in class and in college as a whole, so I thought now would be the perfect time to share some tips about how to get more out of your college classes. Think about these tips as you head into winter break and get yourself a plan of action for the spring semester!
1. Show Up: Look, college isn’t like high school, you are actually paying to be there and believe it or not, the time spent in class can have a profound affect on your knowledge and understanding of the world. Make your best effort to show up to all your classes, and make sure to get there early to snag a great seat!
2. Sit in the front row or center aisle: Apparently, studies have shown that students that sit in either the front row or center aisle of a classroom score higher than their peers in other seats. Make this special T zone your permanent destination in every class.
3. Actively participate in class: Yep, classes can sometimes be boring and even though you are in college, there are still classes that you are required to take that may not interest you. But, you know what they say? Time flies when you’re having fun! So, actively engage in your classes, take copious amounts of notes and ask questions regularly to keep your brain working. This will result in more information retention for you and a much quicker and enjoyable experience all around.
4. Buddy up with your professors: Although some of your professors may seem big and scary, for the most part, they can be some of the most interesting people you will ever meet. Now, I’m not saying that you need to hang out with your professor regularly, however, getting comfortable with them will drastically help you with your classes and workload, because you will feel more at ease asking them for help or advice. Plus, if you become friendly with professors in your major, they are more likely to write you great recommendation letters for grad school in the future or be a great reference for a resume!
5. Get your assignments done early: In most classes you will receive a syllabus on day one outlining all your assignments and their due dates for your class. If you stay on top of your work and get your papers and projects done early, you will be ahead of the curve. A week or two before that assignment is due, when your other classmates are just beginning their work, you can bring yours to your professor and ask them to review it for you before you hand in a final draft. This means you get feedback from your professor on your project or paper with enough time to make the necessary edits and hand in perfect A+ work!
#1. You don’t have a website: For businesses and individuals that want to promote themselves online, having a dedicated website is a must! You need to have a place online that can act as a landing page for all your business and important information so that people who search for you can find you! Now, this can be as simple as a Facebook page or as complicated as a full featured website, but carving out a little piece of the internet for yourself or your business is a must! Oh, and social media accounts don’t count as websites, sorry!
#2. You’re not covering all social media:So you’re online and testing the waters with social media but you aren’t yet comfortable with all the platforms. That’s understandable, but you need to at least have an account set up for your business in each and every major social network, which means Twitter, Instagram, Facebook and if you are selling things online, Pinterest! If you’re not ready to use the account yet, don’t start until you are ready to commit to it, but at least have the basic profile information filled out as well as an icon picture set in place that is something you already use on other platforms!
#3. You’re misusing social media:The beauty of the various social media platforms is that you use each platform for different purposes. They are not one size fits all! What works on Twitter does not work on Instagram, and what works on Instagram, doesn’t work on Facebook. You need to understand how best to use each media to their maximum potential! A great book that covers this is Jab, Jab, Jab, Right Hook by Gary Vaynerchuk! If you’re looking to promote online and you are confused about how to properly market and grow an audience across the various social media platforms, you need to read that book.
#4. You post too often: Most people consider personalities and businesses that post too frequently on social media spammers. Even if you are putting out completely unique information with each tweet or Facebook post, too many posts in a short amount of time annoy people and they will just end up unfollowing you! Stop posting on social media every 5 minutes, and bring it down to a manageable number. Tweet up to 3 times an hour (not including retweets or replies), Post on Instagram 1-3 times per day max and stick to about the same number of Facebook posts during peak traffic times!
#5. You don’t post enough: So you have these accounts and you post on them once a week or worse, once a month! Well that is a sure-fire way to get nowhere fast with your business! Like I said before, if you aren’t ready to start using a social media platform, don’t use, just leave your profile set with a message that says “coming soon” to give your followers a reason to subscribe even if you aren’t currently posting. Once you are ready to use the platform to it’s full potential, make a plan and stick to a regular posting schedule!
#6. You’re not providing value to your audience: How would you feel if Starbucks started posting pictures on Instagram of shoes? You would probably be confused as to why a major coffee company is suddenly interested in footwear! If you follow Starbucks in social media, you probably follow them to see what’s new in store or when your favorite seasonal drink becomes available, right? So, the shoes really don’t provide any value to you. If you wanted to look at shoes, you’d follow DSW or Payless! Well, the same goes for you and your audience. Make sure you are posting things that apply to the people who are following you so they get value out of the experience. If your posts are all over the place, it will confuse your online presence and you won’t be able to establish a firm following.
#7. You’re ignoring video: For some reason, I have noticed that many business and personalities on the internet are apparently afraid of video, although video sharing sites like YouTube and Twitch are gaining ridiculous amounts of success and every other day I feel like new video capture apps and features are being added to our current social media feeds. There is a clear trend here, video is happening and its big! So, you really need to get over the fact that the camera adds 10 lbs and start bringing your message to the video sphere. YouTube is a great way to share quick messages with your followers and share important or helpful information with others, but it’s not the only way! I already wrote about ways to add video to your website, but even creating videos for places like Instagram and Facebook will really help to establish your footing with video and bring added value to your followers!
I hope this post helps you to identify areas in your online marketing plan that may be preventing you from reaching your fullest potential online! If you have any additional no-no’s for self-promotion online, let me know in the comments!
With Black Friday just short of two weeks away, I thought now was the perfect time to discuss my favorite ways to get deals and save money, especially on pricier items. I am definitely the type of person who has slightly more expensive tastes, but I am also a complete cheap-skate! I hate spending more money than I have to on an item (who doesn’t, really?) and I will go out of my way and spend extra time price checking and scouring clearance racks to get a deal on an item I want. I realize, however, that not everyone always has the time to comparison shop and price check, so I thought it would be helpful to compile a list of a few tried and true methods I use to find deals quickly, when I need to make a purchase!
1. Take advantage of Black Friday Deals: Now, although Black Friday only happens once a year, it’s one of those events that we all know is coming. So, throughout the year, I will hold off on buying certain items for myself, my family and my home if I can wait until November 30th to grab them at a great price. With Black Friday around the corner, I suggest giving good thought to items in your home that may need replacing, upcoming gifts you may need to buy within the next year, and any wish list items you have been pondering. Decide if its worth it to upgrade that aging tv now, to buy your nieces graduation gift a few months early, or to pick up that high-end bag you have been eyeing, taking advantage of seasonal sales for purchases you know are coming down the line anyway!
2. Shop Designer Outlets: I think you can tell from watching a few of my youtube videos that I am something of a designer handbag and accessory nut! I love having quality staples in my wardrobe, but I don’t like to pay full price! I don’t even like to buy bags and accessories from designers when they have sales or provide me with a 25% off coupon (I feel like they send those to me every week)! No, I pretty much never buy a designer item from their retail stores, instead I shop their outlets or larger department store outlets and take advantage of real savings and price cuts! Outlets are great because their items are always significantly marked down in comparison to what you would pay for an item in a designer retail store, and on top of that they are always running at least one sale on any given day. If you shop around holidays (any holiday really, Presidents Day, Memorial Day, Labor Day- not just Christmas) they often have sales on top of sales! If you ever wondered how it is that I own multiple bags that retail for a few hundred dollars each, it’s because when I want a $500 bag, I go to the outlet where they sell it for $350 and then take advantage of their 40% off with an additional 30% because it’s a holiday. So that $500 bag ends up being less than $150 dollars!
3. Sign up for store mailing lists:Now, you and I both know that it isn’t the occasional splurge purchase on a handbag that kills your budget, but rather it’s those daily expenses on pricey necessities that add up quicker than anything! Clothing, home supplies, or car repairs are much more dangerous to our finances than we give them credit for and on a daily basis, I don’t think enough of us are taking advantage of sales and discounts in these areas. Make sure to sign up for store mailing lists and email marketing lists to the places you shop at most often, and even a few you may only occasionally visit. Why? Because most stores send out weekly coupons and flyers that outline sales on specific items, and if you just spend a few minutes checking out what is on offer and making your shopping decisions based on the stores advertising coupons or running sales across specific departments, you will save loads of money for sure!
4. Price check through Amazon: Whenever you are questioning whether or not you are getting a deal on an item, the best thing to do is to price check through Amazon.com. Why? Because Amazon is all about making sure they price match even the best published deals. So, if you are looking for an item and you think you are getting a deal in store, Amazon will be able to accurately tell you what the lowest advertised price is for that item, because they automatically lower their prices to match deals found elsewhere in store and online! So, if you have the time to do one quick little price check, use Amazon and feel confident that it was time well spent!
5. Check Clearance and As Is sections: For some pricey items, especially home goods, appliances and furniture, many stores keep a clearance/as is section where you can find great deals on new items that may be older or slightly damaged. With many large items, even the smallest dent or scratch means the store can’t sell the item at full price because it’s not in perfect condition. If you don’t mind a little superficial marking or buying an item that is maybe a model year older than current offerings, make sure to check for Clearance and As Is sections in your favorite stores because you can save a lot of money this way!
I hope these tips help save you some time and money, not just during the holiday season, but year round! There are plenty of great deals out there, you just need to know a few little retail secrets to find them sometimes! If you score some big deals this Black Friday, make sure to let me know about it in the comments or send me a tweet!
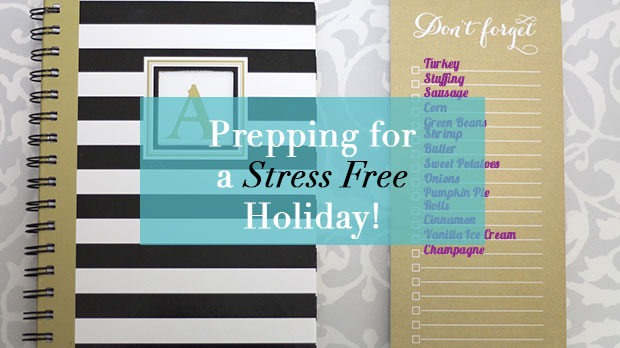
Now that we are firmly into November and the holiday season is nearly upon us, I wanted to spend a little time talking about holiday stress and how to manage it! The end of November thru December is often a very exciting and busy time due to the multitude of holidays scattered throughout the season. With busy times often comes stress, and I for one am definitely someone who feels it this time of year. Sometimes the pressure of wanting to please large numbers of people, mostly friends and family, can just build up. This time of year isn’t cheap, we all want to buy presents for our loved ones and the purchases add up causing mental strain and stress on our purses. Then there are the gatherings, and I don’t know about you, but if you get more than two members of my family together at a time, conflict often arrises over the silliest issues! It’s my ongoing mission every year to manage this stress the best that I can, so that I can enjoy the season instead of stressing about things beyond my control! So, I put together some easy steps, tips really on how to manage the holiday stress before it begins and during the thick of it! Hope these tips help you as much as they help me!
#1 Have an Attitude of Gratitude
Get your head in the right place before the stress begins!
Make your gratitude list and keep it with you!
Focus on what the season is really about- being grateful for your life, your family and friends and celebrating that together!
#2 Have a Plan
Know what is going on when it comes to events, parties, obligations etc
Don’t assume someone is going to tell you, make an effort to find information (people are busy after all, especially now!)
Know who is doing what and what you are expected to be doing for certain events.
Make lists for everything so you don’t forget anything.
Review your recipes (if you’re cooking) and make a schedule for when you will start them!
#3 Be Flexible
When it comes to getting large numbers of people together during the wintery months, understand that plans often change at the last-minute, so don’t get worked up about it if that happens to you!
Don’t fight the change, just roll with it!
#4 Prepare Yourself
If you know there are people, events or situations that will stress you out, avoid them or be prepared for them.
Try to enter tough situations with a positive mindset, often your negative thoughts going into these situations can blow things out of proportion and stress you out much more than the situation itself.
Don’t let anyone rain on your parade- these are your holidays too and you have a right to enjoy them!
#5 Spread Happiness
Go out of your way to help others and make them happy.
This sort of behavior will catch on and put those around you at ease as well.
Pay it forward as much as possible!
I sincerely hope that these tips help you to manage your stress during this wonderful time of year! If you have any additional tips or tricks you think I missed, please let me know in the comments below! I need all the help I can get- that’s for sure!
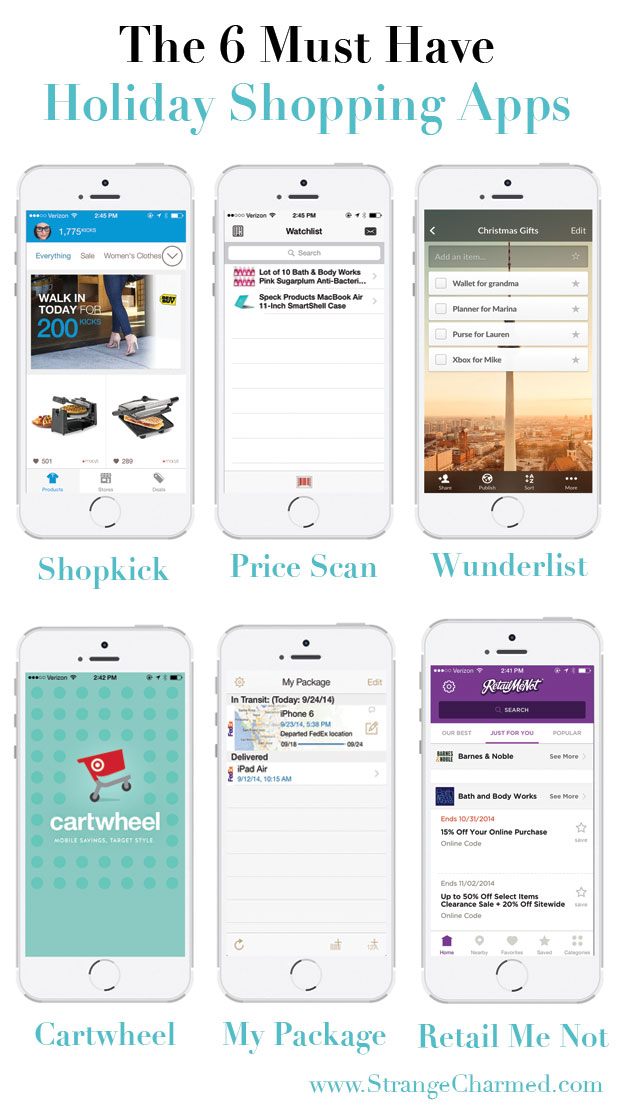
Holiday shopping, for many of us, can be something of a complicated process. If you have a large family or many people to buy for, purchases can start to add up quickly and keeping track of what you have purchased for whom can become really tricky when you are busy hiding boxes of presents in remote hidey holes in your home! You’ve probably asked yourself a time or two, is there a better way to manage all this? Well, yes, glad you asked, because I have assembled a list of 6 must have apps to help with your holiday shopping. Apps to help you save some cash, apps to help you keep track of what you are buying for whom and apps to help you have a little fun while you’re making those few hundreds of stops to the mall in the next few weeks! And best of all? All these apps are absolutely free!
1. Shopkick: I have written about Shopkick before, so I will try to keep this short and sweet, but basically, Shopkick is an app that you can use to help you earn rewards just for shopping and visiting your favorite stores. Through Shopkick, retailers market and promote their stores and products and offer Shopkick users “kicks” for various activities, like making a purchase, going to check out a specific product, and even just for walking into the store! These kicks add up and then you can redeem them for gift cards to a variety of different stores! So, with Shopkick, you can turn all those last-minute errands and repeat visits into real rewards for you!
2. Price Scan: Ever find an item in a store and then wonder if there was a better price at a competitive retailer or online? Well, with Price Scan you can scan a barcode with your phone and instantly find the best deals available for the product! Simple as that! This is a great resource to use if you are like me and enjoy “browsing” for gifts before you actually intend on making purchases because you can keep track of the gifts and products in the app and come back to them over time to see if prices have changed, making sure you are getting the best deal possible!
3. Wunderlist: If you have a long list of friends and family to buy for, keep your thoughts and purchases in order with Wunderlist. Touted as being one of the best list making apps available, Wunderlist has a simple and clean interface with just the essential list making necessities to help you keep your list in order. Use the app to keep track of who you are purchasing for, gift ideas and even budgets for each present. Now you have no excuse for purchasing duplicate gifts or going over budget!
4. Cartwheel: If you are already a frequent Target customer, you may already be familiar with the Cartwheel app. It is a dedicated app for Target shoppers to find instant savings on items in their cart while they are shopping. Simply scan the barcode of your item while shopping to find any extra deals or instant coupons that you can apply to the item. Once you go to checkout, give your phone to the associate at checkout and they will scan the custom barcode in your app and apply all the discounts and coupons you found while shopping! It’s pretty easy and can save you some extra money, especially if you are like me and bad about using coupons!
5. My Package:Online shopping for the holidays has grown exponentially over the past few years, so chances are you are going to have more than a few items coming in via the mail! Keep track of these packages to make sure you don’t loose anything but entering your tracking number and an item description into the app. The app will then begin to track your package with its geographic location and alert you as it makes its way to you! You can even set up delivery alerts, so you can be sure to check the mail before anyone else at home and tuck away any important packages like the gift giving ninja you are!
6. Retail Me Not:You may have already heard of or used the coupon site, Retail Me Not, but they also have a great app that can help find you coupons and deals for both in-store and online purchases! Add your favorite stores to the app or let the app track your location to find great deals near you at a wide variety of retailers. Again, this is an awesome app, especially for people who like to hunt for great deals or are always forgetting about coupons!
I hope you found this list of apps helpful as you proceed with your holiday shopping! I know we are all trying to save extra money where possible and make this stressful time of year a little easier and especially more enjoyable! If you have any other must have shopping apps that you think I need to know about, please let me know in the comments! Of course, don’t be stingy- go ahead and share this post in your social media feeds so your friends and family can make use of these great apps as well. I’m sure they will be very thankful you did!
Welcome back for another installment of My Productivity Playlist, aka Whistle While You Work 2.0! Since it’s October, I thought it would be super fun and festive if I themed out this playlist to fall favorites and haunting Halloween sounds! I’ve gone ahead and made another Spotify Playlist in order to share these tunes with you, and it seems that you guys like this idea because many of you told me so and began following me on Spotify which I do appreciate. Plus all you followers had the added bonus of actually accessing this playlist before I published this post!
Toccata and Fugue in D Minor by Johann Sebastian Bach
The Phantom of the Opera by Andrew Lloyd Webber
I Put A Spell on You by Nina Simone
Witchcraft by Frank Sinatra
Montagues and Capulets by Sergei Prokofiev
Sweet Transvestite by The Rocky Horror Picture Show
Told you it was festive! I hope you guys enjoy this playlist and of course I want to know what you’re listening to right now! So, leave me a comment or go ahead and send me a tweet and tell me what music you have been loving this month to get into the Halloween spirit or just to help get you through the day!
I recently received a very lovely comment from a reader and member of my online community about my life and the work I do creating inspiring and motivational content for others. The comment was truly sweet, and ever since I received it, I have been thinking a lot about my life and the way it must seem to others who follow me online. From the outside looking in, I seem to be living a very charmed life! By all means, I feel incredibly grateful and thankful for my life, because I know that I do live extremely well and am overall, incredibly happy with my situation in life. That doesn’t mean I don’t have bad days like everyone else, or struggle with things like anxiety or depression from time to time, but I know I lead a charmed life. Hence this blog is called Strange & Charmed because it encompasses the duality of my quirky yet blessed life, but I think you already knew that.
What you don’t know about me, the part I am not so open about sharing, is my past, most notably my life before I began blogging in 2008, and even further back than that. Truth be told, as much as I live a wonderful, happy life today, things were not always going so well for me. Growing up was pretty rough for me. For most of my childhood my family was lower middle class, my parents divorced when I was young and from that time onward, I was always moving from one place to another, never setting down roots or establishing friendships in any one place for too long. At various points in my life, I was exposed to some decidedly unfortunate aspects of life, like addiction, abuse, neglect and of course, poverty. It’s a little hard for me to even admit that here to you all on my blog because to be completely honest, it’s painful to even remember those times. However, I think it’s important for me to share this with you guys because we have all gone through bad times in our lives and although some of us have experienced different struggles, we all have them and they are all painful!
What I want you to really take away from this is that if happy well-adjusted Alexis can come from a a place in life where she didn’t have very much and then turn around and make something of her life- something lovely and wonderful- then you certainly can too! I gave it some thought, and put together a list of some of the things that helped me to get where I am today. If you are struggling right now or in a rebuilding phase, hopefully these tips will help you get inspired to make changes in your own life in order to fulfill your dreams and potential.
1. Make a plan: So life isn’t great for you right now, but it doesn’t have to be that way! The first step to getting the charmed life you want is to make a plan. What can you do right now to make your life better? What is lacking in your life that you need to acquire to come to a better place? Figure out what you need and make a plan on how to achieve it!
2. Get to work: If you want something, you have to work for it, it’s that simple! I know this can be a scary concept sometimes because it means that we actually have to take control and get things done ourselves. Your wonderful life is out there waiting for you, but you need to work for it- the world isn’t just going to roll over and hand it to you.
3. Ask for help: I think one of the major things people get wrong when they are trying to build their lives is that they feel like they have to go it alone, as if having help diminishes what you have or can accomplish. This just isn’t true. Don’t be afriad to ask for help if you need it. Sometimes, we don’t know exactly what we need from others, but reaching out for a lifeline can often bring unexpected and positive results.
4. Get out of your comfort zone: We all know that change isn’t easy, and it certainly isn’t comfortable. However, if you want to bring change to your life, you are going to have to get outside your comfort zone and be prepared to feel very uneasy and unsure. Stick to your plan and understand that just because you can feel the pain of change, doesn’t mean that you are hurting yourself. In the long run, a little discomfort during the process is much better than staying in a bad situation.
5. Replace bad habits with new ones: Often times, we are our own worst enemy in our lives. If you complacently play the role of innocent victim, your life will never change. Instead, try to pin-point the areas in your life where you feel helpless, and make changes in your habits to develop confidence. For example, if you feel like you are always working but never have money and like to blame “bad luck” when you get a speeding ticket or a bill goes missing, acknowledge that the common denominator in those situations is you and that you need to become more responsible with your money by getting into the habit of paying bills early or making sure you practice safe driving. Whatever bad habits are holding you back, acknowledge your part in them and do what you can to build new habits in their place.
6. Always be ready and willing to learn: I believe that the people who have the greatest lives are the people who always keep their eyes open for new opportunities to learn. You seriously never know what important life lessons are around the corner, but if you walk around with blinders on all day you will miss them and in turn may miss important signs from the universe that may help you make the most of your life. Be open and always prepared to absorb new information and messages that can bring greater insight to your life.
7. Mix it up: They say the definition of insanity is doing the same thing over and over and expecting different results. If you have made your life changing plan and have gone ahead and broken out of your comfort zone but you still don’t see changes yielding any results, mix it up. Don’t be afraid to try something new, or to approach your problems from a new angle. Remember, the path of life isn’t a straight line, you may have to take a few turns from time to time!
8. Have a back up plan: So, you have made your plan, and you are determined to stick to it, but things just aren’t working. This is why you need a backup plan- something else to fall back on if your original plan doesn’t pan out. After all, it’s important not to rely too much on one single course of action. Like they say “don’t put all your eggs in one basket!” Options are good, just so long as you aren’t bouncing between options too frequently!
9. Stay inspired: It could take years for you to see major changes in your life, at least, I know it did for me! Don’t let this deter you or cause you to loose hope in your dreams. After all, this is life, and your in it for the long-haul! Make sure to constantly look for motivation and inspiration for your journey so you don’t loose steam. Even when things get tough, and they will get tough as you try to make major life changes, remember this quote by Kenji Miyazawa “We must embrace paid and burn it as fuel for our journey.”
10. Share what you have learned: As you take this journey of self-advancement, you will certainly learn a thing or two along the way. I believe that what we have learned, we must also share with others. Although this post may be titled “Secrets of a Charmed Life” there is nothing “secret” about it. The formula for a charmed life isn’t something that’s hidden from people, in fact, if you really pay attention, you are receiving signs and messages to uplift and advance you all the time. It’s just a matter of believing in yourself and trusting that you will end up where you need to be in life. As you go along on this journey, take a moment to stop and share your knowledge with others. It’s almost like leaving a trail of breadcrumbs behind so that you do not get lost along the way and so that others can also find you and see the direction you have headed.
Now, to help you guys remember these little lessons, I have created a lovely free printable with a book mark, some journaling cards, some page tabs, and deco flags! Like I said above, you will need a lot of inspiration for your journey, and I hope these small reminders help you stay inspired. For best results, I suggest printing these on 98 bright, 32lb paper or a nice heavy card stock if you have it handy! If you enjoy this printable, I may start making more of these sorts of things and including them in my blog posts as little mementos that you can keep with you in your planner, a notebook, or on your inspiration board! Make sure to let me know what you think and what sorts of printables you would like in the future, and of course, make sure to share this in your social media! I would also love to see pictures of these journaling cards and deco items at home in your planners and notebooks, so please make sure to upload a picture to Instagram and tag me!
Welcome to my second installment of My Productivity Playlist aka Whistle While You Work 2.0! Many of you told me that you liked the first installment of this series, and I’m seriously thinking this may become a monthly series that I do because I like it as well! I love music and my tastes are so all over the place that I think I may really have something for everyone! Well, this time around, I got smart and realized that you can actually make sharable playlists via Spotify and I could then go ahead and share those playlists with you so that you can actually listen to the music I am suggesting for you. Novel, ain’t it?
So this is what you will hear on My Productivity Playlist this month. Click here for Spotify playlist! Also, if you have Spotify, feel free to follow me!
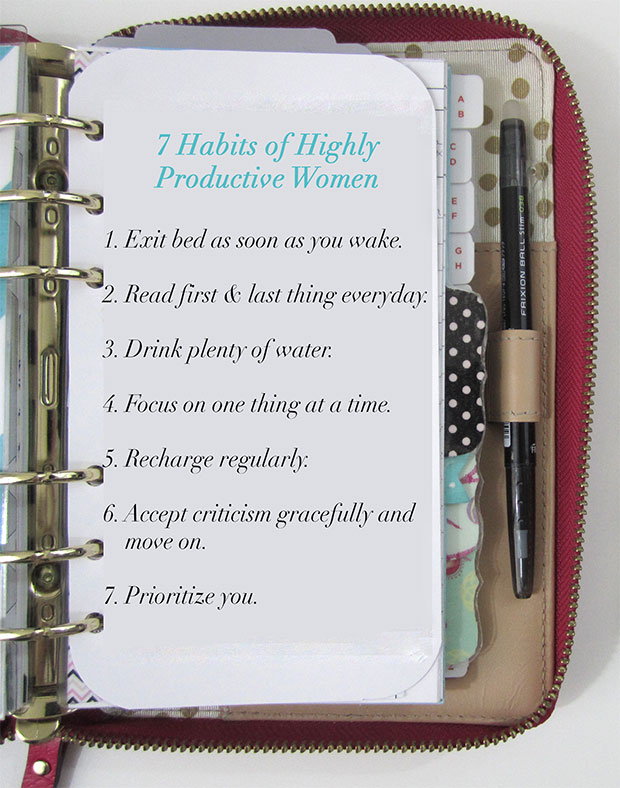
I have a lot of female role models that I love to read and learn about. What is their secret to success? How can I be more like them? What’s the magic formula that they have harnessed to make their lives so productive and interesting? Wouldn’t we all like to know? The truth is, as much as I look to other women, these role models for inspiration, I know deep down in my heart, that it really is just simple hard work that brings you from average to extraordinary. It’s all about the doing, making things happen and having the follow through to see a project from start to finish! You may be familiar with this popular quote seen all over the internet lately “You Have the Same Hours in a Day as Beyonce!” Yes, we all do, so it’s all about how you spend that time and making every minute count. So here it is, the not so secret 7 Habits of Highly Productive Women!
1. Exit bed as soon as you wake: How many times do you wake up in the morning and just lay around in bed playing on your phone or trying to catch a few extra minutes of sleep? I know I am very guilty of this one, but the truth is, when we wake up in the morning, it’s very important that we don’t waste those precious early moments. Get out of bed immediately to wake yourself up and just start your day without delay!
2. Read first & last thing everyday: The most productive women in the world all have something major in common. They are all readers. More specifically, they are all constant learners who read anything from the daily news, to industry updates, to popular literature on a constant basis. When you start to prioritize this sort of important knowledge, you begin to sharpen your edge and boost your personal productivity. For some, it can be a challenge, but give yourself a goal of reading something, even a short news story or a chapter of a book first thing in the morning and last thing before bed!
3. Drink plenty of water: Hydration really does play a major part in our overall wellbeing throughout the day. When I haven’t had a drink of water after a few hours I begin to lag and feel myself drying up, not just physically but physiologically! Although we are often told to drink 8-10 glasses of water a day, that is actually not a precise figure. To figure out how many ounces of water you need per day, take your body weight and divide it in half. That is how many ounces of water you need! So, get yourself a large water bottle or tumbler, keep it with you all day long and feel the energy and productivity boost a simple element like water can bring to your day!
4. Focus on one thing at a time: Although most women would consider themselves professional multi-taskers, when it comes to being productive, it’s actually better for you to focus on one thing at a time. Yes, we all have a lot on our plates, and yes, we will need to move between multiple different tasks and projects throughout our days, not just for work, but for many of us, home and personal obligations as well. But, when you go to complete a task or series or tasks, it’s much better if you onto do one thing at a time. This is precisely why I prefer to batch my work, taking care of all my calls at one time, my emails at one time, and doing certain receptive tasks in bulk, instead of moving from one thing to another more frequently. Give it a try to see how your productivity improves!
5. Recharge regularly: I think there is a major misconception out there that in order to be productive, you need to be focused on work. It’s all work, work, work, right? No time to dilly dally! Well, that’s not exactly true. You can’t expect to carry on non-stop forever, that would be a disaster, which is why it is so important to take time off and recharge your batteries. Throughout a busy work day, schedule in 5-15 minutes every 2 hours or so for you to just take a moment and gather your thoughts. Send a quick text to a loved one, play a quick game on your smartphone or browse a few pages of your favorite magazine, anything that will take your mind off of work and bring a little happiness to your soul. During days off, make sure you really spend a little time resting and relaxing. Go to bed early or schedule some time to sleep in, enjoy the company of friends and family, and just give yourself time and permission to turn off from work. It will do you wonders!
6. Accept criticism gracefully and move on: Everyone faces criticism, that’s a fact! And the truth is, the higher you rise the more criticism you are gonna get because more people are going to be aware of you and your work. Is that any reason to stop what you’re doing or spend hours of your precious time worrying about what other people are going to think? No way! The most productive women in the world face terrible criticism each and every day and they just smile through it and move on.
7. Prioritize you: As women, we are often lured into something of a mart complex, a sense that we need to put everyone else above ourselves in order to be successful and productive members of society. Let’s be honest, we all know women like this, or are ourselves striving for this delusional ideal that a women needs to be everything to all people, a wife, a mother, an employee, a student, you name it, we have to become it! With all that time spent focusing on the external elements of our lives, we often find that we put ourselves last. Unfortunately, this leads to some devastating developments for women, health-wise especially! We need to stop perpetuating this notion that women must do it all in order to have it all, so that we can start putting ourselves first! I’ve written about this before, but one of my favorite examples of why it is important to put yourself first, comes inside a little safety pamphlet found in each and every airplane. You’ve heard the phrase before, “secure your own mask first before attempting to help others.” That’s right, in the event of an emergency during air travel, you are directed to make sure you have taken care of your own safety before attempting to help those around you. Why? Because if you aren’t taken care of, how in the world can you be expected to take care of others? It’s common sense. So, seriously, start putting yourself and your needs first! Make sure you do all those little seemingly insignificant things that help support your well-being, because in the end, all those little things add up to something very, very important!
If you remember, last September I challenged myself not to make any frivolous purchases for the whole month! It was actually a pretty successful endeavor for me, and to help keep my readers inspired to save their hard-earned dollars along with me, I spent the month writing about various money-saving techniques, tips and tricks! Well, fast forward a year and here I am this September doing an awfully bad job at saving money. So, I thought to give myself a little reminder of all the ways I should be saving my money instead of wasting it, I would do a quick little flashback of some of my favorite posts from that series! If you remember these posts, hopefully this will be a nice refresher for you to get your butt in gear and into money-saving mode, and if you missed it last year, hopefully this will give you a little inspiration to poke around these posts and learn some money-saving hacks!
One of my first posts from the Commercial Detox series last year was one of my most popular! It was my first installment of my Starbucks @ Home DIY coffee recipes, a delicious Salted Caramel Mocha! So, if you have a Starbucks addiction that is costing you too much, you may want to give this recipe a try!
Although I am not normally a big clothing shopper, especially now that I work from home, I have been addicted to the boutique clothing site Jane.com for the past few months and just can’t say no to some of their amazing deals. Sales or no sales, however, I really need to reel it in when it comes to my spending on clothing because I know I already have too many items in my wardrobe! So, I think I will have to plan a day this month to clean out my closet using the tips from my Rediscover Your Wardrobe post! If you are a clothing hoarder, you may want to start with this one!
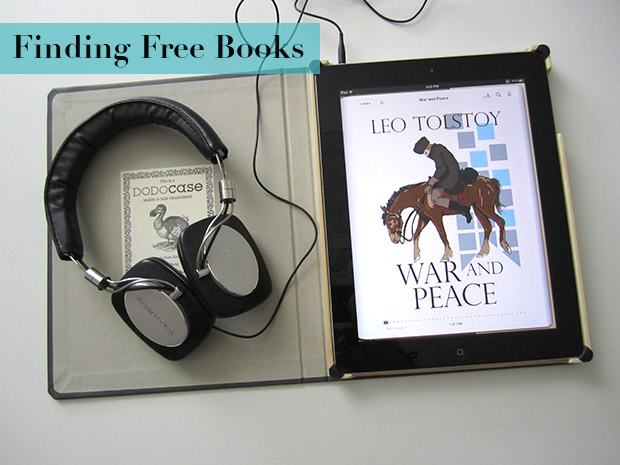
Entertainment is another area that I often find myself spending too much money on! With one-click purchases enabled on my iTunes and Amazon accounts, it often seems too easy for me to buy a book or rent a movie on my devices! So, if you are an entertainment junkie and over spender, you may want to check out Finding Free Books and From Cable to Netflix! Oh and if you already have a Netflix subscription, don’t forget to check out my list of YouTube Series’ Worth Watching!
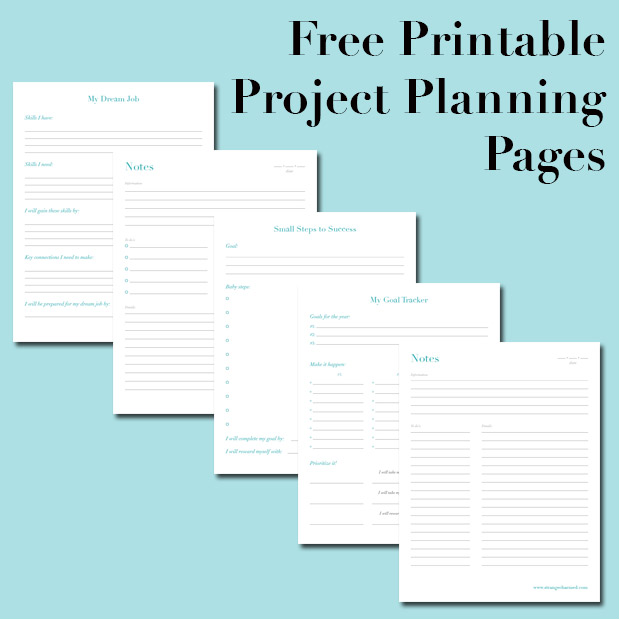
Last but certainly not least, I know I have a bunch of readers who are #plannernerds just like me! Did you know I created some custom project planning pages and made them available for download FREE on my blog? Yep, here is the link in case you missed it the first time around! You could even use these project planning pages to help you track a personal financial goal, smart eh? And if you are stuck with the basics of budgeting, don’t worry, I have that covered too! Happy Planning and Money Saving!
I hope this little blast from the past helped to inspire you to say NO to your frivolous spending habits! I know from time to time I need a reminder too! Oh, and of course, there were many more posts in my Commercial Detox series, so if you want to read them all, go ahead and click here! Tell me what you think of the series and let me know if you need any other more specific money-saving advice by sending me a tweet!