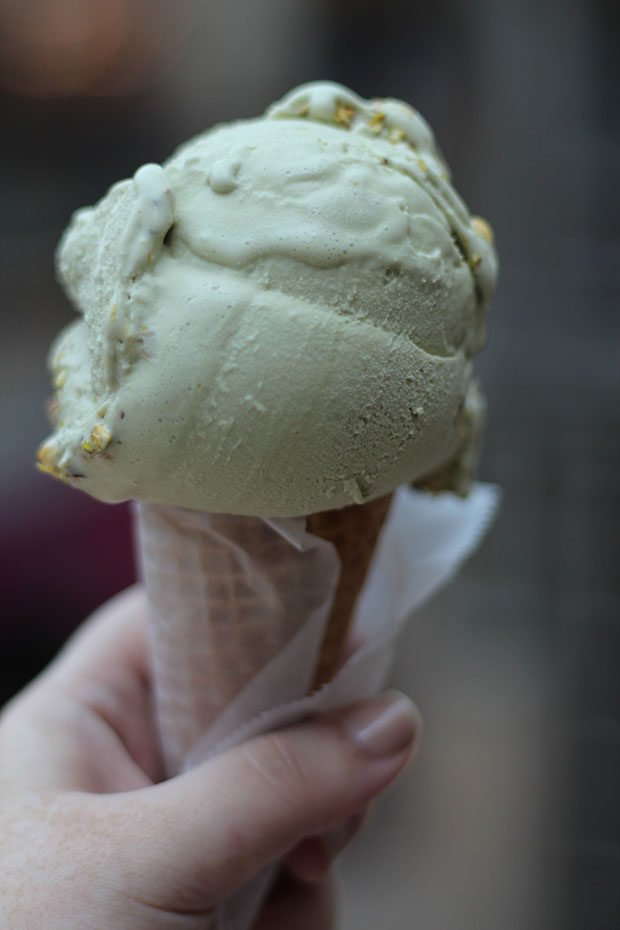
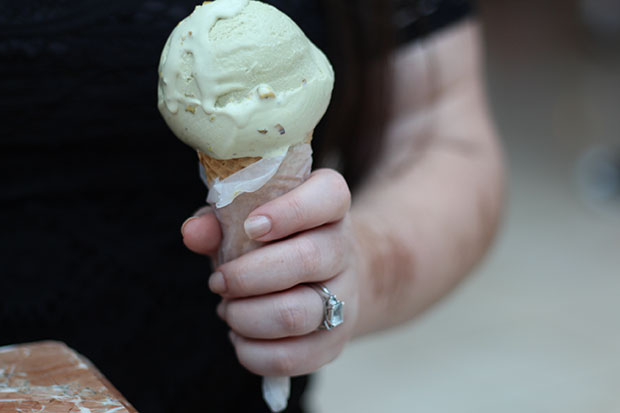
Today is Labor Day in the U.S. which means the unofficial end to summer. Since it was a three day, holiday weekend, I went ahead and did some vlogging on Saturday and Sunday while Mike and I did some intense hours of shopping and went to a friends BBQ! One of my favorite parts of this weekend, however, was a little trip to a Gelato stand while Mike and I were shopping on Saturday! There is footage in the vlog below, but I couldn’t help but to share a few of my favorite pictures taken from our little indulgence. I haven’t had gelato in the longest time, so it was a refreshing way to symbolically end my summer!
I ordered the pistachio and Mike went for the cookie dough, both were fantastic! Like a little scoop of heaven on a waffle cone! Or in Mike’s case a chocolate and sprinkle dipped waffle cone!
Sorry about the gratuitous images of sweets, but don’t you just love the way a gelato (or ice cream) cone looks when its melting? Okay! Okay! I’ll stop now! Make sure to click on the video below to check out the vlog and see more details on what Mike and I got up to this Labor Day Weekend!
So, what do you have planned for your Labor Day festivities? Let me know how you spent your weekend by sending me a tweet and telling me all about it! Or tag me in an Instagram photo while you are out and about celebrating or even having some R&R at home!
As you may already know, I heart Instagram! This really shouldn’t come as a surprise to anyone, especially if you do follow me on IG! So, like a love letter to my favorite app and pastime, I have decided to put together my own TAG on the subject! This is how it’s going to work people, I have 10 questions below, I will answer my own questions and when I am going to TAG 3 people via Twitter to also complete this TAG and in turn, they must TAG 3 more people! Of course, since I can’t stop at a blog post, I also made a YouTube video for the TAG that I will link below. I go into a little more depth in the video and its always much more entertaining to watch someone answer questions than just read their responses, so yea, check that out! If I don’t TAG you and you love Instagram as well, consider yourself TAGGED! Oh and make sure you send me a link to your blog post or video so I can see it!
What’s your instagram handle? @misstrenchcoat
How many people do you follow? 258
How many followers do you have? 2,222
What are your favorite hashtags? #filofax #filofaxers #instageek #katespade
What is your favorite genre of pictures? Celebrity, fashion, lifestyle, food, design or cute? I love desk photos and styled shots of accessories, so I would say lifestyle, design and sometimes food!
How often do you post? I try to post everyday!
How often do you check ig? Every 15-30 minutes, is that a lot?!?
What’s your favorite filter? Valencia and LoFi, although I used to love Nashville, but not so much currently!
iPhone only, purist or rebel? I am most definitely a rebel! I use my digital camera and now my new DSLR to take the best pictures I can and then I share them on IG. I believe people appreciate the extra effort!
Three favorite IG accounts currently? @stephsterjovski, @blushshop, and @plannerdarling!
On my iPhone is a new monthly feature on Strange & Charmed where I give you a peak into what I have been loving on my iPhone for the month! Covering topics like apps, games, podcasts, music, websites, books and more, I hope this series helps you all discover new and exciting content out there that can be enjoyed from your iPhone! To stay up to date with this series, make sure to follow the On My iPhone tag!
To be completely honest, I look forward to putting together this post, each and every month! I love giving you my recommendations for digital content, while also sharing with you my online favorites in such a format! August has been a hot month, and I have to say, I am so looking forward to fall being here already. Summer is nice, don’t get me wrong, but when you’re no longer in school, it sometimes feels meaningless. I am a grown up now and I can go on vacation whenever I want! I’m not on anyone else’s schedule, thank heavens! But the end of August always makes me miss going back to school, whether or not you agree, I believe it was one of the best times of my life, although at the time I would have said otherwise! So, for me, August is like a transition month between summer fun and buckling down, a mix between trying to enjoy what’s left and looking forward to the future. I’ve been doing a lot of that this month, and perhaps, in some way, that’s reflected in the items I am about to share!
Currently Playing, Splode: Splode has been one of my favorite iPhone/iPad games for a while now, but one that I often forget about when I am downloading the latest and greatest! I rediscovered it this month while doing some much needed organization in a few different areas of my life! It’s a quiet, calming game that reminds me of summer and always manages to put me in a good mood! And for only a buck, it’s worth a try!
Currently Watching, DigitalRev TV:Ever since I bought my new Canon DSLR, I have been an absolute photography junkie! In my quest to learn as much as I could about my camera and its functions, i came across this awesome, and very popular photography channel on YouTube and I have been laughing and learning ever since! If you’re a photography geek or just want to learn more about how to take better pictures, you should definitely check out some videos from these guys!
Currently Surfing, BlogLovin: My blog has been on my mind a lot this month. How to make it the best it can be, which sort of content I should be focusing on, and just the best ways to get myself and my writing out there! So, it’s important for me to make sure I am reading as many other blogs as possible! If you also use BlogLovin as your default blog reader, make sure to follow my blog as well!
Oh, and one last thing, in case you were curious as to which iPhone case I have been loving at the moment, check out this link! She’s a beauty, ain’t she?!? Oh, and want a closer look at these apps including a little play through of the game, Splode? Check out my YouTube video below!
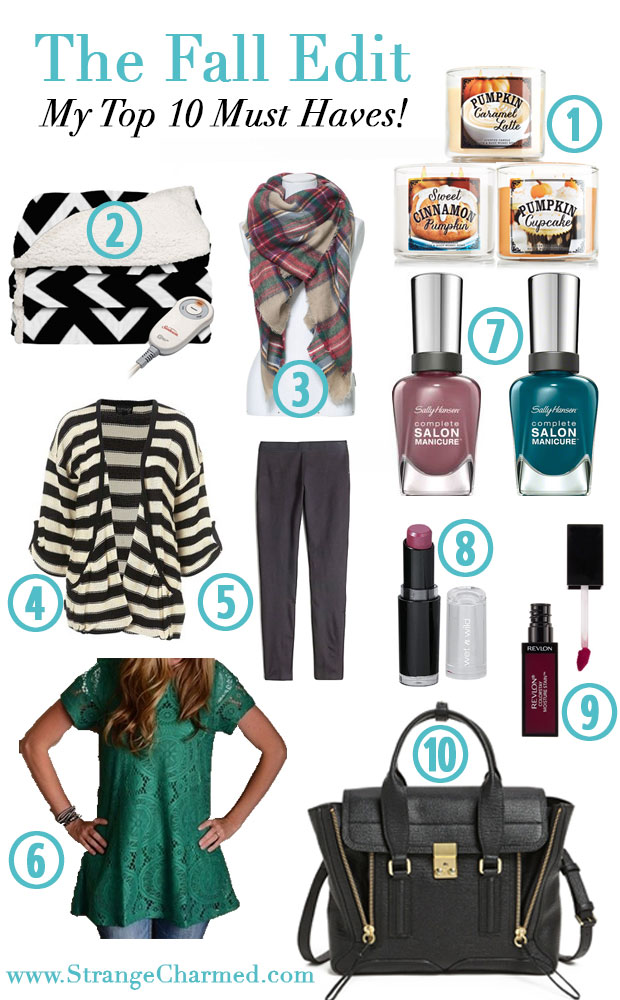
I know, I know, summer has not even ended yet, but for me, I really don’t care! I am not the biggest fan of summer and greatly prefer fall/winter, so if I say it’s time to talk about fall, it’s time to talk about fall! There is seriously something in the air already that makes me feel like this fall is going to be epic. Knowing the sorts of blog posts and videos I am aiming to produce this fall get’s me so excited for the months ahead, and I just have this sense that some good things are going to happen next season! As much as I hope this feeling pertains to good things down the road for me, I hope to share some of that with you as well. Fall, after all is a magical time, and I hope there is plenty of magic to go around for us all! So, today I wanted to cover my top 10 must have items for fall, ranging from home goods, to beauty and fashion alike! These are the items that I am going to be living in and relying on heavily throughout the season.
Home Goods
1. Bath and Body Works Candles: I always have a stack of candles waiting to be burned 24/7 365 days a year, however, the fall is my it time for candles. When the weather changes and it’s cooler outside and you’re trying to stay warmer inside, it’s a wonderful feeling to light up a candle and cozy up with a warm drink! The pumpkin scents from #BBW are a great, festive way to warm up your home and set a wonderful ambience. My favorites currently are Pumpkin Caramel Latte, Pumpkin Cupcake and Sweet Cinnamon Pumpkin!
2. A Heated Blanket: I am obsessed with this Chevron Heated Sherpa Throw that my husband got me for Christmas last year. Okay, it was supposed to be a Christmas present, but I made him give it to me early because I could not live without it! Let me tell you, I used that blanket day in and day out for months, even into summer until it was too hot to get away with using it! I am just aching to break it back out because (1) it has an awesome chevron print, and (2) it’s cozy and warm, perfect for cool fall/winter evenings!
Style
3. Blanket Scarves: One of falls big-ticket items last year was the blanket scarf. It was a hot trend and I have a feeling it’s not going away this year either! And why should it? I am a major fan of scarves, particularly large, oversized scarves that keep you toasty and warm on a crisp day! I’ll be doing some fun things with scarves this season, don’t you worry, and I’ll be sure to share!
4. Striped Flyaway Sweaters: I have already begun collecting these for the fall! They are such a great staple piece because you can layer with them and still wear jackets and light coats overtop! Target has a very lovely one in stock right now that I love, and I also picked one up from Forever 21 not long ago, but of course in typical Forever 21 fashion, whenever I find something in store, I can never seem to locate it on their website. Lucky for you, I found two similar styles that I also approve of and may actually end up ordering off their site. This is simple and stylish and this one looks super cozy (oh, they actually call it a cozy sweater, how sweet)!
6. Lace tunics: I purchased a few of these lovely lace tunics via a sale on Jane.com a few weeks ago and I absolutely adore them! When it comes to tops, I am normally much more relaxed and casual, but there is something so cute and put together about wearing a nicer top, especially if you are going out or want to look dressier. Unfortunately, since I purchased mine from a flash sale site, the exact ones I purchased aren’t available currently, but this is the Etsy shop of the maker, and here is a similar style I found online for a reasonable price if you must have a lace tunic right this instant!
Beauty
7. Sally Hansen Complete Salon Manicure: I have been in love with the Sally Hansen Complete Salon Manicure nail enamel since I first tried them in an Influenster VoxBox! They are such a great quality for drugstore nail polish and really do rival my love for OPI! For the fall, I picked up two new colors that I am obsessing over already! Plum’s the Word, which is a purple based deep grey, and Jungle Jem, a peacock-blue, almost teal color!
8. Wet N Wild Megalast Lipstick in Ravin Raisin: I am a big fan of a bright lip, but last fall I decided to make a switch from hot pink to a bright purple! That went over very well with me, and so this year I have decided to take it a step further by moving into the deep dark purple area! I picked up this very inexpensive Wet N Wild Megalast Lipstick in Ravin Raisin to test out how I like the color on me, and guess what? I loved it! It’s deep, dark, and sophisticated without feeling overly vampy! I also love how this lipstick is completely matte! So for like $2, what are you waiting for? It’s the perfect fall lip!
9. Revlon ColorStay Moisture Stain in Parisian Passion: When I first tried out this new Revlon ColorStay range, I was decidedly not impressed! But, after watching beauty guru after beauty guru rave about these liquid lipsticks on youtube, I decided I had to give them a second chance in case I just got a bad bottle (after all, liquid lipstick is like that, ya know!) So, after falling in love with the deep purples for fall, I decided to test out Parisian Passion, and I have to say, my opinion has changed, slightly! I don’t think the Revlon ColorStay Moisture Stain line is the best liquid lipstick out there, but it isn’t bad. The consistency of this darker color was much more acceptable to me and much longer wearing that the previous shade I had purchased (Rio Rush).
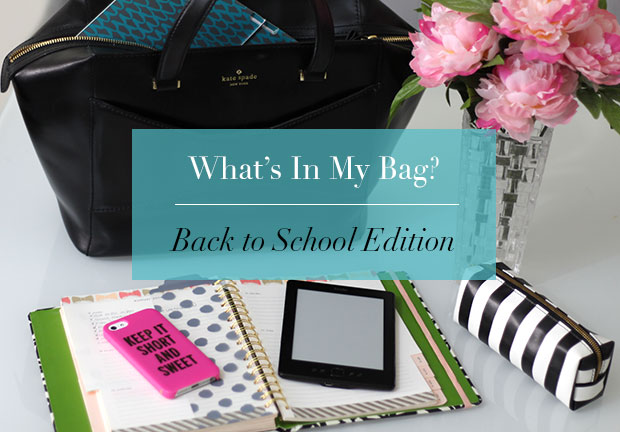
I believe I’ve mentioned before that it’s been ten years since I first went off to college! My, my, where has the time gone? Well, in the spirit of back to school season, I thought it would be fun to do a special Back to School Edition of a What’s In My Bag post! So, here it is!
The Bag
If I was heading back to school this season, there would be only one bag that I would want to carry. My Kate Spade Beau! This large briefcase style bag marries form with function and the result is 100% fashion adorable-ness! Although this bag is nearly a year old at this point, it still holds its form very well and has managed to make it with only a few light marks and scuffs on the leather, which makes me think it would be perfect for the college experience!
The Contents
I don’t think I need to go into detail about each and every single item in this bag, so let’s cover these bullet point style!
11′ Macbook Air with the Michael Kors Sleeve
Kate Spade Literary Glasses Agenda
Multi-subject notebooks (with cute designs on the cover, of course!)
A File Folder (also with a cute design)
A Pencil Case filled with pens, pencils, highlighters, correction tape, markers and more!
A large pouch filled with purse essentials (since I wouldn’t carry a pure with this bag!)
Amazon Kindle (you can buy and read ebook textbooks and save yourself the weight in your bag!)
Rebecca Minkoff Little Louis Card Case
Ban.do iPhone Backup Charger
iPhone 5
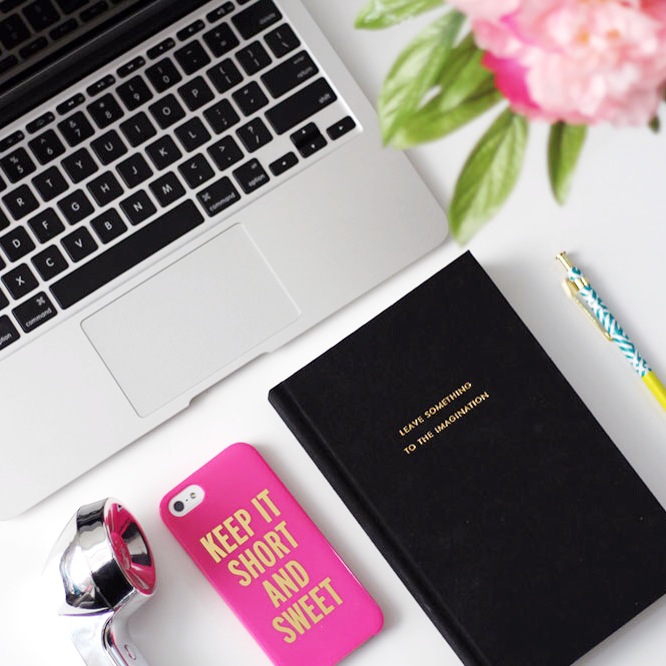
Kate Spade iPhone 5(s) case “Keep It Short And Sweet”
The Video
Of course, if you want to see more of these items in greater detail, including a deeper look into my necessities pouch, you will want to check out the video I made to accompany this post! Direct links to items mentioned in this post (or similar) are also included in the video’s description, so make sure to click through to YouTube to watch and of course “Like” the video! You can also go ahead and subscribe while you’re there too, you are going to need to if you want to enter the super secret giveaway at the end of the video 😉
I have been practicing yoga since I was a junior in high school. When I first started out, it wasn’t all the rage it is today. It was still largely misunderstood and not quite considered a mainstream form of physical activity as we know it now. Finding information on yoga and how to get started on a beginners level wasn’t as easy as you would think! Obviously, we are talking about two very different times, one of those being a time when the internet was young and sites like YouTube were years from inception. So, I starting off talking to as many people as I knew that had some clue about starting off with yoga and of course I googled the heck out of the subject, although good websites with solid information were few and far between. Eventually, either through a friend or through a website (I honestly can’t recall, but I think it was a friend in my AP Euro Class that suggested it) I discovered the book Yoga Burns Fat by Jan Maddern. It is a pretty simple guide to practicing yoga at a beginners level, and I still reference it from time to time today. At the time, yoga classes were not an option for me most likely because they were either hard to find or would have cost money to attend. I prefer to work out alone anyway, and especially when it comes to practicing yoga, I don’t think I would feel comfortable in a group setting. But of course, we live in a totally different world now, which means I have much more control over my options for practicing yoga, including many technologically advanced methods, like using an app!
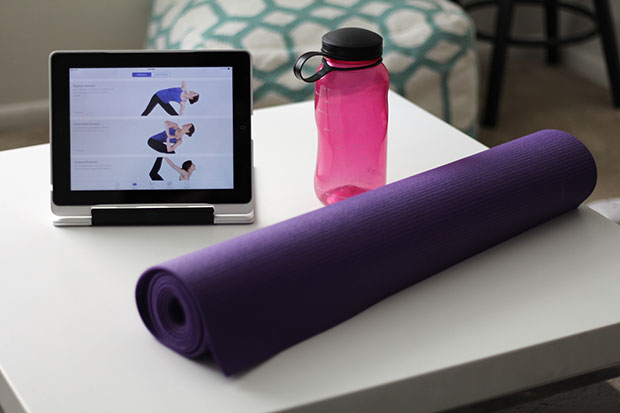
Specifically, I prefer to use the app Yoga Studio. This comprehensive app acts like a personal yoga instructor, with a variety of options on classes offered by skill level or customizable routines that you can build to suit your own needs. I love how clean and simple the interface is; it makes finding the classes or routines you want a breeze and with the built in step by step video demonstrations, you almost get the sense that you are in a real yoga studio filled with serene white light!
So, if you are a beginner who needs that visual guidance that will help you figure out the positions and give you extra advice during the routines on ways you can challenge yourself more or even how to make a difficult position easier for you if you’re having a hard time, I would suggest an app like Yoga Studio over a book. It’s all the benefits of having an instructor, plus you are able to practice in the privacy of your own home and even on the go while traveling! As long as you have an iPad handy and preferably a yoga mat, you are ready for your workout!
I hope this app helps you get starting on your own personal yoga practice! I also went ahead and made a video discussing my history with yoga and why I love it so much that goes along with this post, so if you have some time, feel free to check it out below!
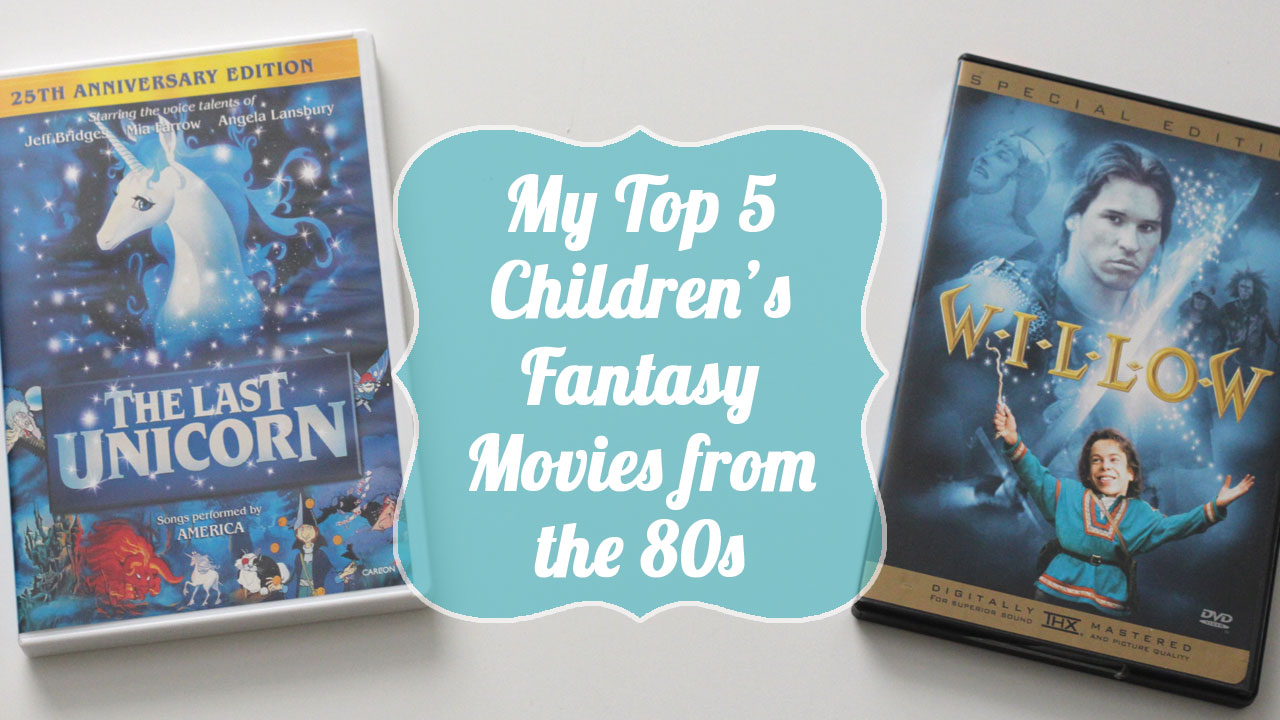
I was talking to my blogging buddy Kristin a few weeks ago about wanting to do a blog post about some of my favorites movies from the childhood. Of course, all of these movies fall into that 80’s children’s fantasy genre that was clearly a strong force at the time. Seriously, what was it about the 80’s that produced so many epic movies, the likes of which we really haven’t seen since. There was something about these movies that was just different from the way they make children’s movies today. They were much darker and often times more adult than movies today tend to be today and even though these movies were my favorites back when I was a kid, I still have an obsessive need to watch and rematch them even till this day. I know its not unusual for children’s movies to include moments of humor for adults, and really the best children’s films (and books as well) are the ones that blur the lines between entertainment for children and entertainment for adults. These movies do just that, and although I fell in love with them as a child, they are even more enjoyable for me as an adult.
So, I’m sure you’re on the edge of your seat wondering which films I have chosen as my Top 5. This was a really difficult task for me to pick 5 out of the many, many more that I watched and loved throughout the years. But, I have chosen to limit this to 5 and so here is what I came up with!
Now, if you would like a little more backstory and explanation behind this list, go ahead and check out my YouTube video below where I talk more about each film!
So, how did you feel about the movies on this list? Are these some of your favorites as well or do you think have a different set of favorites? I would love to know which movies from the 80’s are your favorites and which ones you still enjoy until this day! Feel free to leave a comment, or better yet, send me a Tweet and we can chat about it!
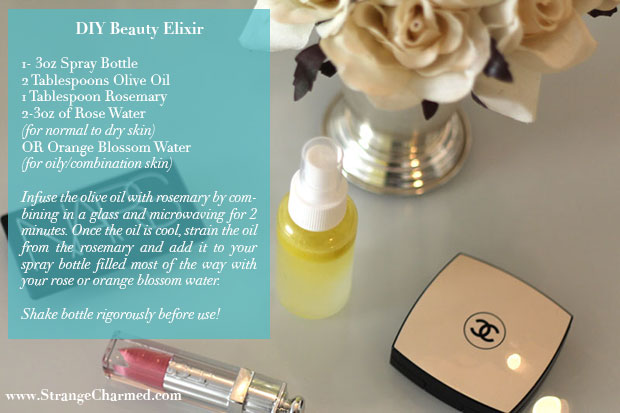
Hands down, one of my favorite skin care items is the Caudalie Beauty Elixir! If you’re not familiar, the Beauty Elixir is a facial toner & makeup setting spray made from all naturals ingredients that help to hydrate, moisturize and refresh your skin! Problem is, it will set you back about $50 for a full size bottle, and during the warmer months or during times when my skin is out of control, I can go through that bottle fast! So, I did a bit of research and decided that I would try my hand at creating my own recipe for a DIY facial toner spray that I could make at home for a fraction of the price of Caudalie’s! Here’s what I came up with!
Now, if you would prefer a step by step tutorial, I also made a video showing how I make this elixir so you can watch that in real time! I’ll link it below so you can take a look!
I hope you enjoyed this DIY skin care recipe I cooked up for you guys! I love facial toners and they are easy enough to make at home, but I am always up for hearing your thoughts and recommendations for similar products or alternate ingredients! Send me a tweet and let me know what you thought about this DIY!
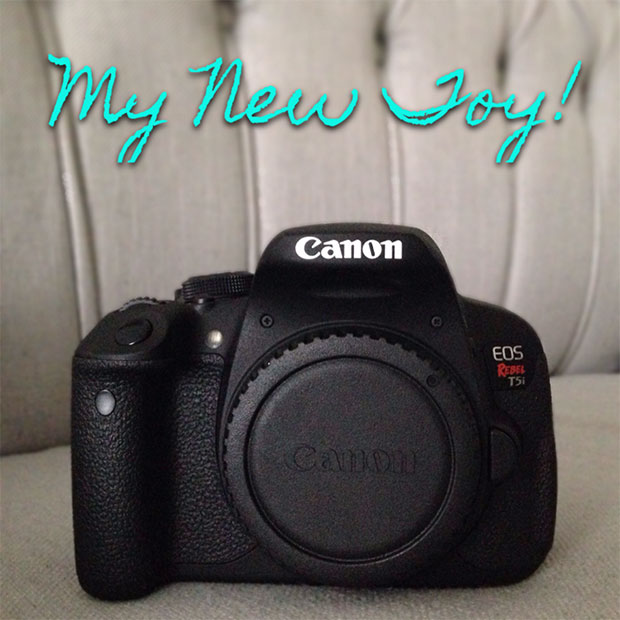
I have been wanting a DSLR camera for such a long time! I’m honestly so surprised that it actually took me this long to finally bite the bullet and just buy one, but now I have one and life is picture perfect! Okay, camera puns aside, I am very excited about my new purchase and since it is definitely going to be affecting the blog the most, I thought I should introduce you all to my new toy! Here is my new Canon EOS Rebel T5i… TA DA! Feel free to start throwing confetti on your end of the computer screen!
Now, you might be wondering why I chose this camera and what compelled me to finally make such a large photography purchase. Perhaps you are also a blogger and have been looking for a nice DSLR to help you make the most of your photos as well. That’s pretty much why I decided now was the time to buy. You see, I have been making do with my Canon point and shoot camera for the last few years, and of course my iPhone’s camera as well. Now, however, I feel like with blogging being my full-time career, that I really needed to take my quality up a notch. Once I knew it was time for a DSLR, I knew I would purchase a Canon because I have always owned Canon’s. After looking at the budget I wanted to work within and scouring reviews for different cameras, the T5i seemed to be the best fit for me. Although it is technically a 2013 model, as far as consumer grade DSLRs go, this one is top of the line and checked all the boxes for my needs as a blogger.
Do I think every blogger needs a DSLR camera to take good photos? Heaven’s no! I have said it before and I will say it again, I think it is important for bloggers to make do with that they have and what is in their budget. If a DSLR isn’t in the cards for you, I firmly believe that a decent point and shoot or even your iPhone’s camera can be used to take awesome images for your blog. You may need to do a little more work making sure things like lighting and composition are on point in order to capture the best image possible, but I still know its possible. Heck, I have been doing it for years and I am always complemented on my photos!
So, for me, I am looking forward to using a DSLR, taking what I have learned about styling photographs and images for blog posts and marrying the two together to create some wonderful images for this site! If you would like more details on all the items and accessories I purchased with this camera, like the lens and a very cute camera bag, feel free to take a look at the YouTube video linked below! I did film a haul for all the items I purchased and if you are a blogger looking for the best lens for your DSLR, I talk about the one I purchased and why (Hint, I didn’t bother with a kit lens)! Also, make sure to check out my blog post on Photography Basics to help you take the best photos for your blog, no matter which camera you are using!
I hope you enjoyed this post and this video! Let me know if you use a DSLR, which one you use and which lens you prefer to shoot with. Also if you have any resources that you recommend for beginner DSLR users or any awesome, can’t live without accessories for a DSLR, please let me know in the comments below or feel free to send me a tweet about it!
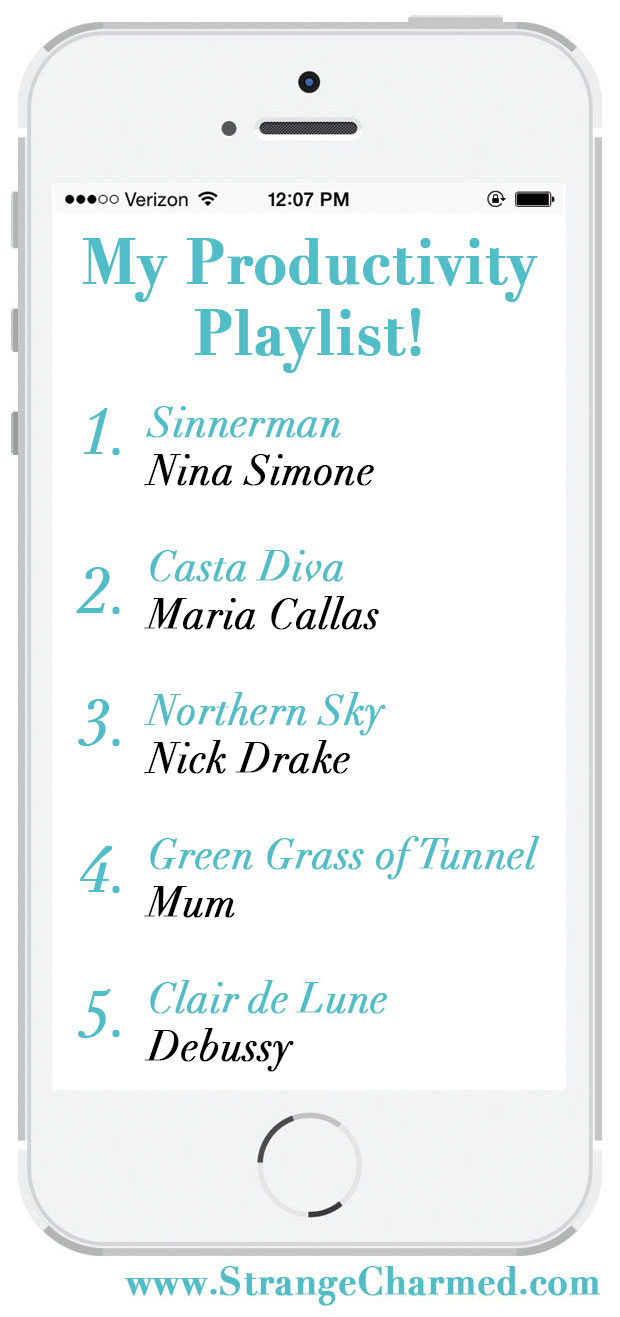
So, I thought it would be fun if I spiced things up here on the blog and let you guys in on a little more of my personal life, including the music I like to listen to throughout the day. Consider this Whistle While You Work 2.0! Without further ado, here is my first installment of My Productivity Playlist series, five of my favorite songs from various genres that makeup the soundtrack to my work day!
I hope you have enjoyed this first installment of my new feature! Let me know in the comments if you would like me to continue with this series and make sure to send me a tweet letting me know what you like to listen to while you are working!