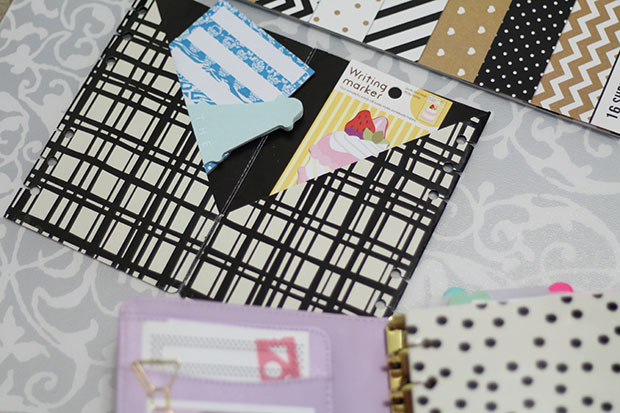
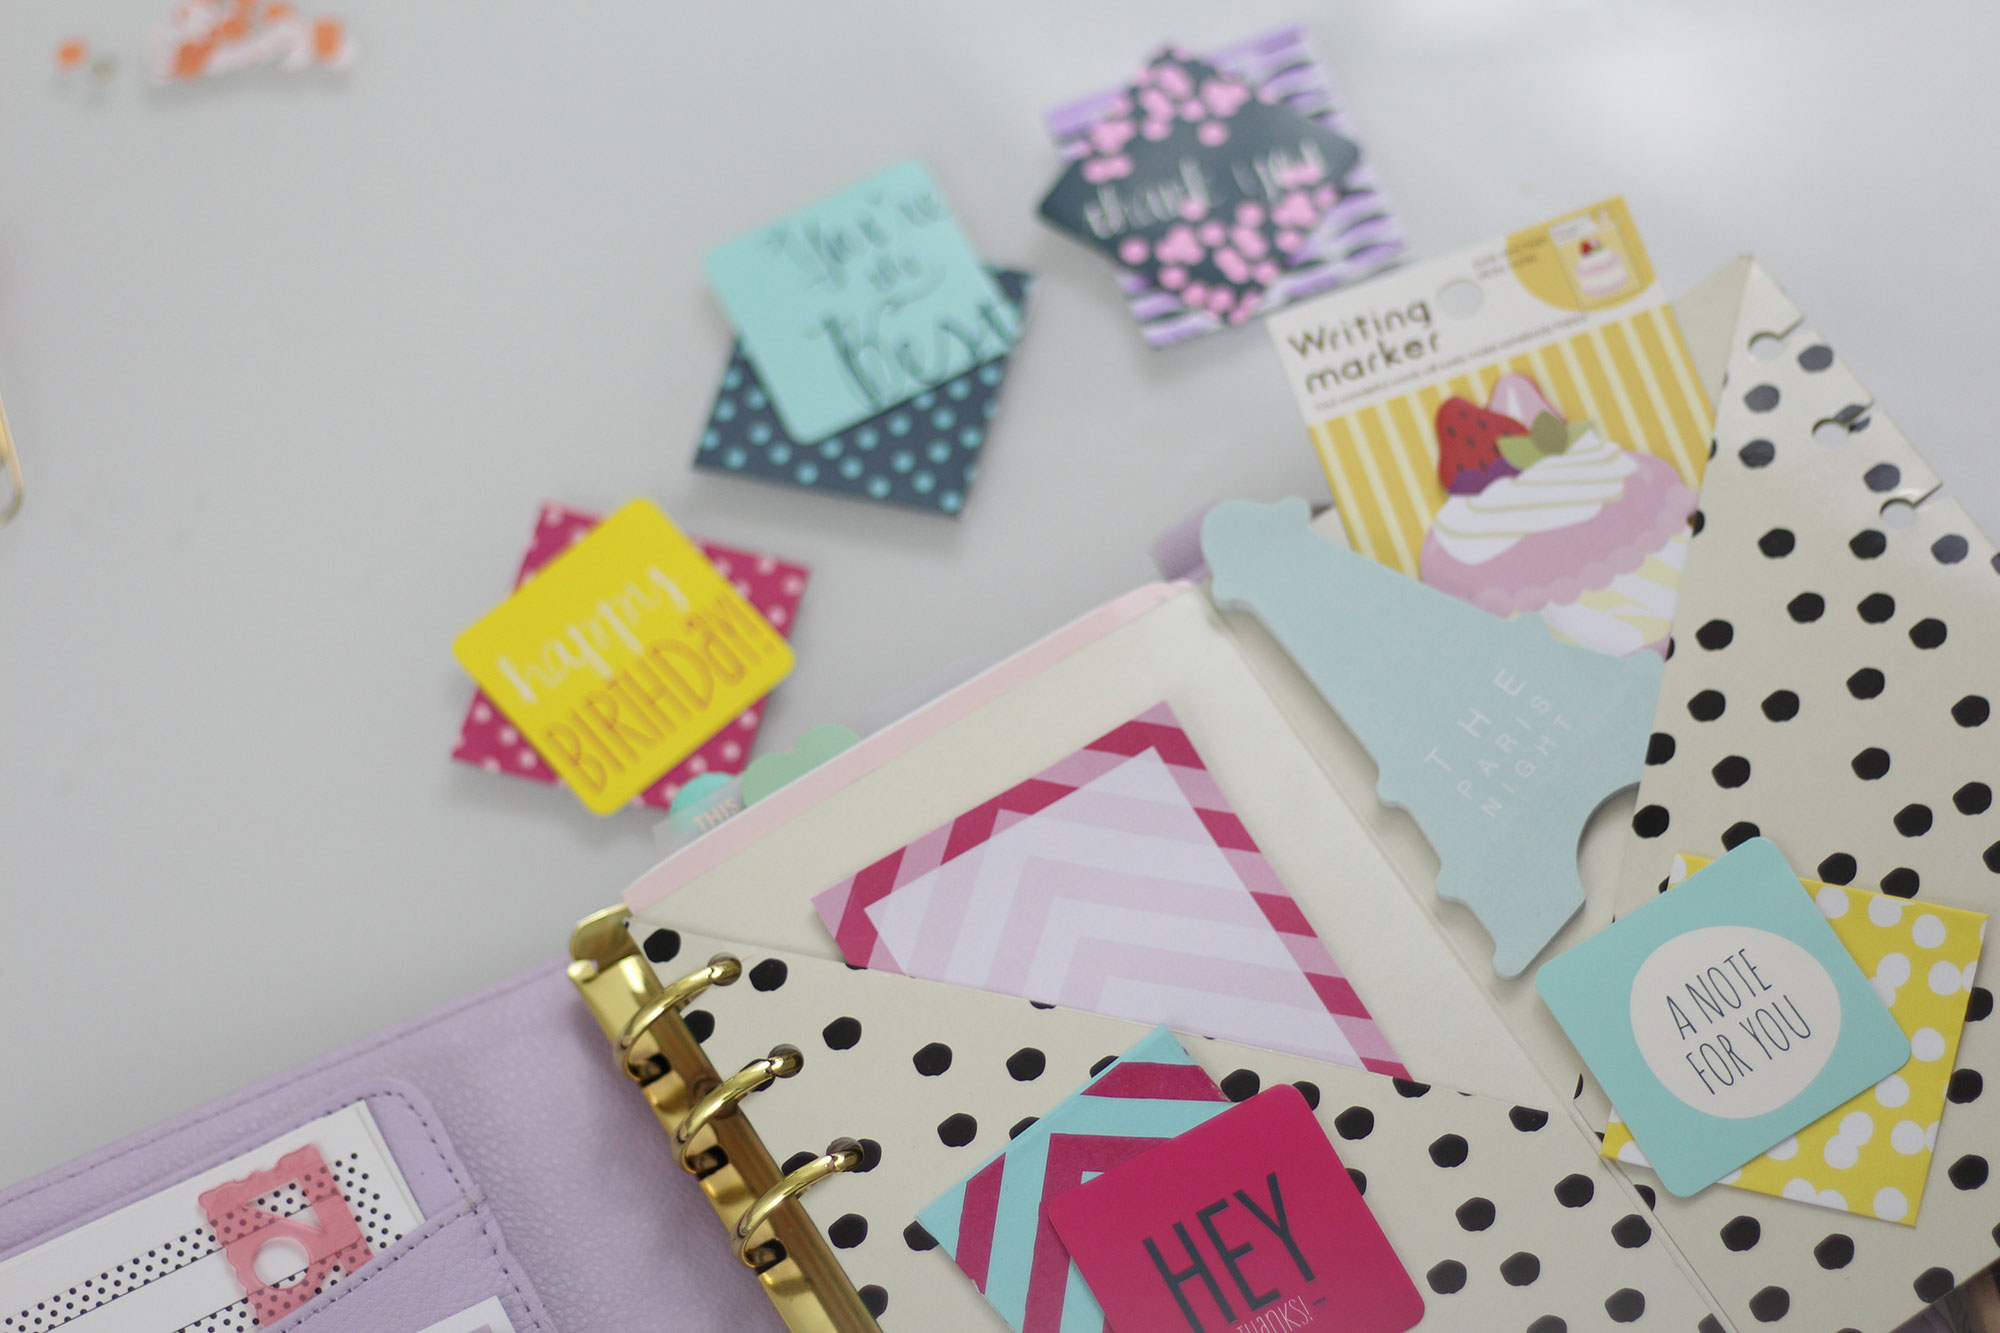
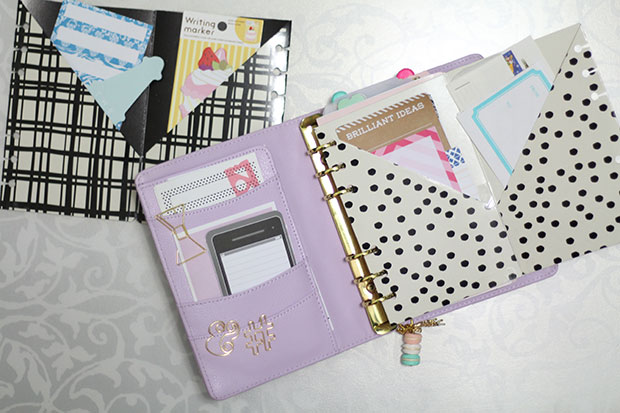
Immediately after I received my newest planner, the Kikki K Lilac and Gold 2015 Time Planner, I went through something of a Filofax revival! All of a sudden I was super obsessed with my planner again, I scoured the internet for new inserts and goodies and started watching way to many planner set up videos for new inspiration. At some point, I watched a video where a woman showed her setup and briefly commented on a DIY folder she had assembled for her planner. I remember thinking it was one of the cleverest things I had seen in a planner in some time, and made a mental note to attempt to DIY one for myself, not knowing exactly how she had gone about making hers. A few weeks later, I found a little note in my planner that referred to this file folder DIY, and feeling crafty, I decided to see what I could come up with!
Many of you have seen exactly what the result of my labor was, and have commented on your interest in seeing a DIY on the topic. So, I went ahead and filmed a video where I walk you through how I made mine. As this wasn’t my original idea, I really wanted to find the source of my inspiration and link you all to the original video I had seen that had inspired this creativity, but for the life of me, I can’t find the video! I searched through my YouTube history, spent days searching videos trying to find the originator of this idea, but alas, I could not find it and thus do not know who I should credit for this idea, but thank you, whoever you are! I love this little folder I have made for myself and I think you guys will love this DIY because it’s really almost too simple!
I considered whether or not I should write out the directions to this tutorial, but I know I will probably get a bunch of questions on the process because I feel like crafty tutorials like this need to be seen, not read. So, below is the video where I walk you through the process. Here is a list of supplies I used and suggest for this project:
A Target $1 Spot File Folder
A cutting mat
A metal ruler
An exacto knife
A permanent glue roller
Clear tape
Scissors
A single hole punch
I hope you all have enjoyed this video and this DIY! I think this little folder is great for storing a variety of different planner supplies like extra paper, sticky notes, page flags, stickers and more! It can also act as a divider as well or even a dashboard if you keep yours in the front of your planner like I do! If you have a planner that lacks lots of pockets or if you just need a more unique storage idea, definitely take the time to try this out and share it with your planner friends as well!
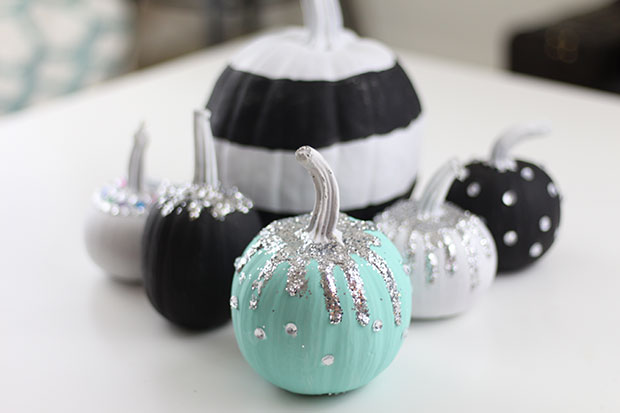
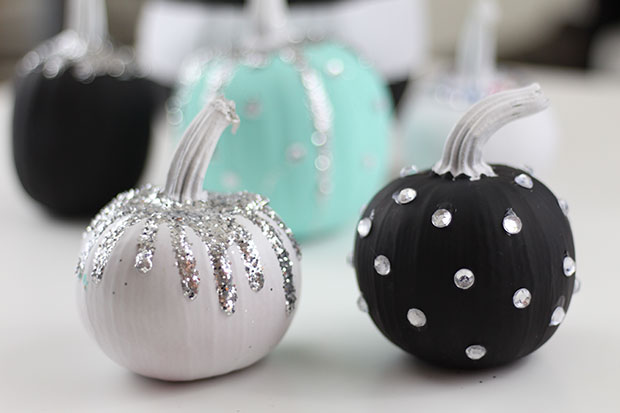
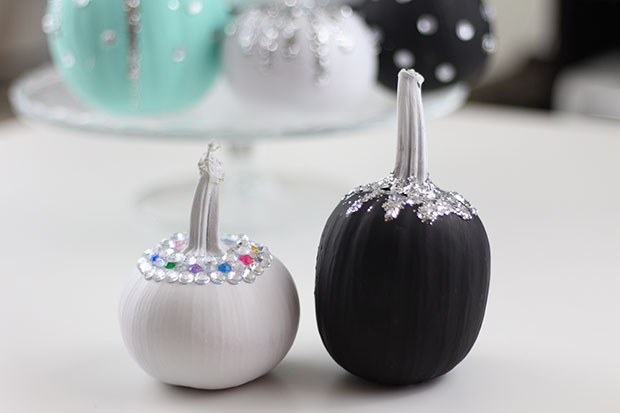
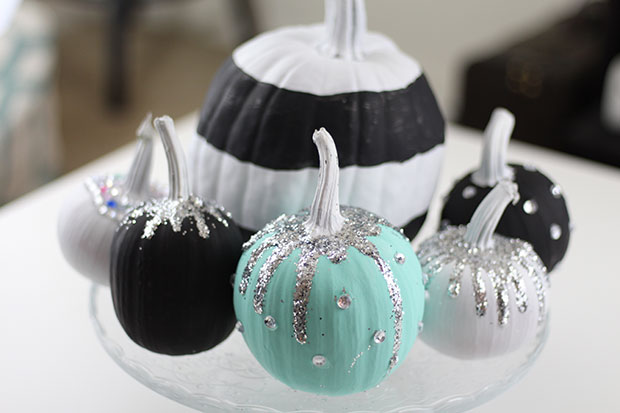
We are nearly half way through my favorite month of the year and although I am sad to see the time passing so quickly, I will say that I am very happy about how much I have managed to pack into this month thus far! This may be my most eventful October to date and I may have to credit my 31 Things to Do In October Printable for that! You seriously need to check it out and download it before the month is over- it has really helped me stick to the Halloween/Fall spirit! In 14 days I have actually managed to check off 14 items from that list, including take a hayride, visit a pumpkin patch, and complete a corn maze- three fun activities that I crossed off this past Sunday during my visit to a local farm. You may have noticed the Instagram picture of an adorable little pumpkin just waiting to be picked… yep, I brought him home with me along with a few of his friends. In fact, for the first time in a number of years, I not only purchased real pumpkins (I normally prefer the fake, non decomposing types) but I also had a blast decorating them! Yea, you see these pics? These aren’t designer pumpkins I pulled from Pinterest, no, they are my pumpkins! I decorated them all by myself, and I honestly couldn’t be prouder! Of course, for those who know me and my aesthetic, it should be no surprise that I went with a glittery black and white scheme with a punch of turquoise thrown in the mix. I’m especially pleased with my black and white rugby stripe pumpkin that I painted by hand after a few failed attempts at creating straight lines with tape. He’s quirky and a little messy… just like me.
These pumpkins were really fun to paint and decorate and not too difficult either. All I did was primed the pumpkins with a white spray paint primer (thank goodness I used spray paint because it made the process so much smoother and gave me a fresh base for my pumpkins) and let them dry. Then I painted two of them black by hand with some acrylic paint, and one turquoise. I knew I wanted to use silver glitter and plastic rhinestones to bling them up, so I got those over at the craft store! For the glitter topped pumpkins, all I did was spread Elmer’s School Glue in sort of a drippy pattern on the tops of the pumpkins and then covered the glue in glitter before it dried. As you can tell, some of the glue dripped down a bit more obviously in certain areas, but it all adds to the charm! Then for the rhinestone pumpkins I just applied some super glue to the backs of the rhinestones and arranged them in place. I like how one of the rhinestoned pumpkins looks like it’s wearing a jeweled collar and the other looks like polka dots. Of course my special turquoise pumpkin got the best of both worlds with the glitter and the rhinestones and I love her excessive bling. She is my official Strange & Charmed pumpkin, so she sits front and center!
Anywho, enough about painting pumpkins! On to the real topic of this post, my favorite non-Halloween, Halloween movies! Okay, so what do I mean by non-Halloween? Well, I mean movies that aren’t your typical blood, guts and gore horror movie! These aren’t necessarily all kid friendly movies, and some definitely fit into the horror genre, but they aren’t your typical slasher/monster/ghoul movies either!
So, I hope you enjoyed this little update to my month and got some good ideas for some movies to watch as we near Halloween! If you’re looking for some actual Halloween type movies, I found this list of the best Halloween films currently on Netflix. If you’re looking for a more traditional scare, I’m sure you could fill more than a few movie nights with some of those! Let me know in the comments which movies you are excited to watch for Halloween and if you do some pumpkin decorating I would love for you to tag me in an Instagram picture so I can see your October spirit as well!
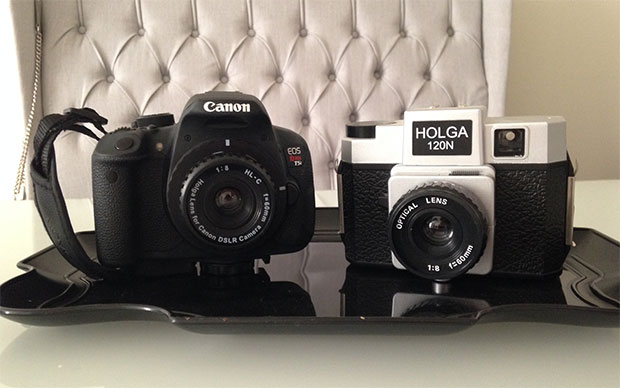
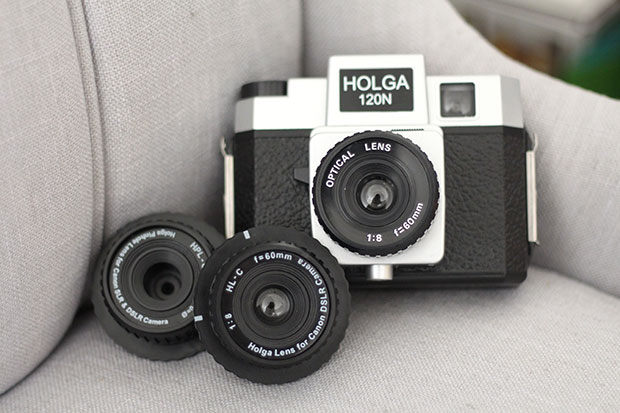
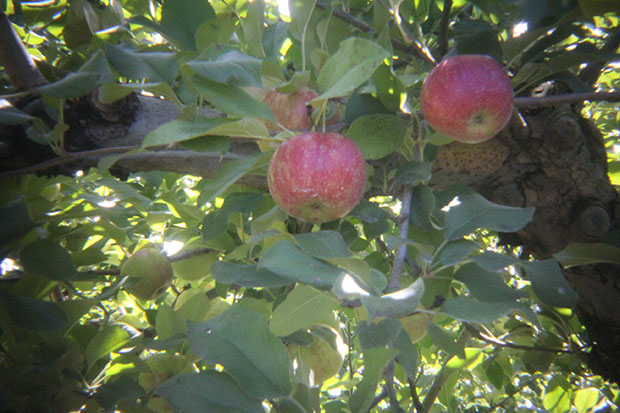
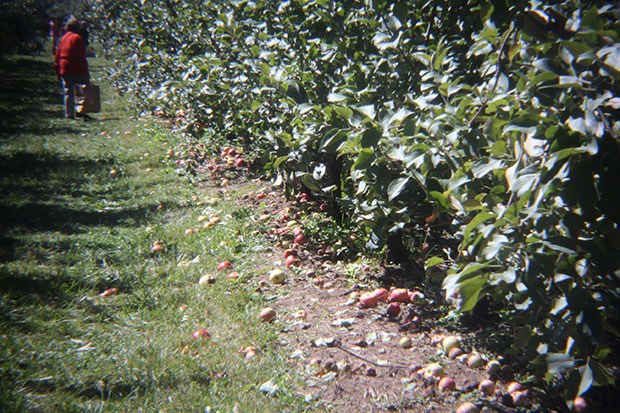
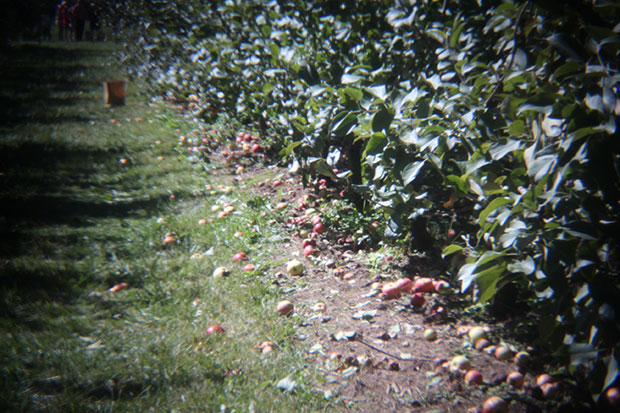
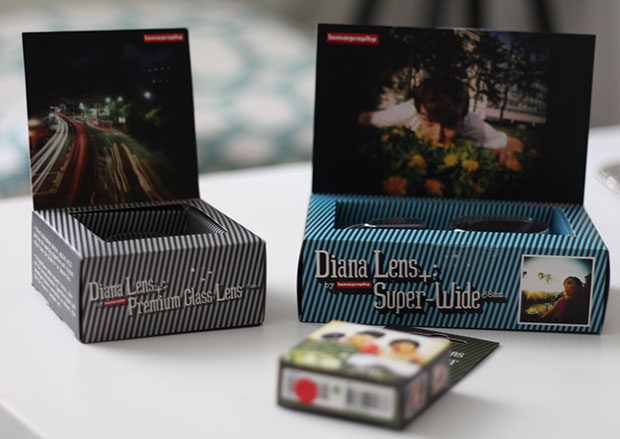
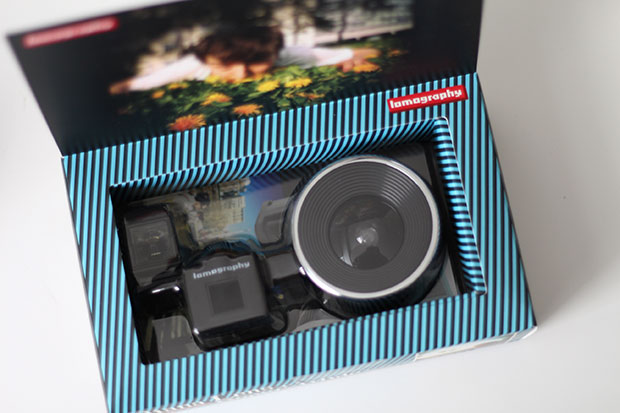
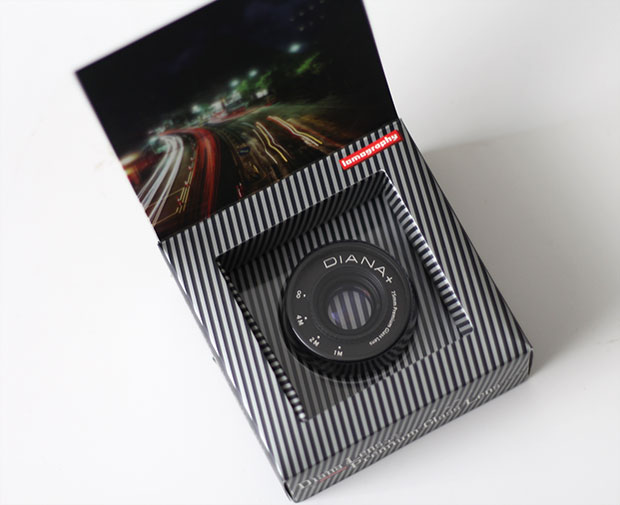
If you saw my September Favorites, you know that I recently purchased a bunch of new “toy” lomography lenses for my DSLR. Go ahead, call me a Hipster, but I actually really enjoy lo-fi photography and that whole lomography movement in artistic photography isn’t going away, in fact I think it’s only getting stronger. In case you’re reading this and asking yourself what lomography is, let me sum it up for you. Lomography is basically an artistic photographic style that values the aesthetic of analog cameras. It’s been something of a movement since the advent of digital photography, preserving the artistic experience of film photography. You may be familiar with the plastic “toy” cameras sold at Urban Outfitters, such as the Diana and the Holga, throwbacks to a dying age dominated by film, or at least you are familiar with the many Instagram filters that can give you that analog film camera look with just a tap of a finger! Well, good news, you can actually buy lenses for your DSLR that have been made by Diana and Holga to give you that great vintage quality in your digital images, and I am going to talk about four of those that I purchased and have been testing and give you my feedback in case you also want to give these lenses a try. I recently took all four of my new toys out with me while I went apple picking and shopping in a quaint little country town near my home. This little experiment on a bright sunny day, gave me the ability to test the lenses in optimal lighting conditions.
Now, keep in mind, these lenses are called “toy” lenses for a reason. They are plastic (for the most part) and not made to be high quality optics. They also only cost me an average of $25-30 each, so they are definitely not pro lenses, but for DSLR owners who also enjoy the lomo look or would like inexpensive lenses to play around with, they are an option out there, and options are good! Another thing to keep in mind is that because these are cheap plastic lenses, they don’t have any sorts of electrical mechanisms that speak to your DSLR body, so you will need to shoot in manual when using these lenses. Your camera will act like there is no lens connected to the body, so depending on the camera you have, you will lose certain features as well, but if you are comfortable or knowledgable in shooting manual, you shouldn’t have any problems. I kept my DSLR in manual with my ISO set to auto (because these lenses don’t have large apertures to let in much light). I also kept my shutter speed as slow as I could without causing blur, again, in order to help increase the amount of light getting in through the lens. Finally, I also used the Live View mode on my display as opposed to shooting through the view finder. In certain situations, you just can’t be sure of the lighting and live view (as least until your comfortable shooting in the lighting/environment you have) will help!
Holga
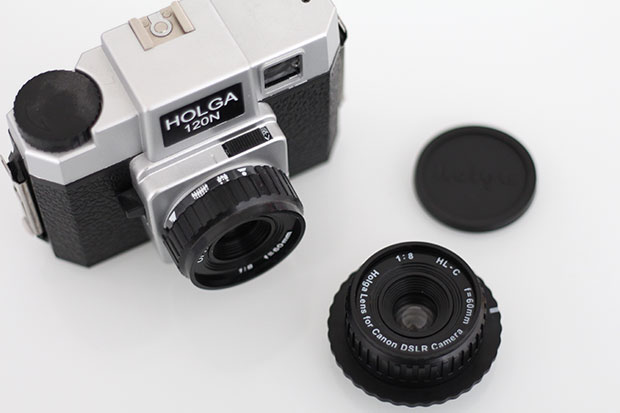
I purchased two lenses made by Holga. The first is their 60mm f/8 Lens, which is the same lens that you would find on a standard Holga camera, but made with a special mount to fit a DSLR. Because these are lo-fi, basically analog lenses, they can’t do things like autofocus, so you have manual control of that by twisting a ring on the outside of the lens that has some convenient little non-specific images that denote portrait, family, group, and infinity! It’s not precise, but it’s also not rocket science! The lens definitely skews on the dark side, and has a good amount of vignetting, but overall, I thought it gave me some of the best “vintage inspired” results out of all four of the lenses. To me, it produced the sorts of images that I might see while flipping through the pages of my grandmothers scrapbook and it’s actually given me a few awesome family photo ideas to work on for the holidays.
TL;DR: Authentically vintage, albeit tricky to use. Will continue to play with it for fun effects!
The second of the two Holga lenses I tested was the Pinhole. This lens is says its 25mm, but since it is just a tiny pin sized hole, there isn’t anything you need to adjust and no way to focus. If you have ever used a pinhole camera before, you know that it’s all about controlling the light with these because their aperture is nothing more than a teeny tiny hole that lets in next to no light. This one was probably my least favorite out of all the lenses I tested, and for good reason. Even on a super bright and sunny day, this lens was still overly dark, and I believe the ISO for this picture was at least 400-600, while the shutter was 1/60. In the typical pinhole fashion, you can certainly make out the heavy vignette circle around the image created by the tiny hole, which I do think adds a really interesting vintage feel, but this is the sort of lens that has a time and a place to use and for me, I don’t find I have many reasons to use it!
TL;DR: Lens is way to dark to use on a regular basis, won’t be bringing it out again unless I have a great concept to shoot.
Diana F+
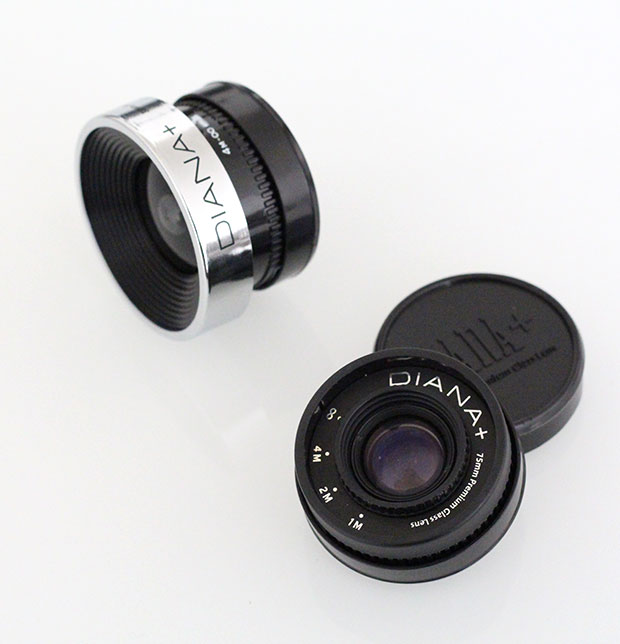
Now on to the Diana lenses. These one’s are a little more unique because they are the actual lenses that fit onto Diana F+ Cameras. In order to fit them to your DSLR, you need to purchase an adaptor that connects the lens to your camera body. Downside of these lenses is that the adaptor is only available for Canon and Nikon cameras (unlike the Holga lenses which are actually made to directly fit a few different camera manufacturers). Now, the first Diana Lens I want to talk about is the 38mm Super Wide Angle. In comparison to the other three lenses, this one felt the most plastic-y. The Holga’s were actually made from quite a hard sturdy plastic, but this Diana lens felt light and wobbly like it may just break apart- but good news, it didn’t! Even after much in and out of my bag and traveling around, it held up, it just felt unstable! This lens is also the largest out of the toy lenses I purchased. It too, like the Holga 60mm, has a focusing ring with a very non-precise system of focus measuring, but again, once you got used to using it, you sort of understood the focusing distances. The thing that is quite interesting about this lens is that it creates some very interesting effects with the light. The Diana F+ is often dubbed the Dreamy Diana, because of the soft, ethereal lighting effects that it creates. This lens works well in situations where you have a lot of lighting contrast, so a bright sunny day was a good time to shoot with it, or conversely, I would also love to take this out into the city at night and capture the electric city lights and signs that brighten the night (it’s on my to do list)! Because of the dreamy lighting effects, I actually think that I prefer to use this lens for video as opposed to photography. I played around with it while we were apple picking and I loved the vintage feel of the scene as the light danced around in glowing blobs! Overall, it wasn’t a terrible lens and I found the artistic quality of it to be very lovely!
TL;DR: Feels cheap, but gives a unique artistic feel. Best for creating vintage inspired video, in my opinion.
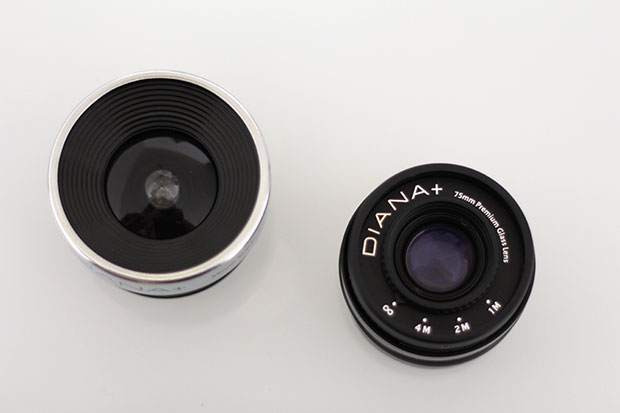
Now to the final lens, and you can say I saved the best for last! This final lens is the Diana 75mm Premium Glass Lens. Yes, I said premium glass. Again, this is a lens that was made for Diana F+ Cameras, sort of as an upgrade to the cheap plastic made lenses that come standard with the camera in order to bring more sharpness to the film photo’s. Out of all the lenses, it was my favorite, but it was also about twice the price of the others. First, let’s address the construction of this lens because it’s a little odd and a bit of a juxtaposition with the term premium glass. Yes, the optical element of this lens is glass, but the body is still plastic, albeit a much sturdier plastic than the 35mm Super Wide. It’s a relatively small lens, that definitely has a more premium look to it than the others, however, it has the strangest manual focus. Instead of the focus ring being placed outside the body of the camera, this one is actually located in the front center of the lens, right around the glass, which makes it awkward to adjust. People with large hands and fingers may find it a pain to focus this way, I found it a pain and I have small hands and fingers, but I will say that this odd focusing ring actually lends itself to an overall positive experience with the lens. As you can see from the sample images I took, this lens is sharp. It produces clear, crisp images once you can get the lens in the proper focus. You have to remember, this is a 75mm lens, so it lends itself to being more of a portrait style lens by nature, and personally, I find that it’s the sort of lens I want to use when I’m taking stills of friends, or I’m on a nature hike, walking at a leisurely pace and photographing flowers and plants. I know that may sound weird, but the fact that you have to take a moment to finger the focus to the appropriate spot means you need to take a moment to stop and think about the shot. I think that slower paced, more thought process driven method of shooting is actually very important and a great opportunity to learn more about your own style of photography. For the size and the price and the quality combined, I have no excuse not to keep this little guy with me!
TL;DR: Good quality lens with relatively sharp optics and small form factor. Is now a staple in my camera bag.
I hope you guys found this installment of Picture Perfect to be helpful and informative. I would say that although most of these lenses aren’t wonderful quality, the fact that they are pretty inexpensive is reason enough to pick one up if you are a DSLR owner who maybe only owns a real lens or two. I could imagine that if you are reading this, you most likely only own an entry-level DSLR with the kit lens, so these loom lenses are a fun way to mix up your photography, especially if you want to pick up the 75mm because that focal length is a pretty good one to own and for the price, you can’t beat it! Even if you’re not so into photography, I think these lenses would actually make really great gifts for friends, family and loved ones who may be interested in photography and own a DSLR! Especially students because I think they would get a lot out of playing with these sorts of artistic/creative lo-fi lenses!
Guess what time it is? Time for a new monthly feature! Since this site was founded on my love for technology and its ability to make our lives easier, I thought it would be fun if I started a new feature where I review awesome apps that I like and that you may enjoy as well! I am calling this feature, Apptastic, and I hope you enjoy it!
For my first installment of Apptastic, I want to talk about a free app that, so far, has been something of a lifesaver for me, and I foresee that it will continue to be of use to me in the weeks and months to come! It is called TV Show Tracker, and I think you can take a good guess from the name what the app does. Yep, it’s Fall and all our favorite TV Shows are premiering left and right! Since I don’t watch much TV on a daily basis, I’m always absentminded when it comes to tracking show schedules. With the help of TV Show Tracker, I can save my favorite shows, see when they are airing and set an alarm to remind me when episodes are coming up! That way I never have to miss a show!
So, what show’s am I watching this fall? Well, first and foremost, Once Upon a Time just restarted a few weeks ago and I have been obsessed with the addition of our favorite Frozen characters! Ghost Adventures, my favorite paranormal travel documentary series is also back with new episodes that just started up last weekend! What can I say… I love scaring myself with ghost stories just in time for Halloween! This week, another modern classic, American Horror Story also premiers with their 4th season, and I cannot wait to learn more about the freak show! Also premiering this week is probably one of my absolute favorite shows, The Walking Dead! Who else is excited to see what Rick and the gang are up to?!? Do you think they will all make it out of Terminus alive? And where the heck is Beth? Last but certainly not least, in another few weeks my final favorite fall show premiers, Grimm! I can’t wait to see what happens with Nick and the new grimm after Monroe’s wedding. In case you can’t tell, my favorite shows are clearly fairy tale and horror related!
Okay, now it’s your turn! What shows are you looking forward to this season? Have you been watching any of my favorite shows? Will you be using the TV Show Tracker App to keep all your shows straight? Let me know in the comments below!
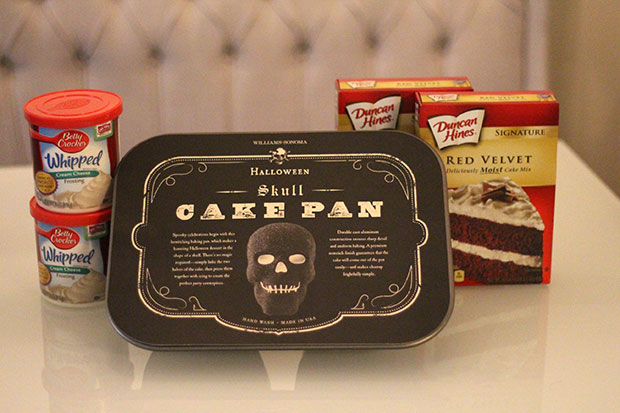
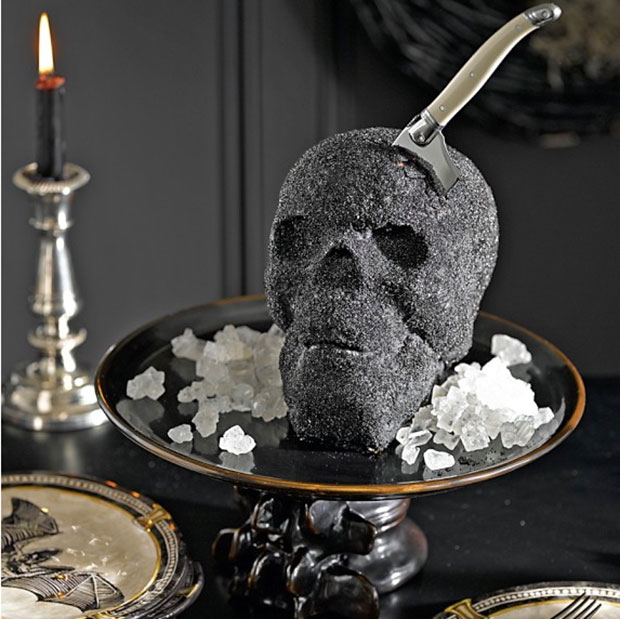
Last year, I was obsessed with the Nordic Ware Halloween Skull Cake Pan from Williams-Sonoma. I’m not really big into baking, but the thought of being able to bake a cake in the shape of a skull was enough to turn me into Betty Crocker! Well, unfortunately for me, the pan sold out relatively quickly last Halloween season, but this year it came back and I had to have it! So, my husband surprised me with it last month and to thank him I immediately made him a cake using the pan!
Mike loves red velvet cake, and I thought it would be the perfect type of cake to make to test the pan! The cake itself is obviously red, and when covered with the off white cream cheese frosting, I thought it would look like a real (enough) skull, and then when you cut into the cake it would look like it was bleeding because of the red cake underneath! I was super excited to make the cake, and although I used a simple cake mix and pre made frosting, it was a really fun and festive activity.
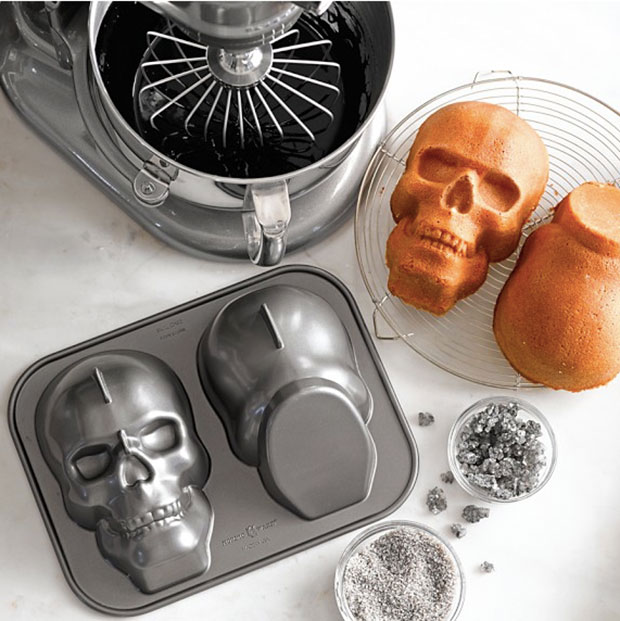
As you can tell from the image of the cake pan, the cake is made in two pieces. The pan itself has two wells, one for the face of the skull and the second for the back of the neck and head. Once the cakes are baked, you connect both halves to create a complete 3D skull! But I was thinking about it and if you wanted to, you wouldn’t necessarily need to make the whole cake, you could just use the well with the skull face and that would make a festive cake that didn’t require too much coordination connecting the two halves of the skull. Using both wells, it took two boxes of cake mix, so it becomes a rather large cake in the end once it’s all together, so in the future I will probably end up making half of the cake more often than the whole head!
Now, although this is a Halloween themed cake pan, I think it’s interesting enough to use year round and I plan to make skull cakes for every event I plan to attend from now until forever! Really, the possibilities are endless. The next cake I make may be a white cake, perhaps an angel food cake?!? That could be awesome and it wouldn’t require frosting (which, admittedly, I am not so good at) but would still give that bone white skull look! For now, if you would like to see how my cake turned out and the process for how I put it together, check out my video below!
I love this cake pan, and if you are a fan of skulls and/or Halloween, I think this is a great festive addition to your bakeware collection! Now, if you like the skull motif but don’t think you would get much use out of such a large pan, Nordic Ware also makes a Mini Skull Cakelet Pan that makes 6 large cupcake sized skull cakes (face only). Since the Halloween bakeware is currently on sale, I may go ahead and pick this one up as well!
Thanks for reading (and watching)! So, tell me… who else is super excited for Halloween? What sort of festive treats are you looking forward to for celebrating the season of spooks and ghouls? Let me know in the comments below!
October is here and I am super duper excited! I know I mentioned this in my impromptu post yesterday, but October is one of my favorite months of the year, mainly because it’s the first official month of fall, and fall is my favorite time of year! October is filled with so many wonderful things, and this month I am hoping to share some of those things with you! You may be wondering, what the heck I am doing writing a letter from the editor to you, anyway. Well, the thing is, I am shaking things up a bit on the blog, as I tend to do from time to time, and I decided that at the start of each new month I would write a personal letter to you, my friends and readers, outlining my plans and the type of content you can expect! I know in the past you could never really tell what you were going to get from me each week here on the blog, and although I’m not going to reveal all my secrets, I thought giving you a sneak peek into the sorts of content you can expect would be a nice way for you and I to connect!
So, what do I have planned for you this month? Well, to start, food… lot’s and lot’s of food! Specifically, I have a couple of recipe posts to share with you guys starting on Monday with a very special seasonal experiment in baking that I have been very excited to share with you! If you follow my YouTube channel as well, you may have seen that last month I started a series called The Lazy Girl’s Cookbook, where I feature recipes for seasonal meals that are super easy and delicious! Well, that series is going to continue on this month as well with a few more of my favorite fall recipes! Moving on from food to fashion, I have a fun scarf tutorial planned just in time to keep you warm in the crisp fall air! Of course, since it is October, and I am obsessed with Halloween, you can expect a Halloween themed Geek Speak feature this month, as well as a seasonal installment of My Productivity Playlist! Rounding out the month, I am also planning a few new reoccurring features around planners and productivity inspiration!
I hope you’re all as excited about my upcoming month of content as I am! I also wanted to take this opportunity to say a sincere thank you to everyone who showed their enthusiastic support for my new shop yesterday and downloaded the 31 Things to Do in October printable! I am so glad that so many of you were as excited about it as I was, and I hope that throughout the month you will keep me up to date as you check those seasonal items off your list! Feel free to tag me in photo’s on Twitter and Instagram so I can follow along with the fun!
Thanks again everyone and I hope you enjoy the great things I have in store for you this month!
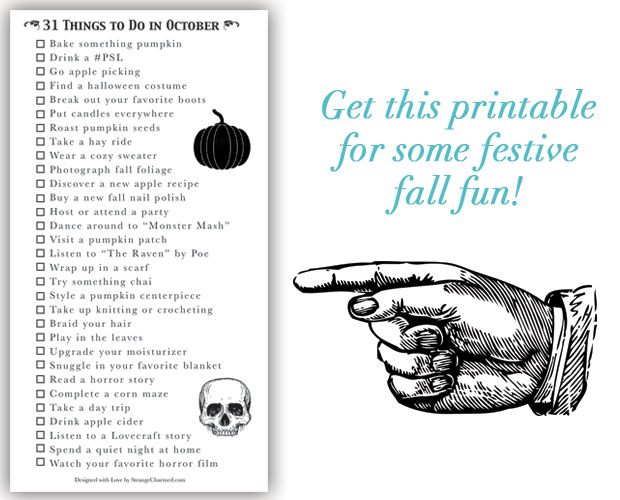
Well, surprise, surprise! I am writing to you mid-week in an unexpected extra blog post because I have created a fun little printable that I wanted to share with you all! I know many of my readers are Filofax and planner lovers, and we all love a good list! So, I have put together a list of 31 Things to Do in October and made it a convenient little free printable to celebrate one of my favorite months of the year! Now, I’m going to go into this a little more in my regularly schedule post tomorrow, but October, to me, means fall is really here and there are a plethora of activities that I enjoy taking part in throughout the month! Yes, a lot of my love for October comes from my love of Halloween, and yes, many of these activities are some of my favorite things to do to celebrate and get into the spirit of Halloween, but there is plenty else to do if Halloween doesn’t happen to be your favorite slice of cake!
To be completely honest, I am taking this 31 Things to Do in October list pretty seriously! In fact, it’s almost like a challenge to me to see if I can fit in all of these activities throughout the month! As an adult, currently without children, I find it hard to get myself into the spirit of a season because it’s not in my face everyday the way it once was when I was in school. So, for me, this is a way to activity participate in all of the fun that October has to offer! Now, I chose 31 Things to Do because there are 31 days in October, however, this isn’t necessarily about doing one thing per day, but you can certainly treat it that way if that is what you would find most exciting! Some things are super easy, some are a bit more involved, but everything is here to help you enjoy the season and add a bit of fun to your daily life!
Wrap up in a scarf: I have a date with a blanket scarf as soon as the weather turns!
Try something chai: It may not be everyone’s cup of tea, but it is a quintessentially fall flavor that everyone needs to incorporate into their October!
Style a pumpkin centerpiece: No matter what your interior design tastes, a pumpkin makes for wonderful fall decor!
Take up knitting or crocheting: It’s officially time for me to start crocheting again, yay!
Braid your hair: Braids are definitely the most fall hairstyle, in my opinion!
Play in the leaves: You’re never too old for this!
Upgrade your moisturizer: Because winter is coming and you need to protect your skin!
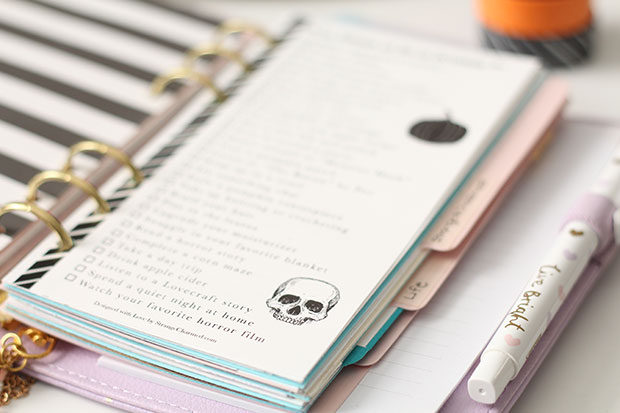
Spend a quiet night at home: I like to light all the candles placed strategically around the house, turn off all the lights and listen to a scary story (like the Lovecraft tales above!)
Watch your favorite horror film: Or just any old Halloween flick you prefer!
So, what do you think of that list? Awesome, right? Well, feel free to download this free printable from my shop and use it to track your fall fun! While you’re in the shop, if you see anything else you like, feel free to use the code SCSHOP20 for 20% off your total order! This code is only good during the soft release of my shop, so make sure to use it before it expires!
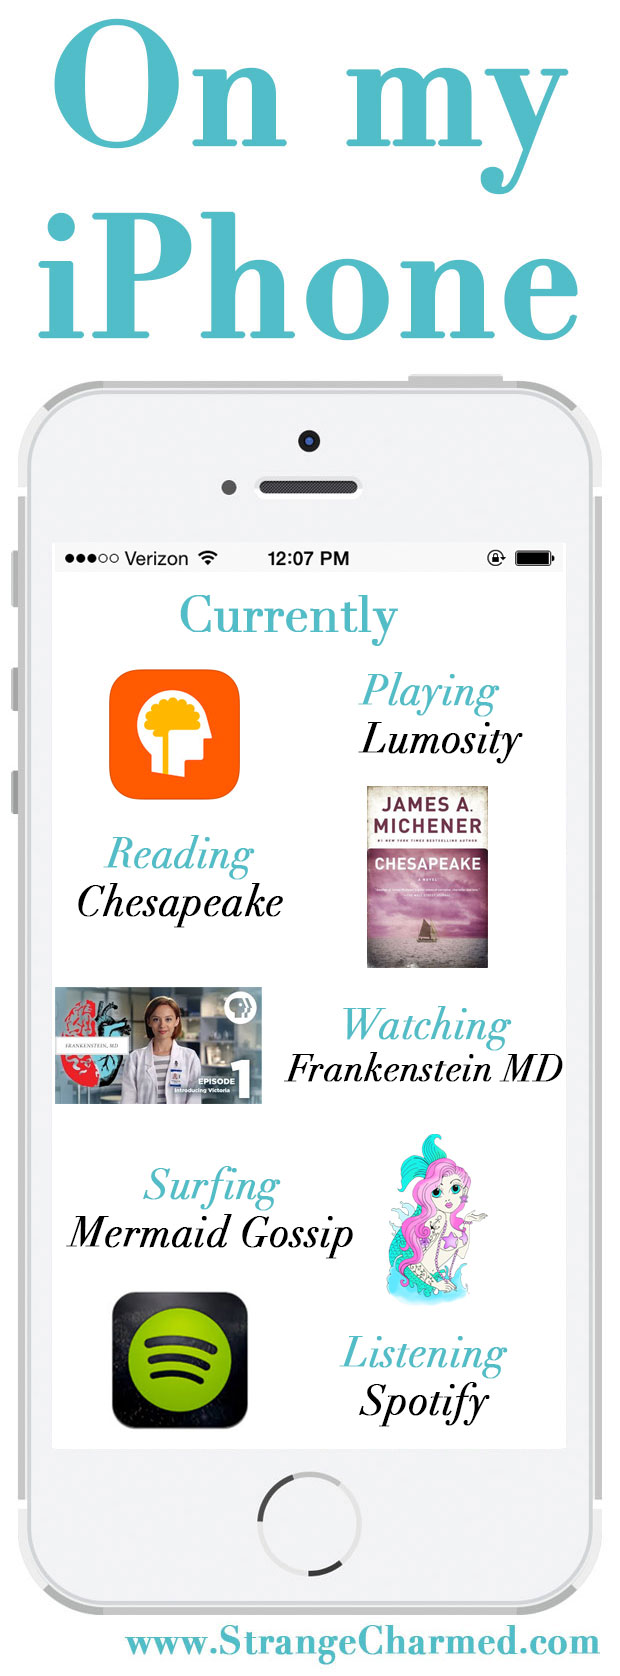
On my iPhone is a new monthly feature on Strange & Charmed where I give you a peak into what I have been loving on my iPhone for the month! Covering topics like apps, games, podcasts, music, websites, books and more, I hope this series helps you all discover new and exciting content out there that can be enjoyed from your iPhone! To stay up to date with this series, make sure to follow the On My iPhone tag!
September came and September went, or really it just flew by pretty much unnoticed. From the weather we have been having in PA, you would think that September was just an extension of August and not the transitional month that heralds us into the fall. I did do some typical “September” things this month. I went apple picking with Mike, enjoyed my first official #PSL, and made some other pumpkin spiced treats! I spent some time outside under the trees, reading on blankets and learning more about photography on my DSLR. But September was a pretty productive month for me. I finally buckled down and opened up my Shop! I also spent a decent amount of time searching for inspiration for future projects and collaborations that will hopefully be coming down the pike soon! As I am apt to do, I spent a good amount of time searching for new digital content to share with you as well, so here is what I have been loving On My iPhone for the month of September!
Currently Playing, Lumosity:I have seen ads for Lumosity for years and years now, but I never actually bothered downloading their free app until (surprise, surprise!) it was offered as part of Starbuck’s Pick of the Week program via my Starbuck’s App! I will say though, that even though I am constantly online and in the know, I have been feeling a little mentally sluggish for some time now, and I decided to give the app a go in an attempt to see if I could sharpen my mind a bit! I was actually quite shocked with how I scored on my first attempt at the game, but I am getting better. I feel like this must be a struggle with most people, because ever since I graduated, I have felt my brain slowly softening, and I’m glad I finally decided to give this game a try because I’m hoping it will help improve my memory in the long run!
Currently Reading, Chesapeake by James Michener: Okay, by reading I mean listening to the book on tape via my iPhone! Chesapeake isn’t a new book for me. In fact, I first listened to the book on tape years ago after it was recommended to me by a friend who knew I grew up sailing with my family on the Chesapeake. Lately, I have been thinking about that time of my life a lot and have really been missing it. For some reason, when I was younger, I firmly believed I would have a sail boat of my own one day, and now I find myself contemplating it seriously for the first time in a while. But back to the book- for anyone out there who loves historical fiction, and maybe grew up in the mid atlantic or enjoys American History and/or boating, you need to read this book! Michener is a complete genius at historical fiction and I am absolutely enamored with this lengthy tale that spends decades of history surrounding the Chesapeake Bay and Maryland’s Eastern Shore.
Currently Watching, Frankenstein MD: I feel like a broken record when it comes to these digital short series’ based on classic novels, but I found another one, and I bet you can’t guess which book this one is about? It looks like this time around Pemberly Digital (of Emma and The Lizzie Bennett Diaries) has teamed up with PBS to produce this new series which follows the video diary of medical student, Victoria Frankenstein, as she guides her viewers through the mysteries of the human body! This series is awesome because so far there is a lot of extra content outside of the show that really add dimension to the story. So if you’re a Shelly fan, you may want to check it out!
Currently Surfing, Mermaid Gossip: I have been following Bristol based alternative fashion blogger and Photo Booth maven Emily Fisher for some time now. We were acquainted through mutual friends/bloggers via the Blogcademy and I was instantly taken with her colorful hair and personality! She recently launched her new style blog, Mermaid Gossip, which chronicles her colorful lifestyle and awesome nails!! She also wins a special place in my heart for also being a YouTuber, and you know how much I love bloggers who make the transition over to video! If you love colorful clothing, unique accessories, rainbows and unicorns, I would go check her out!
Oh and that one final thing of course- the iPhone case I have been using this month! Well, to be completely honest, I have been switching it up between a few different cases in September. Something about wanting it to be fall but it still feeling like it was summer had me all over the place with my case choices, but I did pick up this new case this month from Garance Dore for Rifle Paper Company and have been loving how super protective it is!
So, now it’s your turn! What have you been loving on your iPhone or iPad this month? Any great new apps that have caught your attention? Let me know in the comments or better yet, leave me a comment over on Facebook!
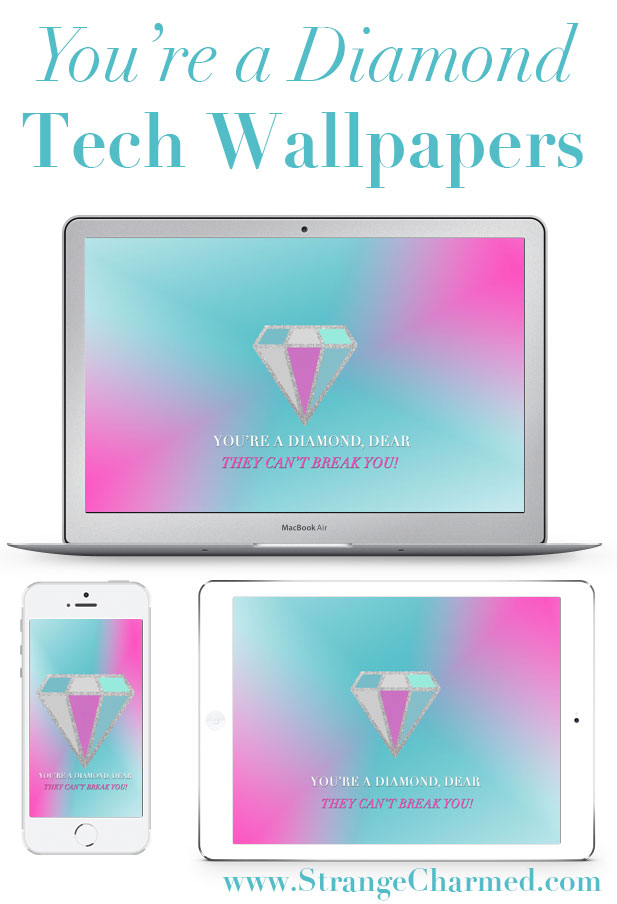
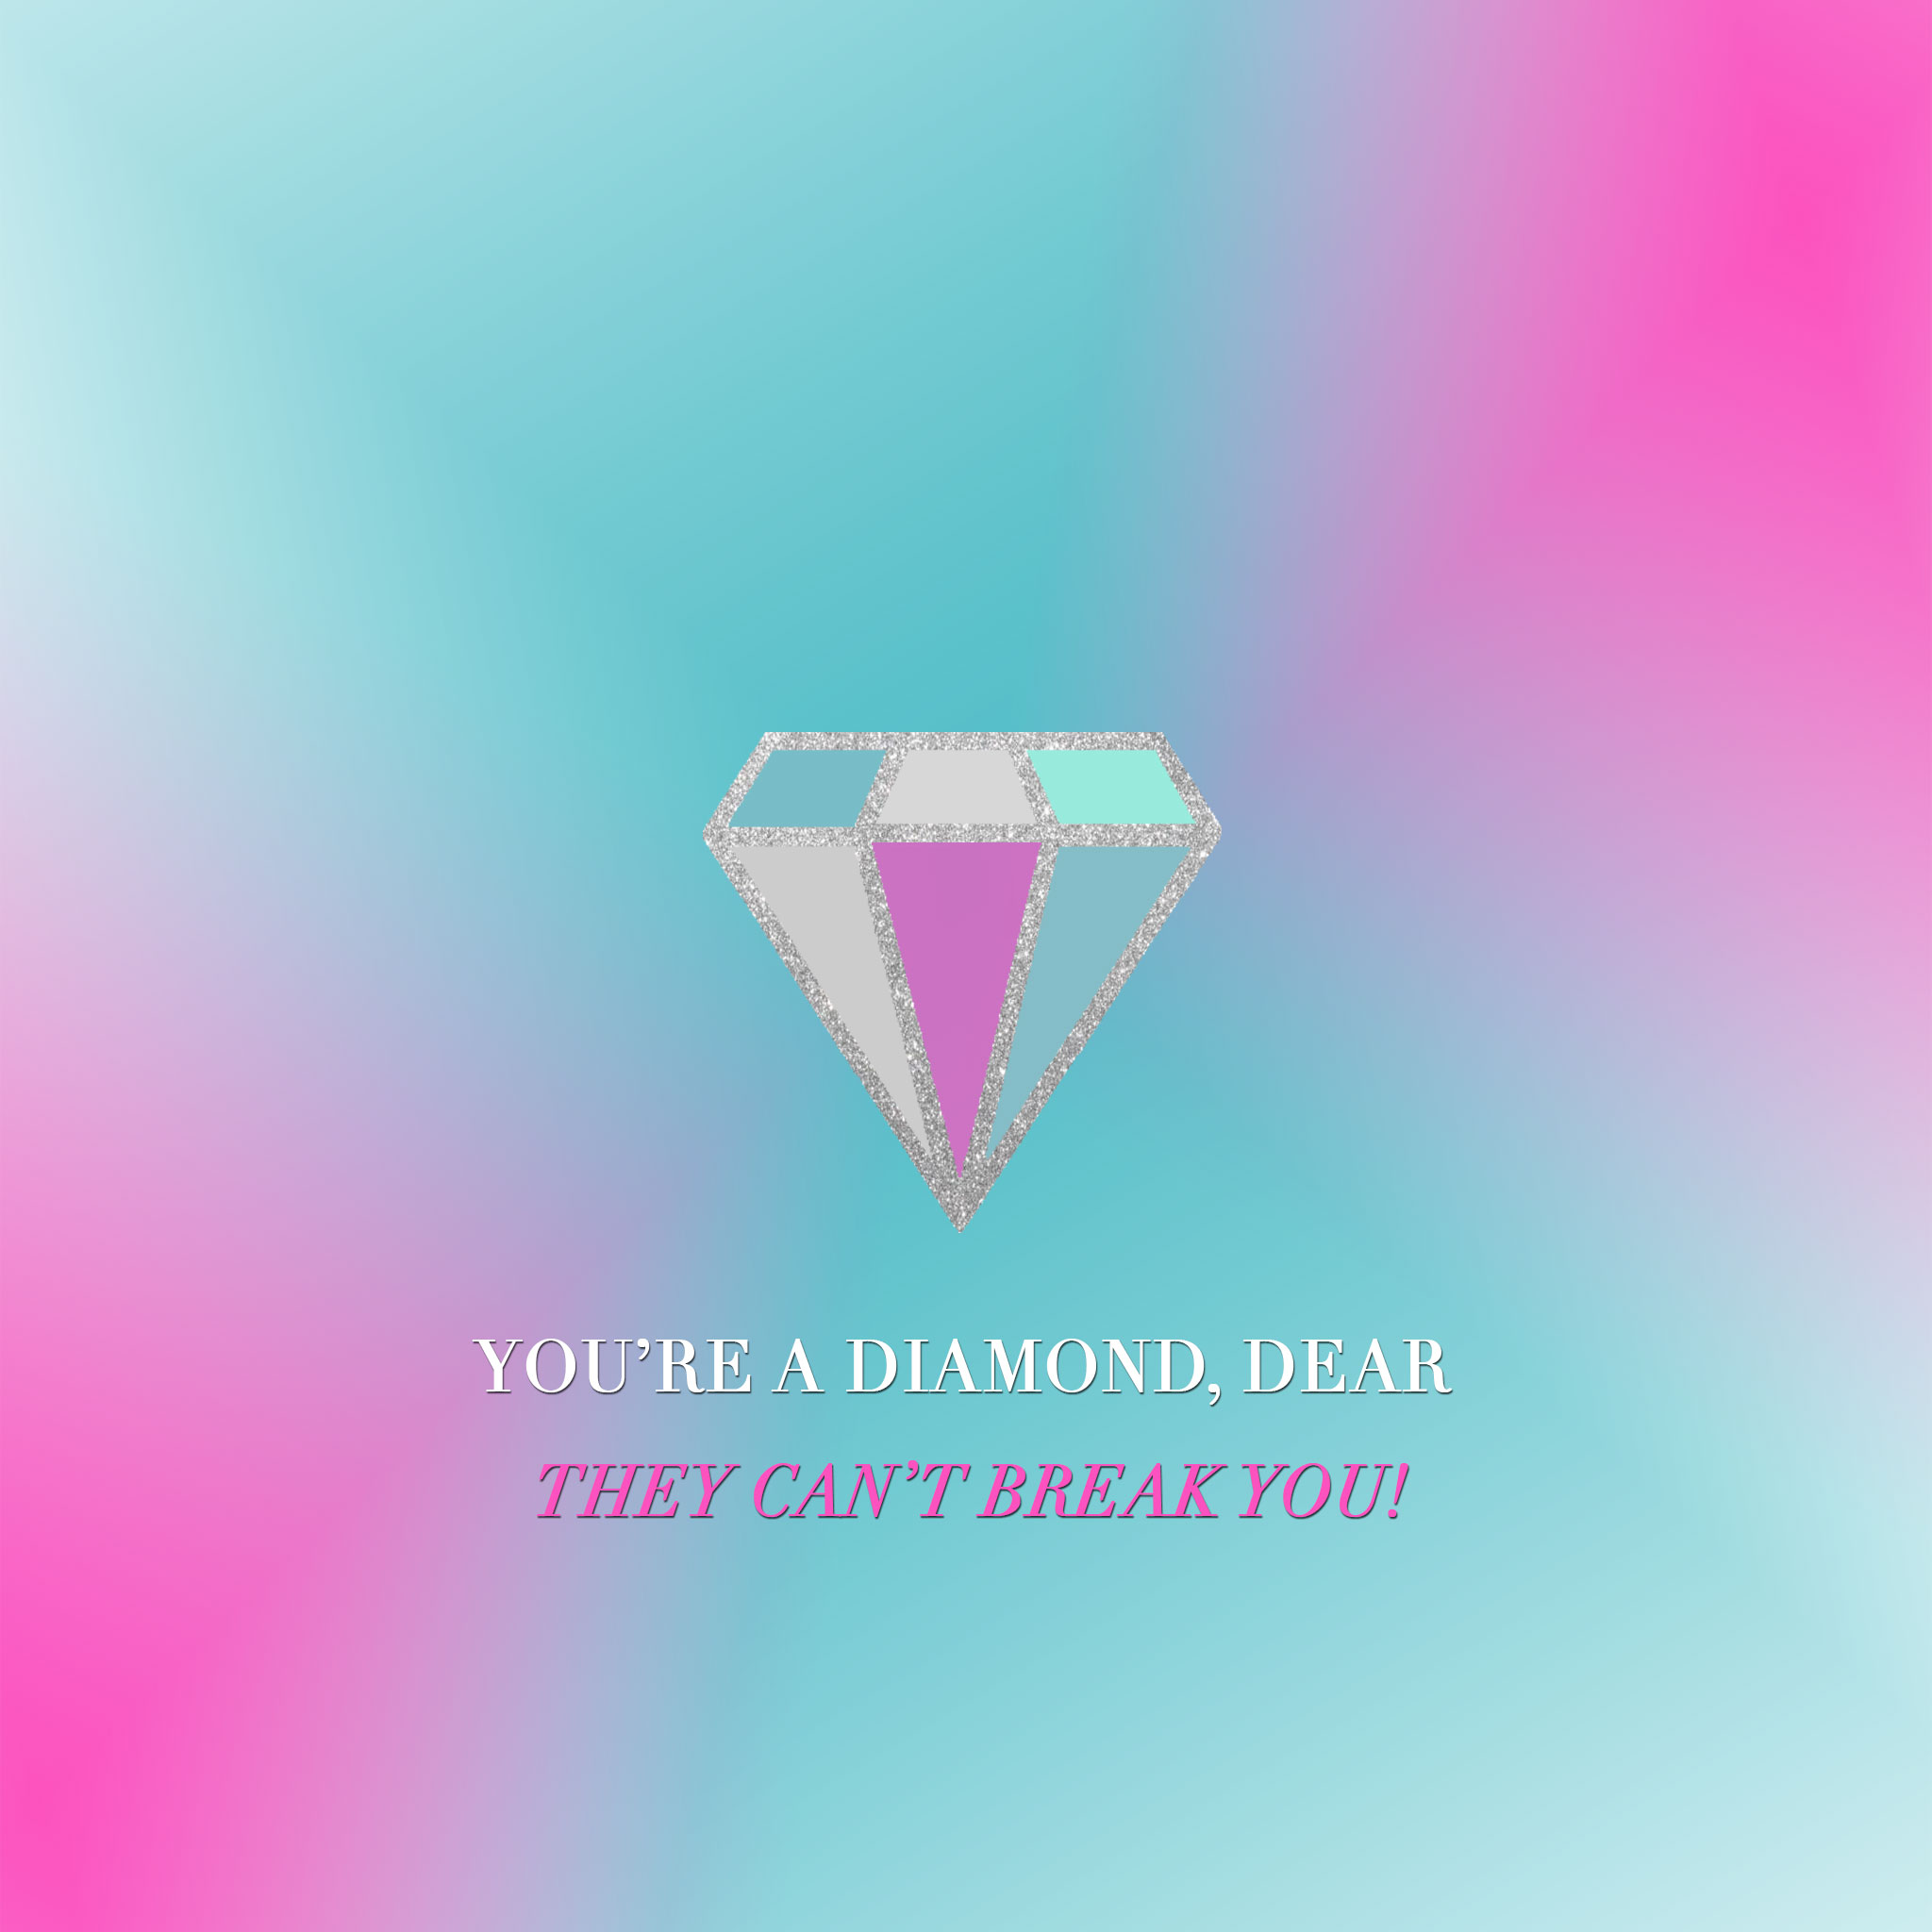
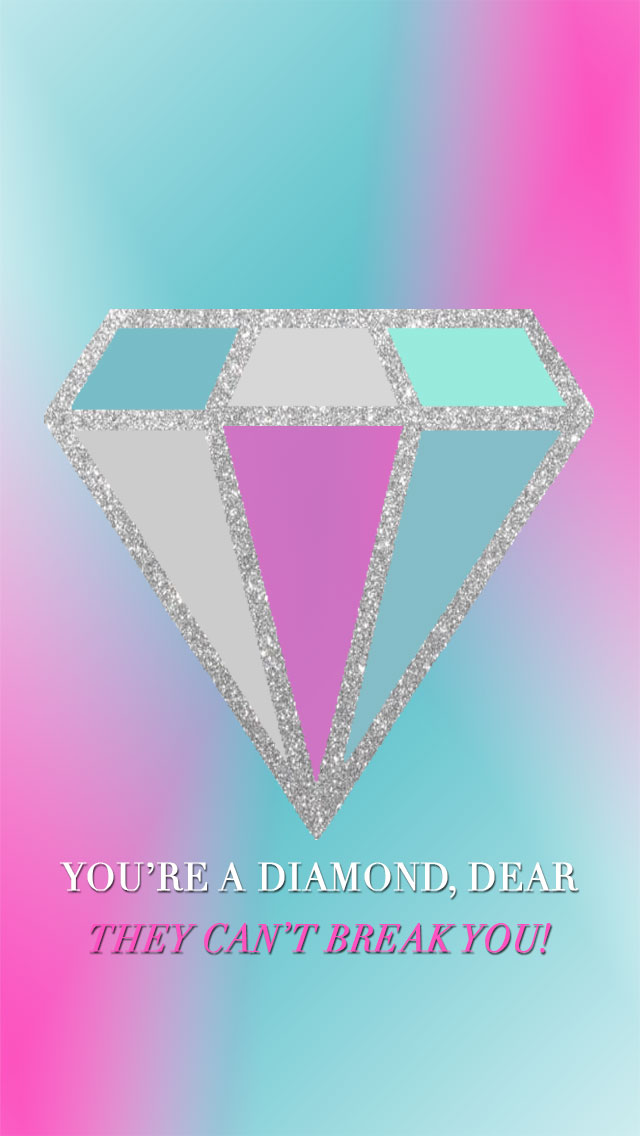
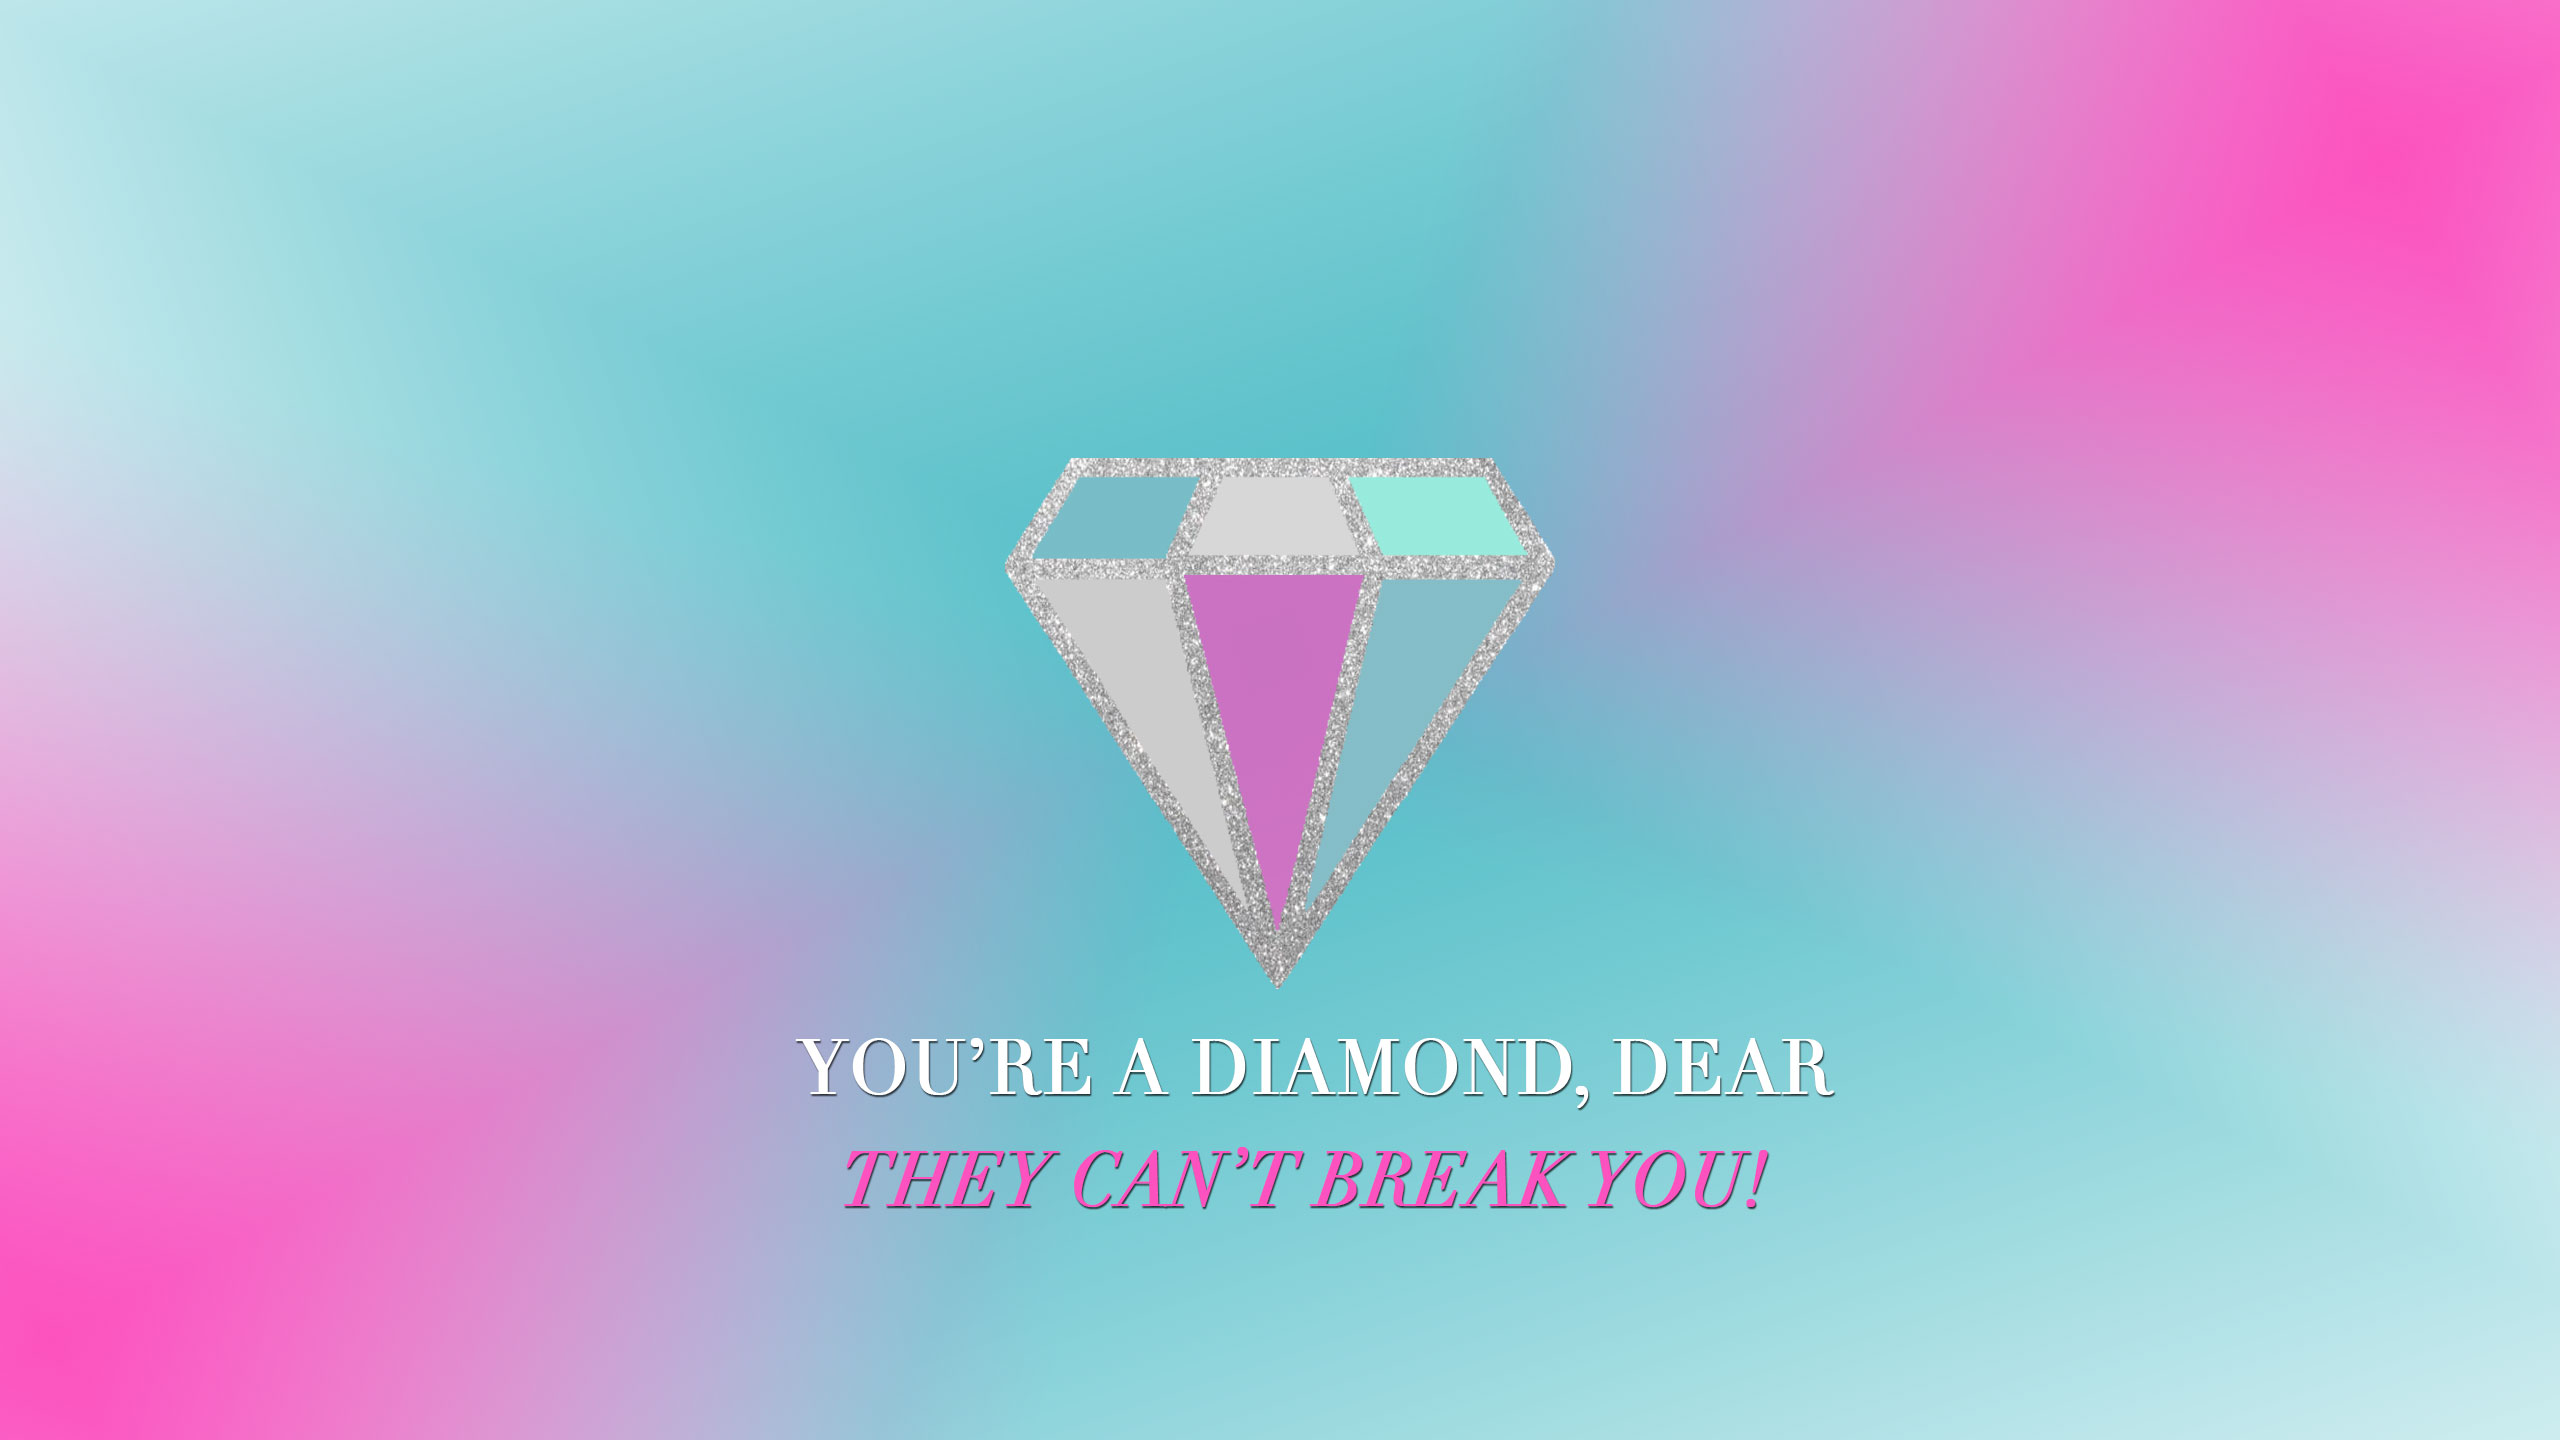
True story- these quarterly wallpapers are some of my favorite posts to do for many reasons! First off, I love design, and any excuse to make something pretty and fun in photoshop, well, I’m all over that! Next of course, is the fact that I love my gadgets and enjoy dressing them up in new wallpapers (and cases!) to give them a fresh new wardrobe every once in a while. Lastly, and probably less obviously, I really take creating these wallpapers seriously because I feel as though they can act as a daily reminder, even affirmation, for our lives. I don’t know about you, but the images and messages I choose to create through this wallpapers are pretty powerful to me, and when I think about the fact that my readers are using these and putting them on their phones and laptops and seeing the messages that I have crafted for them, it really makes me feel like I have done something special!
I know I normally like to theme each of these wallpapers to the season, and I thought about doing something with more of a fall color scheme, but in all honesty, I am not into fall colors so much. I find the browns, dark reds and burnt oranges a little uninspiring, so I went rogue and went for a full on color burst this time around, centered around the image of a multifaceted diamond! I feel like I have been seeing diamonds and diamond imagery all over the place lately, and I feel like diamonds can represent so much. I have seen a few quotes about diamonds all over the place also, not just the quote I use “you’re a diamond dear. They can’t break you,” but also “A diamond is just a piece of charcoal that handled stress exceptionally well.” I think these are really wonderful quotes with very powerful metaphors that we can use to inspire us in our own lives. So, I sincerely hope you enjoy these wallpapers and that you use them to remind you everyday that you have more strength than you even know, and that it is only with great pressure and under great stress that we can truly transform into something brilliant!
For iPad and iPad Mini {right click to save image}For iPhone {right click to save image}For Laptop and Desktop Computers {right click to save image}
These wallpapers do take quite a bit of effort to put together, so if you enjoy this post and like to use these little freebies that I make for you from time to time, please make sure to share this post with your friends via Twitter or Facebook! Also, if you have any suggestions for future tech wallpapers, please feel free to leave them in the comments!
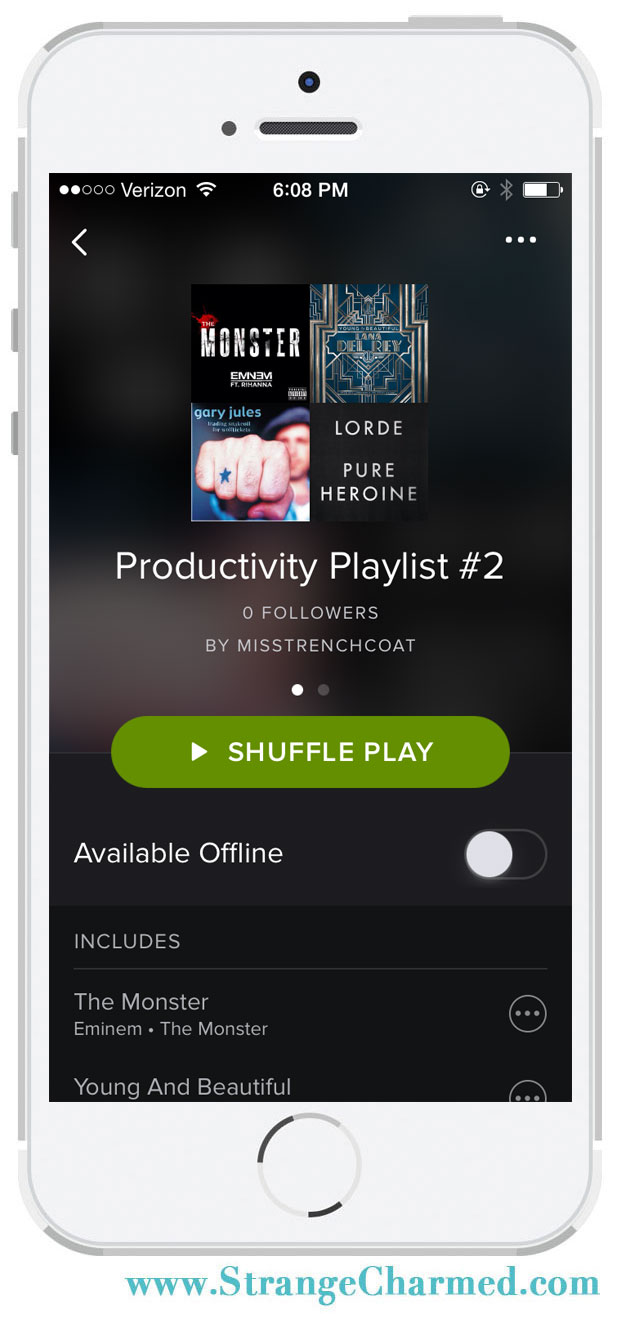
Welcome to my second installment of My Productivity Playlist aka Whistle While You Work 2.0! Many of you told me that you liked the first installment of this series, and I’m seriously thinking this may become a monthly series that I do because I like it as well! I love music and my tastes are so all over the place that I think I may really have something for everyone! Well, this time around, I got smart and realized that you can actually make sharable playlists via Spotify and I could then go ahead and share those playlists with you so that you can actually listen to the music I am suggesting for you. Novel, ain’t it?
So this is what you will hear on My Productivity Playlist this month. Click here for Spotify playlist! Also, if you have Spotify, feel free to follow me!