This weekend is the first three Day weekend of the year if you live in the US! YAY! I love three day weekends because they are like mini vacations spread throughout the year. They can be a great time to catch up on sleep, binge watch your favorite TV shows or finish a home project. So, here are my tips to making the most of your long weekend!
1. Plan Your To-Dos before the weekend begins: On Friday afternoon, I often find myself thinking how exciting it is to have a three day weekend ahead of me! THREE DAYS OFF! That seems like so much time to do WHATEVER I want! But inevitably by Sunday night I find myself wondering where the weekend has gone? Tomorrow is the last day? HOW DID THIS HAPPEN!! I think you know the feeling! So, if you want to fill your weekend with fun and awesome things to do, you should probably plan out your time before the weekend starts (about Friday at 4:30pm)! You don’t have to make an hour by hour schedule, but have a general idea of what you want to do and who you want to do it with. Make sure plans with friends are hammered out before the weekend begins so you spend more time having fun and less time getting people to agree on dinner reservations!
2. Put your space in order:Whether you have your own place or share with roommates or family members, get your space in order and tidy up before the fun begins. Get your chores done, send off your bills, and get your life in order so that you can maximize your weekend time and not have to worry about the minutiae of daily life for approximately 72 hours!
3. Have at least one adventure: By this I mean, leave the house at least once! Yes, you can break from your Game of Thrones marathon weekend to run out for pizza or something, but make sure to get some fresh air! Lord knows you don’t get enough of it in the normal work week!
4. Manage your expectations: I know I am totally guilty of over hyping my weekends before hand and then feeling a major crash when everything doesn’t work out perfectly or when I don’t feel like I have done enough! Give yourself reasonable expectations of how fun/exciting/productive/amazing your weekend will be so that you can focus on enjoying everything!
5. Take time to breath and relax: The weekend is about decompressing from a week of work, and long weekends give you even more time to decompress. Make sure to relax and just enjoy your weekend, whatever it may bring so that you are recharged for work and life in general once Tuesday rolls around!
How do you like to spend your three day weekends? Share more of your tips for a great three day weekend by letting us know in the comments!
Whether you set resolutions for yourself on January 1st or not, goal setting is an important personal and professional exercise that will help motivate you to achieve your dreams or to discover them! This is an exercise that you can work on as frequently or infrequently as you want throughout the year, but I suggest doing this twice a year, roughly every six months to help you evaluate your progress in your goals or to adjust them as changes occur in your life.
Now, before we begin, I suggest downloading my free set of productivity printables here and printing out the sheet titled “My Goal Tracker” on page 4 of the packet. This sheet contains most of the steps in this goal setting exercise and is a great resource to keep with you to track your goals! If you do not want to use the print out, no problem! You just need a pen/pencil and some paper to proceed and YES, it does need to be paper because this is a very personal activity and the act of writing on paper will help solidify your goals in a visceral way!
Step 1: Select 3 Life Goals
The first step in goal setting is to choose the goals that are most important to you! Some people may have multiple goals that they wish to set in motion now, but I suggest only focusing on 3 at the most at one time. Trying to track too many goals will make things more complicated for you and decrease your chances of success by diverting your attention to often! Now, if you would like to select 3 goals, you may want to choose one personal goal, one professional and one other of your choice. Remember, even if you think everything is going well in your professional life or perhaps in your personal life, that doesn’t mean that you can’t set a goal for that area of your life. I suggest thinking about what is important to you and how you can either a) improve that area of your life or b) continue an already successful or positive trajectory. Maintaining success in an area of your life is often just as difficult or sometimes even more difficult than achieving initial success!
Step 2: Decide on 5-10 steps you can take to set your goal in motion!
A good goal is one where you can see a path of success that can be taken through a series of steps! If you are trying to loose weight you know that these steps may include following a healthy diet plan that can be tracked via a daily caloric intake and an exercise regimen that includes working out a certain number of days a week for a certain amount of time. However, unlike a weight loss goal, many personal and professional goals are not as scientifically precise! Achieving a professional goal to get a specific job may include getting additional training that would make you qualified for that job as well as a discussion about your professional advancement with your supervisor or someone who can help you learn how to position yourself as a desirable candidate. If you do not already have an idea of how to achieve your goal, I suggest researching your specific goal and discussing it with those who may be able to give you insight on the matter!
Step 3: Set parameters for your goal.
It’s all well and good to set a goal, and list out the steps you need to take, but you also need to make sure you have set parameters for when you will start your goal, when you want to have it completed and most importantly, how you will reward yourself for achieving it! The reward is particularly important because this should be something that will highly motivate you and be a constant reminder of the goal you are working towards and why!
Step 4: Take your first step!
As I like to say “once begun, it’s nearly done!” I’m not sure where that comes from, or if I have simply created my own version of another popular saying, but I still consider it truth! Sometimes the hardest part of getting to a destination is starting the journey. Once you take that first step you are invested in your goal and you have made progress! Take your first step as soon as possible, while you are still highly motivated, as this will hopefully propel you to take the next step and the next, until you have reached your goal! Remember, its natural once you have started your journey to tweak your path as needed, don’t be afraid to add steps to your goal or adjust expectations as you go along! Good luck & may this advice help you turn your dreams into a reality!
So, will you be setting goals for yourself this year? Did you find my free printable helpful with helping you track your goals? Let me know any other tips, tweaks or advice you have to help others set and achieve their goals this year but leaving a comment!
Last week the Northeast of the US was hit with an overnight snowstorm that dropped something like 8 inches of snow in my area. It was no wonder that both myself and my husband got an unexpected snow day at home together! However, it wasn’t all fun and game for us as we both have the ability to work from home, and so we ended up working nearly a full day together from our living room. Since I am sure this was just the first snow day of many we are sure to have in the next few months, I thought I would write about my suggestions for a Winter Work From Home Day in case any of you also get to work from home when it snows!
Winter Work From Home Day Must Have’s
A Computer: Whether you will be working from your own personal computer or from your designated work laptop, for most at-home workers, this is your key to getting things done! Make sure to find a nice comfortable spot in your home to set up shop (if you don’t already have a designated office area) and make sure to stock up on pillows and blankets to keep yourself warm in your cozy spot!
Your Favorite Mug: Hopefully you didn’t leave your favorite mug in your office, but really any mug will do! Make sure to keep yourself hydrated with your favorite coffee, tea or other hot beverage!
Comfortable Headphones: Okay, so you don’t need a set of headphones that look like ear muffs (those are just my personal favorite on a cold winter day!) but you will probably find a set of headphones or ear buds a good idea to keep you in the zone and focused on working if you aren’t used to the treat of working from home!
Adorable Office Supplies: Nothing is more fun or can keep you focused on getting things done like lovely office supplies! Hopefully you have a nice notebook at home and some matching pens & pencils! Okay, they don’t have to match, but it all adds to the ambience!
A Fun Gadget: Whether it’s an iPad, iPod, or just your TV with Netflix, you will want to have a fun gadget with you to take your mind off work every once in a while! Just because you’re at home doesn’t mean you can’t take a break, so make sure you take a lunch and at least one fifteen minute break to decompress!
A Hydrating Hand Lotion: If you’re working at home because of a snow day, be sure to keep a nice hydrating hand lotion around to keep your skin hydrated and to defend against the chapped skin created by winter weather! Make sure to apply often!
Do you get to stay at home to work during snow days? What are some of your favorite tips for working from home? Make sure to share your experiences in the comments!
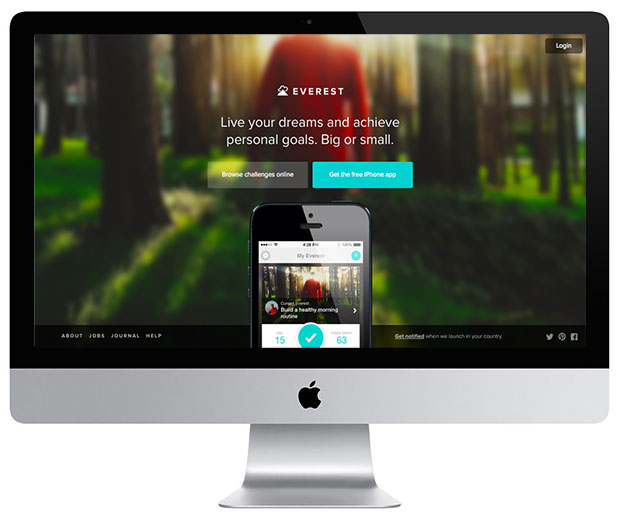
Have you ever heard of an app called Everest? Everest is an app that helps you track your goals, so it’s a great resource to use to help you keep track of your New Year’s Resolutions! When you first open the app, it urges you to enter in your first goal. After categorizing your goal and deciding if you want it to be public (for friends to see) or private (for your eyes only), it then gives you options to add steps to getting to your goal. Each step can be given a specific time frame, where you can set reminders for yourself so that you are keeping on track to complete your goal. This app is a great way to manage your expectations and break down your goals into steps that you can take each day that will make achieving your goals a series of steps instead of a giant feat! After all, you can only climb a mountain one step at a time.
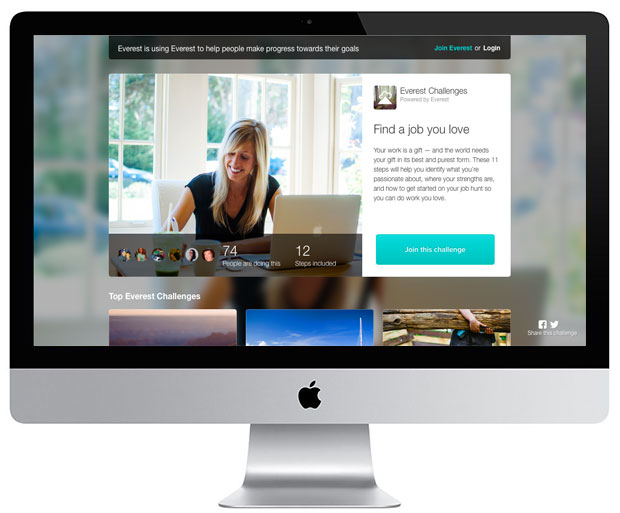
Now, the fun thing about the app is that in addition to creating your own goals, you can also accept challenges from the Everest community that range from health/physical challenges (like doing 50 consecutive push ups!) to personal challenges (like finding a job you love). These challenges are of course optional, however, they are a good constant reminder that everyday you could be taking steps to give yourself a happier, healthier and wealthier life!
So, this year I plan to use Everest to track my resolutions and set small realistic steps for myself to take each week to achieve these goals! Do you plan on using Everest or another similar method to help you break your goals down into small manageable steps and then to keep you accountable for achieving your goals?
Since today is New Year’s Eve, I thought it would be a perfect time for me to reflect on the success and growth of this blog in the last year! This morning I woke up to an email from WordPress that linked me to a Stat’s page for the site that gave me all sorts of fun details about my top posts, my commenters, visitors and site views!
Now, although these posts were my most viewed, I, of course, have my own list of favorite posts! These are the posts that were some of the most fun for me to brainstorm and put together. Some took a lot of time behind the scenes in terms of photographing, organizing materials, and/or Photoshop skills, but in the end these are posts I am very proud I was able to bring to fruition!
The final items I wanted to include in this post were the articles I wrote outside of this blog! You may not have even been aware that I have been writing elsewhere this year, so I thought this would be a good time to review and link those posts, as they are all extensions of Strange & Charmed in one way or another!
The first site where I was able to publish a few articles this year was Levo League! You may have seen me mention them a time or two before, but Levo is a great website that I discovered last year, and this year I was given the opportunity to join their arsenal of amazing contributors with these two articles!
The second place you can find me on the web, outside of Strange & Charmed, is GeeksterLabs! GeeksterLabs is a website I have been following for years that focuses on all types of consumer technology. This summer I joined the team as a feature contributor, writing about fun and quirky ways to make the most of technology! Since I have written a steady stream of articles for them, I have included the direct link to my author page here, so you can check out all the articles I have written!
Overall, I would say that 2013 has been an amazing year for this blog! I have seen growth month after month and I hope that trend continues into 2014! So, let me know what you’re favorite posts were from Strange & Charmed in 2013 and the types of articles you hope to see more of in 2014! Happy New Year Everyone!
One of the most exciting parts about planning my wedding was decided on a wedding cake because when you make your appointment with your bakery they actually let you taste all different flavors of cakes and icing! Our wedding cake ended up being two layers, the bottom was a lemon cake with a citrus icing that was amazing and the top was a traditional red velvet which is my husband favorite!
As you may already know, there is something of a wedding tradition that you save the top tier of your wedding cake for your 1st anniversary! For a long time, I thought this was a totally gross tradition, that was, until I did it myself! I was completely surprised when I defrosted mine because it actually tasted so good! Granted, it didn’t taste like a freshly baked cake, rather, it tasted like a cake that has been left in a refrigerator for a day or two! It’s so crazy to think that it didn’t spoil over the year, but I will have to attribute that to how it was stored. So, I thought I would share with you guys the proper way to store that top tier of your wedding cake and then how to prepare it for your 1st year anniversary so that your cake stays as yummy as possible!
After you get married, it’s really important that you deal with the top layer of your cake as soon as possible to ensure freshness for the year in storage. I suggest getting the cake prepped and in the freezer within the first 12 hours after your wedding! First, you need to cover your cake in plastic wrap, at least 2 layers to make sure every inch is covered and that the plastic is closely fitted to your cake. Make sure to remove any air bubbles or tighten any looser spots of plastic because the less air you have trapped in your cake at the time of freezing, the better for the life of your cake! Next, wrap your cake up in aluminum foil, enough to generously cover it! Then pop it in the back of your freezer! I left mine in the back corner of my freezer so that it would stay out-of-the-way and consistently cold for the year. Leaving your cake too close to the front of your freezer may cause the temp to vary as you open and close your freezer. The defrost instructions are super simple. Once your anniversary comes around, all you need to do is take the cake out of the freezer, remove the aluminum so that only the plastic remains and leave it in your refrigerator to thaw for 2 days! I took a sharpie and wrote my defrosting instructions on the top of the aluminum foil of the cake so I wouldn’t forget what to do a year later! Like I said, my cake defrosted beautifully and tasted delicious, so I hope these instructions help any of you in this situation!
Did you end up saving the top layer of your wedding cake? How did it taste after a year in the freezer? Do you think this is a fun tradition or a gross one? Let us know in the comments!
This year Halloween falls on a Thursday night, so unless you’re a college student or really into the holiday, you will most likely be celebrating at home! Don’t let your adult responsibilities get you down, there is plenty of haunted fun to be had even if you aren’t planning on partying it up! Here are five Frightfully Fun activities for Halloween Night!
1. Have a Monster Movie Fest
There is really nothing better than watching scary movies on Halloween! Some of my favorite Halloween classics are Hocus Pocus, The Rocky Horror Picture Show, and Sleepy Hollow.
2. Listen to The Raven by Edgar Allen Poe as read by Christopher Walken via YouTube
Yes, this really exists and its pretty incredible. If you are a major Christopher Walken fan like I am, you will surely appreciate his eerie narration to one of literatures classic haunting tales.
3. Read H.P. Lovecraft Stories by candle light
Lovecraft is considered one of the great masters of horror, so if you prefer the pace of a good novel instead of a classic film, try one of his spine chilling tales. Make sure to ready by candle light for an extra creepy effect!
4. Dress up as your favorite Ghoul and hand out halloween candy
What’s the next best thing to trick or treating? Handing out the candy, of course! It’s the perfect excuse to dress up for Halloween and the trick or treaters love the unexpected surprise when you open your door!
5. Rock out to a custom Halloween mixtape
Nothing can put you in that Halloween Spirit like music, so make your own playlist to set the mood for a spooky Halloween at home! Some of my fav’s are The Monster Mash, I Put a Spell on You, and Witchcraft!
Happy Halloween Everyone! How will you be spending your night? Let me know in the comments!
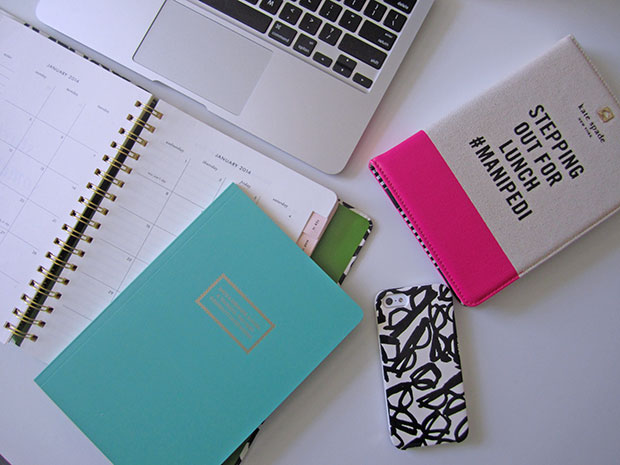
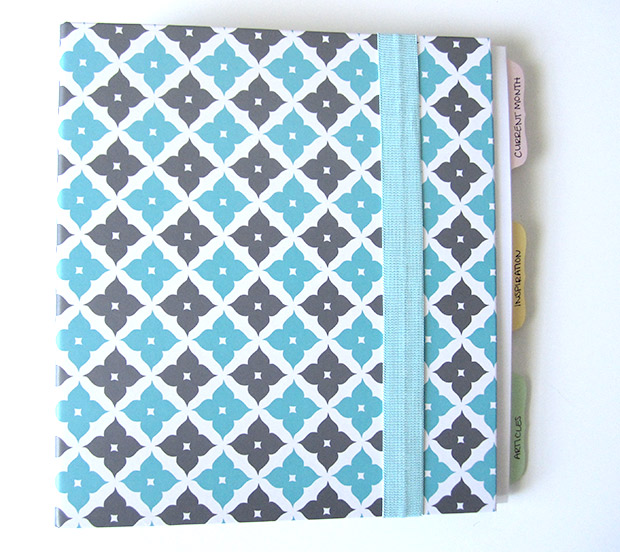
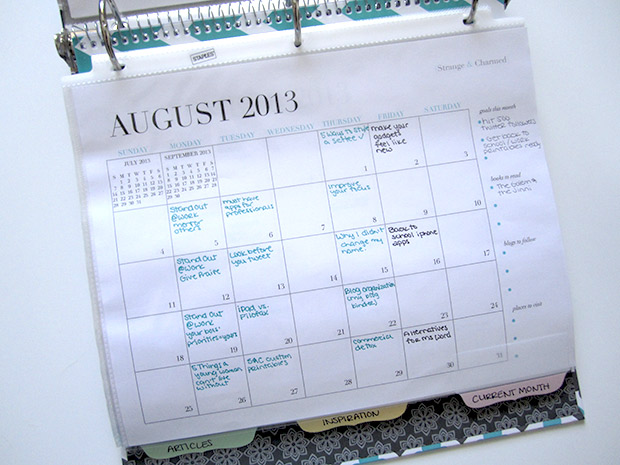
In order to help me stay more organized and focused on my blog and creating great content for my readers, I recently put together a “Blog Binder.” Basically, I bought a three-ring binder and filled it with things to help me keep track of my blog post ideas, editorial calendar and any and all inspiration I have for my blog!
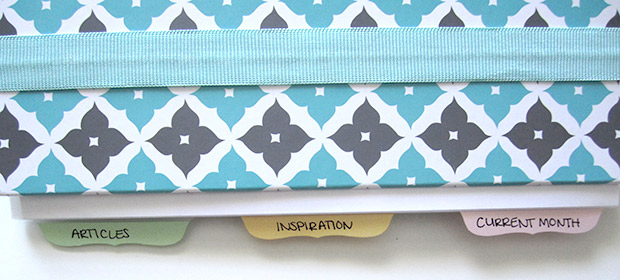
First, I started off by finding a binder that was a physical representation of my blog. I know that sounds a but silly, but I really needed this binder to look like my blog so I chose one that was a nice modern print that I found interesting and of course the color scheme for the binder was in line with the teal and grey of my blog! I also adorned the binder with a binder strap from the Martha Stewart for Staples collection. It, of course, is a teal/aqua color!
Next, I filled the binder with tabbed sections. For this, I used my Martha Stewart large tabs, again from Staples! I knew I only needed a few sections so I broke them down into three important ones; Current Month (for my editorial Calendar), Inspiration, and Articles.
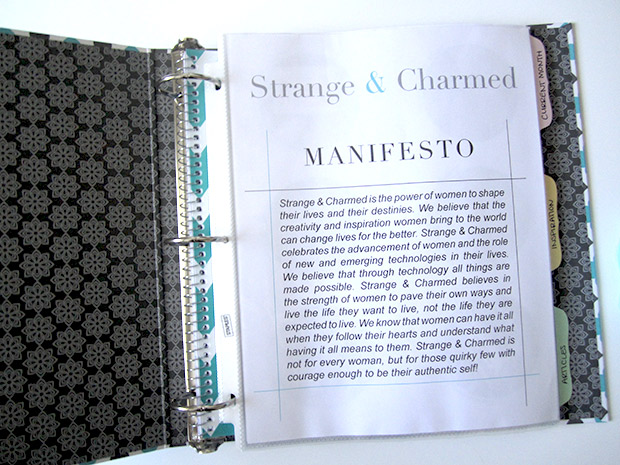
The first page of my binder is my Manifesto for my blog. Once I typed it out, I used Adobe InDesign to format a page that incorporated the look and feel of my blog. So much nicer than just printing out a statement with no life or color to it!
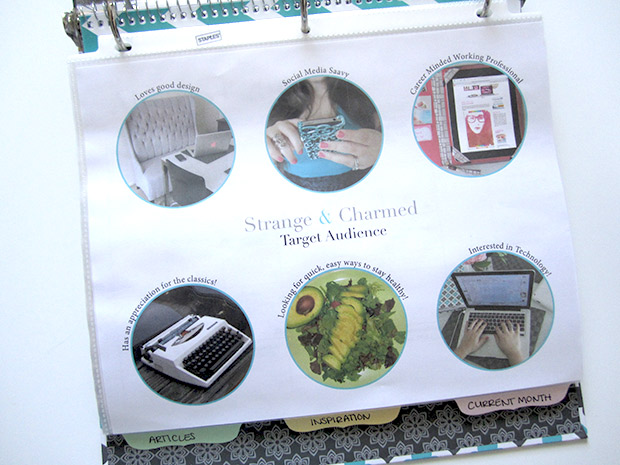
The next page is a mini inspiration board that defines my Target Audience. It’s important for me to keep my ideal reader in mind so that I consistently write for her. For example, my target reader is a female working professional, is interested in technology and loves good design! When it comes to my blog and my expectations, its important for me to always keep in mind that my blog isn’t for everyone, it’s for a very specific type of person. If some people don’t like my blog, that’s okay, if they aren’t my target reader I can’t expect them to like what I am writing!
Next comes my editorial calendar. I have a few months planned out in advance so I keep the Current Month tab on the active month. These calendar pages were also created using InDesign to match the look and feel of my blog. See a pattern here? It’s important, for me at least, that I keep a consistent image so that I don’t clutter up or confuse my brand. I will be releasing these calendar pages in the next few weeks in case you are interested in using them for yourself.
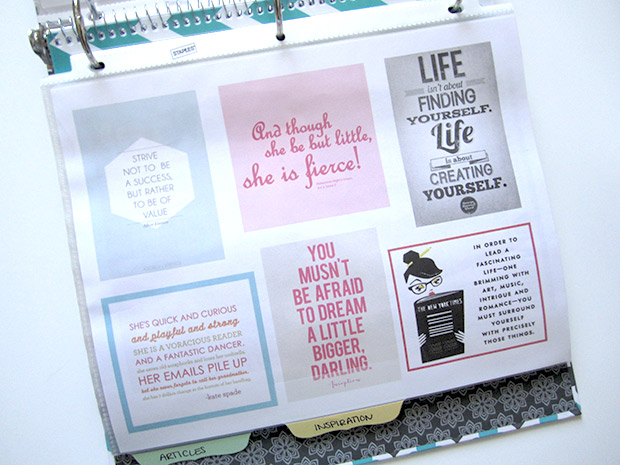
After the calendars are my inspiration pages. They start off with a page filled with some of my favorite quotes that I pulled from Pinterest. I also have some infographics about productivity to keep me inspired when I feel too lazy to write!
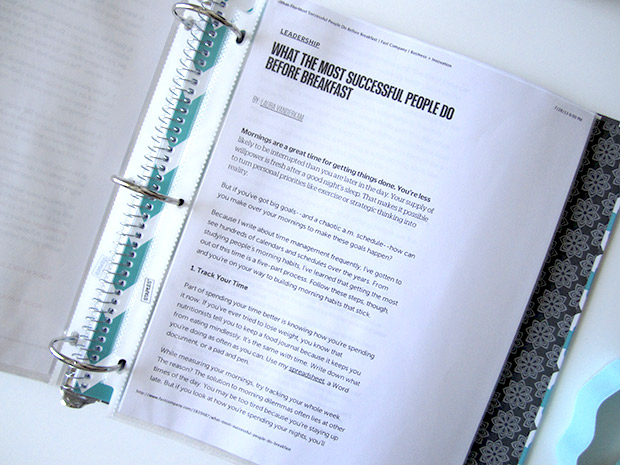
The next section is the tab Articles. Here I have printed out some of my favorite articles that pertain to blogging and/or productivity. Laura Vanderkam’s What the Most Successful People Do Before Breakfast is one of my favorite articles that I constantly return to when I need an extra push in my day! In this section I am also thinking about adding some of my favorite blog posts that I have written over the years just to show case for myself some of my best written work!
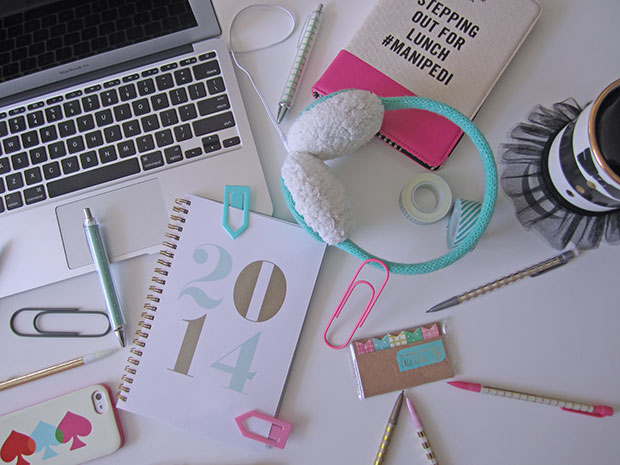
Next I have also included this adorable teal chevron wire bound notebook. Its filled with lined pages and is three hole punched so it attached nicely to my binder. I use these pages to just list out post ideas and items I want to keep track of.
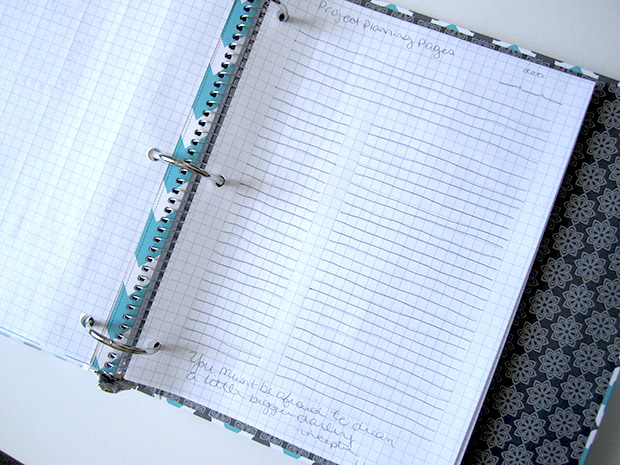
The final section is filled with squared planner paper. Since I have been getting more into the graphic design elements of blogging and designing printable calendars and planning pages, I use this section to sketch out ideas that I will then create using Adobe CS6 software. This image shows a rough idea for a planner page I would like to release as a printable for my readers in the near future.
So that is it! I hope you enjoyed taking a peek into my Blogging Binder! I hope this gave you some ideas of how you too can organize your blogs or any large and ongoing projects in your life!
Do you have a blog? What sort of organizational methods do you use to keep yourself on track? Have you seen an improvement in the quality of your work since you have started using an official organizer like this?
On a recent trip to T.J. Maxx I picked up this beautiful high backed winged settee in a gorgeous heather grey fabric. Although I didn’t have a space for the settee in mind when I bought it (it was one of those, I have to own this no matter what moments) by the time I had gotten it home I had thought of a handful of different uses for it. In case you are not familiar with the term settee, it is an upholstered chair with a back and arms that seats more than one. A traditional settee is something of a love seat sofa, but not as deep as a traditional sofa, they are more of a double wide arm chair! Now, because a settee is relatively small there is really no room in a house that couldn’t fit one! I, however, have boiled it down to five simple and elegant ways to style a settee with a few images courtesy of Pinterest to help me make my point!
1. Style a settee as luxe piece of office furniture.
2. Style a settee as an entranceway statement piece.
3. Style a settee as a dining room table bench or booth seat.
4. Style a settee as an elegant addition to the foot of a bed.
5. Style a settee as an upscale powder room seat.
So, you may be wondering, how then did I end up styling my settee? Well, after careful consideration I decided to do this!
Yep! My beautiful settee is now a bench seat for my dining table! I cannot be more thrilled about it! I have always been a fan of upholstered booth seating in the dining area and this was such a perfect fit for my apartment. I really like the way that the high back of the settee breaks up my great room into a clear living room and dining room area. Of course, the settee is all mine at the dining table and I have taken to bringing out my laptop and sitting at the dining table to write and surf the internet because I enjoy the piece so much!
I hope you enjoyed this post! As I said before the images I found came from Pinterest and you can find the exact links I used by heading over to my Pinterest page and taking a peak at my board called “Spaces.” There are even a few more examples that I pinned but did not use for this post in case you need some more ideas for how to style your settee!
If you have noticed that your Mac isn’t running as quickly as it once did, don’t panic! It is completely normal for your computer to begin to slow down within a few years of purchase, mostly due to normal day to day build up. There are many things that can cause system lag and likewise, many ways to remedy the situation. Although there are software applications you can buy to help you speed up your Mac, I suggest trying some free options before jumping to software support and spending money. So, I have compiled a list of 10 things you can do to speed up your Mac. I suggest trying all of these for the best results, and since these are all free options, you have nothing to loose!
1. Keep your computer clean. It may not seem like an important step in speeding up your computer, but a tidy computer is a faster computer! This is especially crucial if you are using a mac laptop because dirt and dust can make their way into your computer through your keyboard and build up over time, dampening critical air circulation. Make it a regular habit to clean your computer from time to time with dedicated screen and case cleaners. Also, using products like condensed air to force out excess dust from under your keyboard may help to release any particles that may be building up under there. Also, make it a rule not to eat by your computer. I know so many of us are used to eating and working, but its just not good for your machine to be so close to crumbs, especially food crumbs! So, make sure to keep your laptop clean, and try to prevent crumbs from sneaking in through your keys to keep your machine running at top speed!
2. Keep your computer elevated. Again, if you are using a laptop this is another critical factor in the performance of your machine. Airflow is such a determining factor in the performance of your laptop and can be a major reason your laptop isn’t as snappy as it once was. Now, this doesn’t mean you necessarily need to run out and buy one of those stands for your laptop and an external keyboard, but it means you should always use your laptop on a clean hard surface, minimizing the time it spends sitting on fabric like sofa’s, beds or carpeting. Fabric can be a problem because it usually contains a good amount of dust particles and the fan on your laptop will end up sucking that in like a vacuum and inhibiting the flow of air in your laptop. You can help to increase air flow to your laptop, not only by sitting it on a hard surface, but also by propping up the back of the machine with objects like erasers or books. The goal is to give air the space to move around your computer which will keep your device cool and free of dirt and dust.
3. Keep a clean desktop. You may not know it, but the number of icons you have sitting on your computers desktop actually contributes to the speed of your computer. I try to only have my “Macintosh HD” startup disk on my desktop so that I have as few items as possible for my machine to render upon startup. So, go through any items you have on your desktop, file them away properly and see the speed of your machine increase.
4. Clean up your hard drive. Make sure to keep an eye on your hard drive space by right clicking your “Macintosh HD” icon and selecting “Get Info.” From this menu you can see how much space you have available on your machine. If you are running low on space (less than a quarter of your original drive space remaining) I suggest you go through your computer and remove excess files. You can move anything you don’t need to the trash (make sure to empty the trash when your done!) or you can move files off your computer and onto an external hard drive. If you are not sure what is taking up space on your mac you can always download the free application Disk Inventory X. This simple to use software can help you identify what applications and files are taking up the most space on your computer and you may be surprised that your precious hard drive space is being eaten up in the most unusual ways! If applications are your culprit, you will need download the free application, AppCleaner that helps you safely remove unused or unneeded applications and there associated files.
5. Reset Safari. If you are having an issue with the speed of Safari especially, you may need to Reset Safari to clean out its cache. From the Safari Menu, select “Reset Safari” and a box should appear with checked boxes asking which items to reset. I suggest resetting everything, but check the list and make sure there isn’t anything you don’t want reset because the reset will basically wipe all stored information (but not your bookmarks). Things like your downloads file, the autofill forms for websites, and stored passwords for sites will all be wiped. You may be a little nervous to do this, so before you take this action, I suggest visiting any important websites to figure out what your usernames and passwords are for each (because after the reset they won’t autofill again until after you have revisited and reentered your information). If you have a computer that is a few years old, you would be surprised to see how many websites Safari has been storing information for, even ones you haven’t visited in years! This action can take a few minutes, depending on the amount of information you have stored, so don’t worry if you see the beach ball pop up, or if Safari has a little lag once it reboots! That will go away momentarily.
6. Make sure your software is up to date. Apple is frequently sending our Mac’s software updates for everything from iTunes, to Safari to Mail! If you don’t have your Mac set to automatically check for updates, you may need to go in and manually check every once in a while to make sure your computer is running on the most up to date software! From your Apple menu, select “Check for Software Updates” and let your computer scan for any new updates. You will need to be connected to the internet to do this, so make sure you are connected via Wifi or cable.
7. Close out of applications. This may seem like a simple solution, but you would be surprised at the amount of people who do not realize that they have not properly closed out of applications. With a Mac, you can “X” out of an application, but the application may still be running in the background. To check this, take a look at your dock and see if any applications have a little glowing light under neath them. If they do, that means they are still running. To close any applications you don’t need running at the time, right click the icon and select “Quit”. If the application doesn’t quit within a minute or so, you may need to try again and select “Force Quit” as sometimes applications time out while they are running and stop responding to normal commands. Don’t worry if you have to use “Force Quit,” it will not damage your computer or the application.
8. Unplug any peripheral devices you aren’t using. This is a common problem with desktop Mac’s that are stationary. Often times, because we don’t move our computer around, it tends to have lot of extras plugged into it, even when those extras are not in use. Things like printers, external hard drives, card readers and usb thumb drives can all slow down your Mac’s performance. So, unless you are using the peripheral device, unplug it so it doesn’t weigh down the performance of your computer.
9. Restart your Mac. Sometimes temporary lags in performance can be stopped with a simple restart. It is recommended that you first close out of all your applications before attempting the restart. Once you have quit out of everything, you can proceed to “Restart” from the “Apple” menu. If you get an option in the dialog box to “Open Windows upon restart” make sure that box is unchecked so that you get a clean reboot.
10. Shut down your computer. Although Macs do not need to be Restarted or Shut down in between uses, if it has been a while since you last shut down your computer, you may want to give your Mac a rest with a Shut Down. From the “Apple” menu, select the “Shut Down” option and once your computer has shut down completely, give it some time to rest before starting it back up. I recommend running the shut down sequence in the evening before you go to bed, and then giving your computer a quick cleaning while its off. Make sure to leave it on a hard, dry surface, and keep it unplugged if it is a laptop.
If you have trouble or are unable to complete any of these tips, I suggest reaching out to Apple directly for assistance. If you do complete these tips and still see a good deal of system slowdowns and lag, reach out to Apple via the AppleCare hotline or your local Apple retailer to get further information on diagnostics that can check to see if you are having a major system issue that is causing the lag. Lag can sometimes be a warning sign of disk failure, so always keep your files backed up just to be on the safe side!