Late summer is one of my favorite times of year. For a long time it meant back to school for me, which I loved, but now it means back to work after a summer filled with vacation days and long lunches outside in the sunny weather. This is also the time of year when I feel a burst of energy to get myself reorganized, and I don’t know if its because academic planners are just everywhere this time of year, but its the perfect time to check up on your planner and calendar system that you may have set in place at the start of the new year or to implement one if you are not currently using a reliable system!
When it comes to using a calendar and planner system, the biggest choice you have these days is to choose digital or paper. Each system has their own benefits and drawbacks, but your habits and needs will ultimately affect how useful one type of system is over the other.
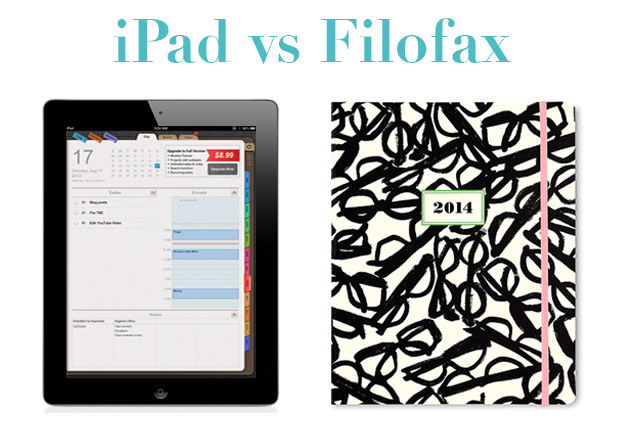
iPad or other Digital Calendar System
Pro’s: iPads really excel as personal planner and calendar systems because of the variety of applications you can use to get yourself organized. While there are plenty of apps for individual note taking and calendar optimization, there are also plenty of all in one apps that can keep you organized throughout your day. IPad’s are also great because normally within the apps you can choose to view your information in a variety of ways, like in daily, weekly or monthly formats. If you need flexibility in your daily life in order to get things done, an iPad may give you everything you need.
Con’s: While iPad’s make great planners because of their array of apps, they are still sometimes cumbersome to use. Many people find input via iPad difficult and slow. Since the iPad also needs to be charged in order to function, your planner system is completely dependent on your ability to keep it charged or have access to an electrical socket. Now, of course there are many portable charging systems you can purchase for your iPad if you work in the field or out of an office, it is still more cumbersome than a traditional paper planner.
Pro’s: One of the best things about a Filofax organizer is that they are nearly infinitely customizable. There are a multitude of planner pages, calendar views and notepads you can use with a Filofax that it makes finding your ideal system a breeze. You can also use a Filofax to store additional papers, sticky notes, and business cards so that you can keep important information close by. Since your dealing with paper and pen/pencil, you never have to worry about being without your notes or calendar, no matter how long you are away from your office. As long as your Filofax is by your side, you can keep yourself organized and on task!
Con’s: Although Filofax organizers have a variety of formats for calendars, notes and to-dos, once you have written in a to do item or scheduled a meeting its permanently there and if you need to change or update information, you often need to erase and rewrite it over again. The flexibility of editing information is much more difficult with paper planners and once you are set with your “view” (daily, weekly, monthly, etc) you cannot easily convert to a new one without purchasing more inserts and rewriting all your information over again.
So, what sort of calendar system do you use? What apps do you keep on your iPad or iPhone to keep you organized? Are you a paper planner person? Which planner system do you use?
On a recent trip to T.J. Maxx I picked up this beautiful high backed winged settee in a gorgeous heather grey fabric. Although I didn’t have a space for the settee in mind when I bought it (it was one of those, I have to own this no matter what moments) by the time I had gotten it home I had thought of a handful of different uses for it. In case you are not familiar with the term settee, it is an upholstered chair with a back and arms that seats more than one. A traditional settee is something of a love seat sofa, but not as deep as a traditional sofa, they are more of a double wide arm chair! Now, because a settee is relatively small there is really no room in a house that couldn’t fit one! I, however, have boiled it down to five simple and elegant ways to style a settee with a few images courtesy of Pinterest to help me make my point!
1. Style a settee as luxe piece of office furniture.
2. Style a settee as an entranceway statement piece.
3. Style a settee as a dining room table bench or booth seat.
4. Style a settee as an elegant addition to the foot of a bed.
5. Style a settee as an upscale powder room seat.
So, you may be wondering, how then did I end up styling my settee? Well, after careful consideration I decided to do this!
Yep! My beautiful settee is now a bench seat for my dining table! I cannot be more thrilled about it! I have always been a fan of upholstered booth seating in the dining area and this was such a perfect fit for my apartment. I really like the way that the high back of the settee breaks up my great room into a clear living room and dining room area. Of course, the settee is all mine at the dining table and I have taken to bringing out my laptop and sitting at the dining table to write and surf the internet because I enjoy the piece so much!
I hope you enjoyed this post! As I said before the images I found came from Pinterest and you can find the exact links I used by heading over to my Pinterest page and taking a peak at my board called “Spaces.” There are even a few more examples that I pinned but did not use for this post in case you need some more ideas for how to style your settee!
If you have noticed that your Mac isn’t running as quickly as it once did, don’t panic! It is completely normal for your computer to begin to slow down within a few years of purchase, mostly due to normal day to day build up. There are many things that can cause system lag and likewise, many ways to remedy the situation. Although there are software applications you can buy to help you speed up your Mac, I suggest trying some free options before jumping to software support and spending money. So, I have compiled a list of 10 things you can do to speed up your Mac. I suggest trying all of these for the best results, and since these are all free options, you have nothing to loose!
1. Keep your computer clean. It may not seem like an important step in speeding up your computer, but a tidy computer is a faster computer! This is especially crucial if you are using a mac laptop because dirt and dust can make their way into your computer through your keyboard and build up over time, dampening critical air circulation. Make it a regular habit to clean your computer from time to time with dedicated screen and case cleaners. Also, using products like condensed air to force out excess dust from under your keyboard may help to release any particles that may be building up under there. Also, make it a rule not to eat by your computer. I know so many of us are used to eating and working, but its just not good for your machine to be so close to crumbs, especially food crumbs! So, make sure to keep your laptop clean, and try to prevent crumbs from sneaking in through your keys to keep your machine running at top speed!
2. Keep your computer elevated. Again, if you are using a laptop this is another critical factor in the performance of your machine. Airflow is such a determining factor in the performance of your laptop and can be a major reason your laptop isn’t as snappy as it once was. Now, this doesn’t mean you necessarily need to run out and buy one of those stands for your laptop and an external keyboard, but it means you should always use your laptop on a clean hard surface, minimizing the time it spends sitting on fabric like sofa’s, beds or carpeting. Fabric can be a problem because it usually contains a good amount of dust particles and the fan on your laptop will end up sucking that in like a vacuum and inhibiting the flow of air in your laptop. You can help to increase air flow to your laptop, not only by sitting it on a hard surface, but also by propping up the back of the machine with objects like erasers or books. The goal is to give air the space to move around your computer which will keep your device cool and free of dirt and dust.
3. Keep a clean desktop. You may not know it, but the number of icons you have sitting on your computers desktop actually contributes to the speed of your computer. I try to only have my “Macintosh HD” startup disk on my desktop so that I have as few items as possible for my machine to render upon startup. So, go through any items you have on your desktop, file them away properly and see the speed of your machine increase.
4. Clean up your hard drive. Make sure to keep an eye on your hard drive space by right clicking your “Macintosh HD” icon and selecting “Get Info.” From this menu you can see how much space you have available on your machine. If you are running low on space (less than a quarter of your original drive space remaining) I suggest you go through your computer and remove excess files. You can move anything you don’t need to the trash (make sure to empty the trash when your done!) or you can move files off your computer and onto an external hard drive. If you are not sure what is taking up space on your mac you can always download the free application Disk Inventory X. This simple to use software can help you identify what applications and files are taking up the most space on your computer and you may be surprised that your precious hard drive space is being eaten up in the most unusual ways! If applications are your culprit, you will need download the free application, AppCleaner that helps you safely remove unused or unneeded applications and there associated files.
5. Reset Safari. If you are having an issue with the speed of Safari especially, you may need to Reset Safari to clean out its cache. From the Safari Menu, select “Reset Safari” and a box should appear with checked boxes asking which items to reset. I suggest resetting everything, but check the list and make sure there isn’t anything you don’t want reset because the reset will basically wipe all stored information (but not your bookmarks). Things like your downloads file, the autofill forms for websites, and stored passwords for sites will all be wiped. You may be a little nervous to do this, so before you take this action, I suggest visiting any important websites to figure out what your usernames and passwords are for each (because after the reset they won’t autofill again until after you have revisited and reentered your information). If you have a computer that is a few years old, you would be surprised to see how many websites Safari has been storing information for, even ones you haven’t visited in years! This action can take a few minutes, depending on the amount of information you have stored, so don’t worry if you see the beach ball pop up, or if Safari has a little lag once it reboots! That will go away momentarily.
6. Make sure your software is up to date. Apple is frequently sending our Mac’s software updates for everything from iTunes, to Safari to Mail! If you don’t have your Mac set to automatically check for updates, you may need to go in and manually check every once in a while to make sure your computer is running on the most up to date software! From your Apple menu, select “Check for Software Updates” and let your computer scan for any new updates. You will need to be connected to the internet to do this, so make sure you are connected via Wifi or cable.
7. Close out of applications. This may seem like a simple solution, but you would be surprised at the amount of people who do not realize that they have not properly closed out of applications. With a Mac, you can “X” out of an application, but the application may still be running in the background. To check this, take a look at your dock and see if any applications have a little glowing light under neath them. If they do, that means they are still running. To close any applications you don’t need running at the time, right click the icon and select “Quit”. If the application doesn’t quit within a minute or so, you may need to try again and select “Force Quit” as sometimes applications time out while they are running and stop responding to normal commands. Don’t worry if you have to use “Force Quit,” it will not damage your computer or the application.
8. Unplug any peripheral devices you aren’t using. This is a common problem with desktop Mac’s that are stationary. Often times, because we don’t move our computer around, it tends to have lot of extras plugged into it, even when those extras are not in use. Things like printers, external hard drives, card readers and usb thumb drives can all slow down your Mac’s performance. So, unless you are using the peripheral device, unplug it so it doesn’t weigh down the performance of your computer.
9. Restart your Mac. Sometimes temporary lags in performance can be stopped with a simple restart. It is recommended that you first close out of all your applications before attempting the restart. Once you have quit out of everything, you can proceed to “Restart” from the “Apple” menu. If you get an option in the dialog box to “Open Windows upon restart” make sure that box is unchecked so that you get a clean reboot.
10. Shut down your computer. Although Macs do not need to be Restarted or Shut down in between uses, if it has been a while since you last shut down your computer, you may want to give your Mac a rest with a Shut Down. From the “Apple” menu, select the “Shut Down” option and once your computer has shut down completely, give it some time to rest before starting it back up. I recommend running the shut down sequence in the evening before you go to bed, and then giving your computer a quick cleaning while its off. Make sure to leave it on a hard, dry surface, and keep it unplugged if it is a laptop.
If you have trouble or are unable to complete any of these tips, I suggest reaching out to Apple directly for assistance. If you do complete these tips and still see a good deal of system slowdowns and lag, reach out to Apple via the AppleCare hotline or your local Apple retailer to get further information on diagnostics that can check to see if you are having a major system issue that is causing the lag. Lag can sometimes be a warning sign of disk failure, so always keep your files backed up just to be on the safe side!
With July 4th right around the corner I thought it would be a great time to discuss some of my favorite Summer Tech Tips. Some of these tips you may already be familiar with, others, not so much, but I keep all of these tips in mind when it comes to the summer because tech, gadgets and the summer time all have a very precarious relationship. After all, no one wants water damage on their tablet or to drop their iPhone off a roller coaster! So, here are my 10 Summer Tech Tips to get you and your gadgets through the summer months!
1. Keep your earbuds safe by keeping them wrapped up in a dedicated cord organizer or in a small contact lens case.
3. Use a dedicated hand cream like my favorite Caudalie or JR Watkins hand creams to prevent smudging on your touch screen devices.
4. Give your devices a deep clean every now and again by using anti-bacterial wipes. I use Wet Ones, and I always may sure my device is turned off before I begin cleaning it and always avoid any openings in the device housing!
5. Use a waterproof bikini bag to store any tech gadgets like phones or tablets when you are going to the beach or too the pool.
6. Use dedicated dust plugs to close up any openings in your device while you are at the beach. After all, sand always finds its way into the most unexpected places!
7. Use a heavy duty case for your smartphone while out and about this summer. Some brands even make waterproof cases that are perfect for those hiking and white water rafting adventures!
8. If you plan to use your devices outdoors this summer, make sure to invest in an anti-glare screen protector for the best viewing on your smartphone or tablet.
9. Pack a backup battery for long days out of the house or away from outlets.
10. Make sure to password protect your devices and activate any device location services you have available. Summer is a heavy season for theft and you don’t want to loose your device to crooks or the casual opportunist!
I hope these tips have been helpful to you! Hope you guys have a great summer and make sure to keep your gadgets safe and sound!
With July 4th coming up, I thought I would take a moment to talk to you about drinking, or rather, how to avoid drinking in social situations. This information doesn’t just apply to July 4th weekend, but can be applied all year round if you are someone who prefers not to drink but finds it had to avoid drinking while others are indulging.
Reasons to avoid alcohol
While you certainly do not need a reason to avoid drinking, there are many legitimate reasons why one would choose not to drink in a social situation. You may be in a recovery program in which you are voluntarily prohibiting yourself from alcohol, in which case you have made a commitment and would not want to stray from that. You may be on certain medications that interact negatively with alcohol, or you may be the designated driver for the evening. These situations tend to have the least amount of pressure from others to drink. Usually, people who know this information will not offer you drinks or try to compromise your integrity or health while out at a bar or a barbecue, but what about other reasons when your avoidance of alcohol is not so clear cut?
I for one, generally do not drink when I am out, even if I am with friends who are drinking. I have no problem defending my position that I don’t like alcohol and the affects it has on my demeanor. I find that alcohol makes me feel tired and gives me a stomach ache, and even if I keep my drink count low, having alcohol in my system usually makes me feel laggy for days. I personally also do not like to drink my calories in alcohol or any other beverage for that matter so that factors in as well.
The Stigma of Sobriety
For me, its not hard to avoid drinking because most people know this about me and will not offer me drinks, but what if you were someone who usually drinks with friends but now, for whatever reason, has decided to stop?
The first thing you have to know is that sometimes people find it hard to understand why someone would not be drinking alcohol if it was offered. People almost take it personally or feel like they are being judged when someone suddenly stops drinking. There is definitely a stigma around sobriety and it usually leads to the assumption that you are recovering from an alcohol addiction (whether you are or not) or that you’re pregnant (if you’re a woman). These questions can lead to a feeling of peer pressure that could cause you to fall off your own wagon in a way and choose to drink just to fit in.
I know some people who end up doing this. They may want to avoid alcohol for one reason or another but when they get together with their group of old drinking buddies, they find it hard to avoid drinking and since they don’t have a strong reason to withhold they end up imbibing. I think this stigma sucks, but luckily there are some things you can do to avoid it!
Tips to Avoid Alcohol
If you feel like you cannot survive the stigma around sobriety, there are a few things you can do to avoid suspicion. If you have an event at a bar or restaurant, I would suggest arriving a bit early before the others and talking to your bartender or waitress. If you let them know you are not drinking this evening, but you don’t want anyone to know, they can make you fake drinks that appear to be alcoholic beverages, but are really just club soda or mixers without the alcohol. Many times, the glasses they use at bars and restaurants denote alcoholic beverages from non alcoholic beverages, so if you arrive ahead of your friends and they see you with a clear glass filled with ice and garnished with a lime, they will just assume its your usual gin and tonic, even if its clear soda or seltzer water.
Just make sure if someone wants to try your drink you keep it to yourself. Its easy enough to make up an excuse like “I think I may be coming down with something so its probably best if you don’t drink from my glass.” And if you can’t make it early to to location, don’t fret, just try to pull your waitress or bartender aside and discreetly let them know your preference for the evening. Bartenders especially will understand this and are usually more than willing to oblige. Just make sure you pass them a good tip at the end of the night for keeping your secret safe, after all, you are saving a good amount of money if your drinks are dressed up sodas without the shots of alcohol!
Now, these tips may work when you are out with friends, but what about when you’re at someones home or a barbecue? Obviously, its a little harder to control this situation, but there are things you can do to avoid alcohol without people pestering you about it. First, I suggest bringing some drinks of your own. Usually, if your attending a barbecue or a party at someone’s house, or at a public place like a camp site or local park, you would bring something like a side dish or a bottle of wine etc. Well, make sure you bring yourself something to drink without alcohol in it.
I suggest one of three things. First, if you are normally a beer drinker, I suggest picking up a 6-pack of a micro brew root beer or ginger ale that you can find at your local grocery store. Often times these microbrew non alcoholic drinks appear to be actual beers as they are packaged like them. You don’t need to say anything about what you brought, but if someone asks you and notices its not a beer, you can say something like “I really love this stuff, its my new addiction!” People may offer you something alcoholic, and you can politely pass on it with the legitimate excuse that you brought your own. I find with situations like this, people aren’t so concerned with what you are drinking as long as you are drinking something that looks familiar.
My second suggestion would be to bring a pitcher of a beverage that looks like a mixed drink. Remember in college when you used to drink “jungle juice” and it was basically Kool Aid with tons of clear alcohol in it, but for some reason you couldn’t taste the alcohol? That’s the concept with this one. Make a colorful beverage and stick to it for the event. If someone asks for a sip, let them have it and revel with them in amazement at the fact that you just can’t taste the alcohol! “Maybe I didn’t put enough alcohol in,” you can suggest. Your not lying and your friends will probably end up avoiding your beverage for something stronger anyway. In the end, everyone wins and you most of all win for avoiding alcohol without feeling the peer pressure of your friends.
My final suggestion would be to use a colored solo cup or your own opaque pitcher to drink from during the event. At parties, the non alcoholic beverages are normally sitting right next to the alcoholic ones, so its easy enough to fill your cup with a soda or juice instead of the hostesses homemade sangria. As long as they can’t see whats in your cup, no one can notice what you are or are not drinking. If comments arise as to the quality and taste of the sangria, make sure you give your thumbs up to be polite to your host. She certainly won’t know you didn’t try it!
Conclusion
Even though you may find yourself in social situations where you would normally enjoy a drink with friends and family, its often tough to avoid alcohol even if you want to. Compound that with the fact that many people find it odd when friends suddenly change their drinking behavior, and certain social events can turn into a pressure filled time instead of a fun event! Although honesty is always the best policy, what your friends and family don’t know won’t hurt them, and its not like your hurting yourself by not drinking. So, with a little forethought, you can make sure you look and feel like you fit in with your crowd while also maintaining your personal integrity. After all, alcohol is a tricky thing. It may be fun to loosen up with a drink, but it can also have short term and long term affects to your well being that just aren’t worth it to some people. So make sure you’re doing what you need to do to get by and I hope you have a great July 4th wherever and however you are celebrating!
I absolutely love my Kate Spade iPhone hard case, but when I first purchased it, I will admit, I couldn’t figure out how to install or remove it! The case did come with a short set of directions, however, I found those to be utterly useless, so I headed to YouTube to find the answer. There weren’t many videos on the subject but I eventually found one that helped me get my case up and running. Recently, I decided to return the favor and filmed my own “How to Install and Remove a Kate Spade iPhone Case” video that shows the best way I have found to deal with the case. Above is the video in case you want to watch it, but I thought I should give a brief written overview in case your not able to watch the video.
To Install the case
The Kate Spade Hard Cases come in two pieces, a front section that includes the front lip and sides of the case and a back section that is just a flat backing with raised grooves that will lock into the front portion. To open the case for installation, simply push the backing out away from the inside out. Make sure to firmly hold onto the front lip of the case and push the back plate out of place. This made be hard to do initially, so don’t be afraid to use force.
Once the two parts are separated, you will drop your phone face first into the front portion of the case and then fit the back plate in behind it to close it up. You will then need to push firmly all around the back edges of the case to get the back plate to snap in. If any sections around the sides seem to be lifting away from the case, push firmly on those side sections while also pushing down with on the backplate until you hear that section snap into place.
On a side note, these cases are so well fitted that you cannot use a thick screen or back plate cover while using this case. For example, I had one of those thick mirrored screen protectors when I received this case and it wouldn’t go on properly so I had to switch my screen protector out for a simple thin one. Just keep that in mind when using a Kate Spade hard case!
To Remove the case
Removing the case is the tough part, especially since you are going to feel like you’re breaking the case, so this next part is not something to rush through without thought. The best way I have found to remove the Kate Spade Hard Case is by pushing the front portion away from the back portion at the cut out for your volume rocker. That is really the only spot on the case where you can get a good grip with your thumb.
So holding the case face down in your hand so that you are looking at the back plate, position your thumb into the opening for the volume and begin to firmly pull it down away from the back plate. You will see a little section pop up away from the front portion and with that you will use your fingers or finger nails to peel the back plate away from the front section of the case. The first few times you do this may be difficult and if you are having trouble definitely watch the video to see how I do it, but this method is the easiest, you just need to do it carefully because you don’t want to break the casing around the volume rocker because it is thinner plastic, so it could break theoretically with too much force.
I hope this information was helpful to anyone out there who has a Kate Spade iPhone Hard Case or was thinking of buying one! If you are interested in the case I have, I have included a link to mine through Amazon where you can buy one pretty inexpensively!
{Click through the image to get to product information}
You Missed a Spot is a new Spring Cleaning feature for the month of April focusing on the not so obvious places you will want to tidy up for the season! Each Thursday visit us for a new installment that goes beyond the how to’s of vacuuming, window washing and laundry!
{Cleaning and Organizing your Handbags}
If your the average woman, you have about 10 handbags in your collection and the average price of those bags is about $150 each. So, I am going to walk you through keeping your handbags clean and properly stored so that you are taking care of your rather large investment because you may not even know your not caring for your handbags properly!
Step 1: Dump the contents of your bag!
You are going to need to make sure your handbag is empty so that you can properly organize it and identify any areas of concern that may need attention.
Step 2: Check the exterior of your bag for tears or stains.
You will want to evaluate your bag to make sure its in good condition. If you find any stains, you will want to address them based on the fabric of your purse and try to get them cleaned off. If you find tears and the bag is expensive, contact the manufacturer to see what can be done.
Step 3: Check the interior lining of the bag for tears.
Make sure the interior lining of you bag is intact. Often times, it can tear causing bits of dirt or even whole objects to disappear into the lining. In most instances you can probably repair the lining safely enough on your own, but if you have questions and the bag is pricey, again, speak to the manufacturer.
Step 4: Organize your bag with care.
At this point, if you bag is clean and in good condition and you want to continue using it (remember, its probably one of ten and you may want to rotate!) make sure to be deliberate with the objects you carry inside it so it is not too heavy or filled with useless items. Also, make sure your makeup is contained in a makeup bag so that powders and lipsticks don’t break or melt on the interior of your bag causing stains or damage to the bag in the future.
Step 5: Properly store your bag(s).
If your bags were designer made, they may have come with a dust bag to use for storage, you should be using these but a dust bag alone doesn’t cut it as a storage solution! You must also make sure to stuff your unused bags with bubble wrap or tissue paper so that the bags keep their shape. You may not think this is necessary, but especially with leather bags, its easy for them to ‘deflate’ in storage, causing the leather to crack due to the lack of structure. Also, make sure to keep the bags in a cool, dry, and dark place. This will preserve color and give the bag longevity.
I guess I will leave you to it! Good luck and happy cleaning!
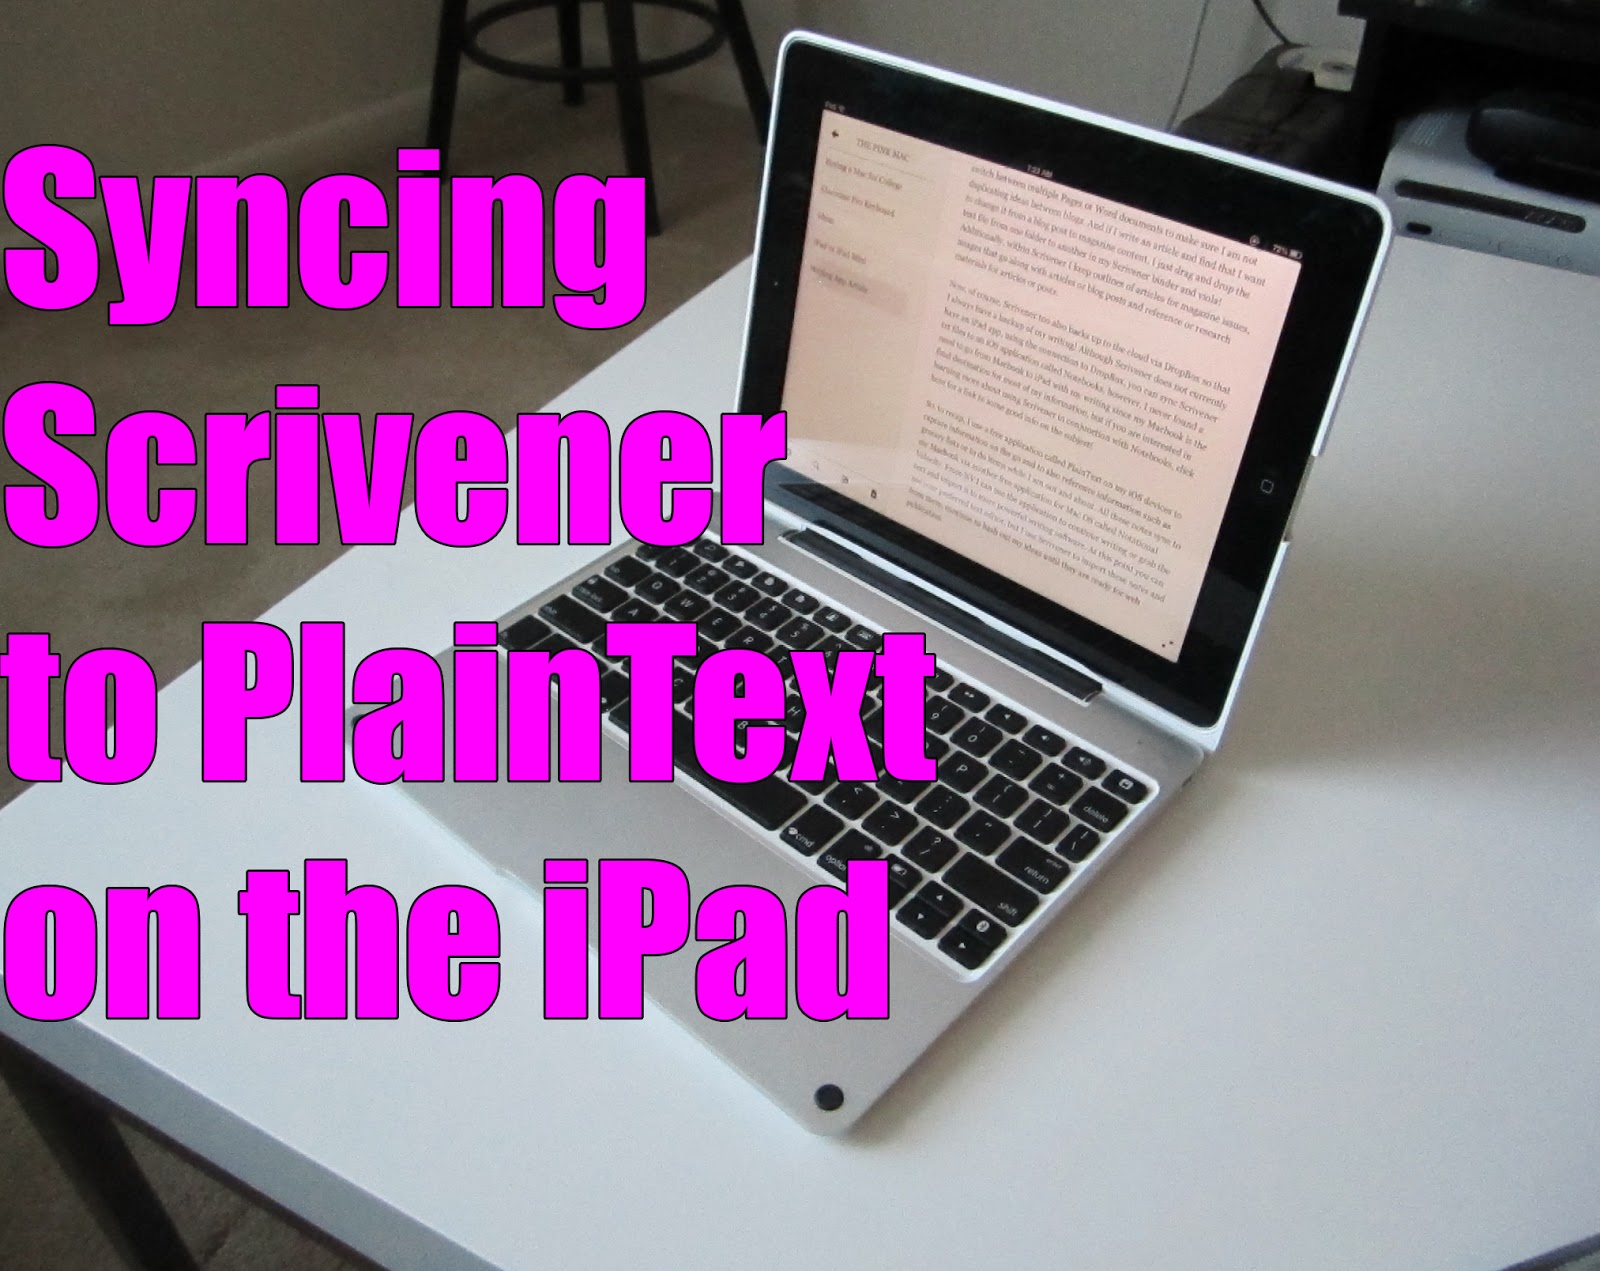
As I am now using my ClamCase Pro keyboard and iPad full time as my portable writers desk, I have been working on finding a solution that will complete the loop of writing between my iPad and MacBook Pro. When I first received the ClamCase Pro, I was using a multipart system, using the PlainText app on my iPad to write, then using Notational Velocity on my Macbook to sync with my PlainText documents and finally, moving the files over to Scrivener on my Mac where I organize all my writing. It was a reliable system thanks to Dropbox, and it worked, but it was only a one way street. It was a great way for me to import documents I wrote on my iPad back to my Mac, but I could not call up existing files sitting in my Scrivener project back to my iPad to be completed. I suddenly realized that my ClamCase Pro was so powerful that I did not need the crutch of my Mac to assist my writing, instead what I needed was complete access to my Scrivener project files in an infinite loop between my Mac, Dropbox, and iPad, then back to the Mac.
So, I started looking into alternatives for how to Sync my Scrivener folder with my iPad, because ultimately that is what I want and need. I do love Scrivener because its organizational ability is outstanding and if it had an iPad app that mirrored my Mac and my iPad that would be ideal! Sadly, it does not currently as I am writing this, perhaps in the future it may, but I won't hold my breathe in the meantime. Scrivener does, however, sync to Dropbox, also to a few iOS apps, and has built in functionality to work with SimpleNote- but I don't use SimpleNote. I know many people like it, but once I found PlainText I was in love and really don't want to keep switching around between iOS apps.
Luckily, in my research I did find a way to make my Scrivener/PlainText relationship work. Scrivener has an option to “Sync to Folder.” This option allows the user to sync all or some of the files in your Scrivener project to a specific folder and if I were to sync to my PlainText folder within Dropbox, well then, that may actually solve all my problems! So, I gave it a try and I am glad to say it actually works! On the iPad's end, its not the prettiest sight, but the files did show up in the order they appear in my Scrivener file, so I am now able to reference back to previous articles or in progress works between my iPad and Mac. If I create new documents on my iPad, it syncs those back as well and although they fall into a catchall folder, all I need to do is drop them in the correct place to remain organized (upon syncing Scrivener the document then falls into the correct order on my iPad.)
Step-By-Step Guide to Syncing Scrivener with PlainText on the iPad
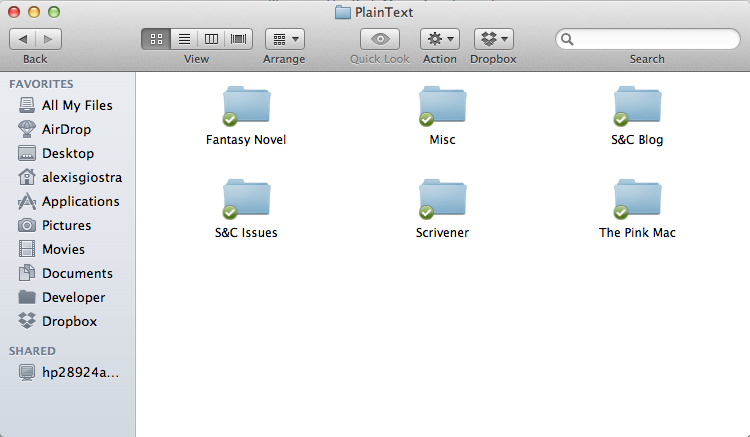
Step 1: Make sure all your connections are in place. In order for this to work, you need to be syncing PlainText to DropBox. This means your PlainText Files are actually stored in your DropBox file. Even if you do not sync your PlainText across numerous devices, this is necessary. Simply open the system preferences (the cog wheel) within PlainText and use the DropBox option to sync to your DropBox account. You can verify that this has happened by opening up your DropBox folder and seeing the PlainText folder inside. If you open this folder it will show plain text documents of any documents you have created within the app. I suggest creating a folder called “Scrivener” or some equivalent within the PlainText folder so that you have your Scrivener documents separated from your other PlainText documents.
Step 2: Select the Scrivener project you would like to sync. With this process you can only sync one .scriv file at a time to your PlainText, so open up the project of your choice. Give it a once over and make sure that all your text documents and folders are organized the way you want them. This will dictate the order in which the files will appear in your PlainText folder.
Step 3: Getting to the Sync with External Folder Option. From your File Menu hover over the Sync option and then choose with External Folder. See image for details.
Navigate to the Sync with External Folder option from the File menu.
Step 4: Set up your External Folder Options.Within the dialog box that appears, you must first choose the shared folder you would like to sync to. In this option you are going to navigate to your DropBox folder and open the PlainText file that you have stored there and finally select the “Scrivener” file you created in Step 1. By doing this you will have a separate space for your Scrivener documents, which will come in handy for organizing all your PlainText documents. Once your shared folder is selected, I recommend using the settings I have selected as illustrated in the below image. If you are using PlainText you need to make sure your files are formatted as Plain Text files instead of the default Rich Text.
Choose your options in the Sync with External Folder dialog box.
Step 5: Sync. Once everything is set properly, you can select the Sync option. Once the sync is complete you should be able to turn on your iPad, open PlainText and see a new folder called Scrivener organized amongst your documents. If you navigate into this folder you will then seen a subfolder called Drafts and another called Notes. Open the Drafts folder to see your Scrivener writing project laid out in the order in which they appear in your Scrivener file. Folders will be empty documents (this is for organization) but text documents will show content so long as their had been content in the files on your computer.
Upon Syncing you will find the Scrivener file among your other files and folders in PlainText.
Navigate through the files Scrivener > Drafts until you come to your Scrivener files organized in their original order.
Now you are free to continue writing and editing your Scrivener project on your iPad. PlainText automatically syncs back to your DropBox folder when changed are made to your documents so the next time you open your Scrivener project on your computer it will ask you to sync and it will import all the changes made through your iPad. Because your iPad does have complete control over your Scrivener file, I suggest that you keep your project backed up in case you delete something important from your iPad. The Automatic back up options are found in the File Tab under Back Up for your reference.
If you enjoyed this post, I suggest also reading my previous article on How I use Scrivener to Organize my writing for a short overview on organizing files within Scrivener. Enjoy!
You Missed a Spot is a new Spring Cleaning feature for the month of April focusing on the not so obvious places you will want to tidy up for the season! Each Thursday visit us for a new installment that goes beyond the how to’s of vacuuming, window washing and laundry!
{Organize your Lingerie Drawer}
Your lingerie or underwear drawer is probably the last place you would think to organize, so I figured we should start there! Its not uncommon for people to hoard bras and panties thinking, ‘you can never have too many’ but the truth is, you should be filtering through your underclothing at least twice a year.
Bra’s: You should get fitted annually to make sure you are the correct size or anytime your weight changes significantly. Since we wear bra’s daily for hours at a time, they wear out quicker than you would expect, and you need to know what to look for in order to determine if you should keep or toss one!
Signs you need to toss your bra
Warped or protruding under wire
Limp appearance to cups
Stretched out straps and elastic
Rough or matted appearance to fabric
Panties: Like bra’s your panties are worn everyday (hopefully!) and worn for nearly 24 hours in most cases! You should make sure to regularly check your underwear to make sure it is in good condition and immediately toss any undesirable pairs and replace them with a few new ones.
Signs you need to toss your panties
Excessive stains (blood, sweat, etc)
Stretched out
Holes or runs
Lining in crotch is ripping
Stockings: Stockings may not be worn as often as your bra’s or panties, but they are significantly more delicate in most cases. Its not rare for someone to put a run or a hole in a pair of sheer stockings the moment they put them on, which is pretty upsetting because no one wants to toss something that’s new, but keeping stockings with imperfections, especially those in visible areas, is just not good sense.
Signs you need to toss your stockings
Ill fitting, either too loose or tight
Holes, runs, tears, etc
Fabric is matting up
Discoloration from stains or sweat
I guess you’ll want to get to work now! Good luck and happy cleaning!
In my opinion, Scrivener is the best software available on Mac or PC for writers, both professional and otherwise, or those who need to organize writing projects of any size for school. I began using Scrivener in 2009 as part of my first adventure with NaNoWriMo {National Novel Writing Month}. Since then, I have used Scrivener to write most of three books, organize and plan out numerous others, and most recently, to organize all my writing for my two blogs and digital magazine. I wish that Scrivener had been around when I was in high school and college, because I know it would have done wonders with organizing my research papers, response essays and such. You see, that is really where Scrivener shines. It is an excellent tool to organize writing, research, information, ideas and so much more associated with writing.
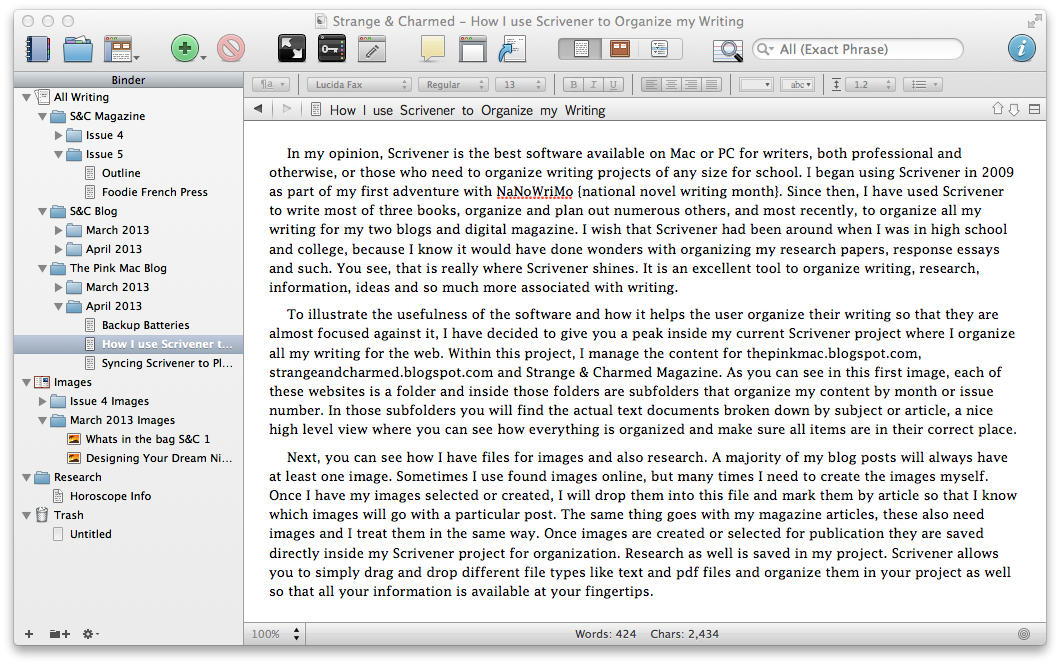
To illustrate the usefulness of the software and how it helps the user organize their writing so that they are almost focused against it, I have decided to give you a peak inside my current Scrivener project where I organize all my writing for the web. Within this project, I manage the content for thepinkmac.blogspot.com, strangeandcharmed.blogspot.com and Strange & Charmed Magazine. As you can see in this first image, each of these websites is a folder and inside those are subfolders that organize my content by month or issue number. In those subfolders you will find the actual text documents broken down by subject or article, a nice high level view where you can see how everything is organized and make sure all items are in their correct place.
Next, you can see how I have files for images and also research. A majority of my blog posts will always have at least one image. Sometimes I use found images online, but many times I need to create the images myself. Once I have my images selected or created, I will drop them into this file and mark them by article so that I know which images will go with a particular post. The same thing goes with my magazine articles, these also need images and I treat them in the same way. Once images are created or selected for publication they are saved directly inside my Scrivener project for organization. Research as well is saved in my project. Scrivener allows you to simply drag and drop different file types like text and pdf files and organize them in your project as well so that all your information is available at your fingertips.
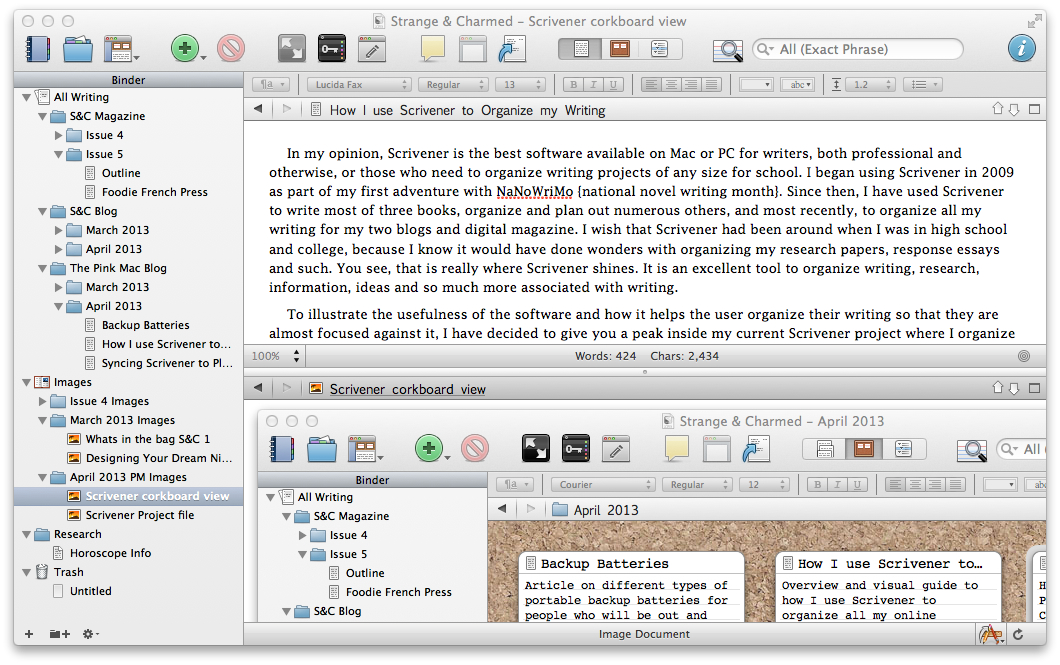
Scrivener has a few alternate views with some extra tools to help you stay organized. In the cork board view you get another high level look at your project broken down by text documents shown as index cards. Here you can add text to explain what each document is about or will be about. This is a great way to use Scrivener to plan out your ideas and what you want to write about. Once you have your ideas all laid out in this cork board view, you have a constant reference guide for your writing that makes it easy for you to jump around between documents without getting lost.
The last alternate view I would like to show you is the split screen mode where you can open two files or documents at once. Here you can see I have a text document open on top and an image file open on the bottom. This is a great way to use your reference tools to aid you in your writing because you have your active text area and another piece of information you can refer back to without switching between documents and loosing your place.
Scrivener is filled with a variety of tools, most of which I did not even touch on. The great thing about Scrivener is that you can use as much or as little of its features as you want. If you want to keep it simple like me, understanding the basic controls and options will definitely give you a great start in organizing your writing and making you feel so much more on task, and for me, personally, that makes me more productive. The Literature and Latte website is a great resource explaining in more depth the advanced tools of the software. There you can find tutorials that walk you step by step through the software so that you can take advantage of all that Scrivener has to offer.
If you enjoyed this post, stay tuned for my update on Syncing Scrivener to PlainText on the iPad for continuous access to your Scrivener files on the go!