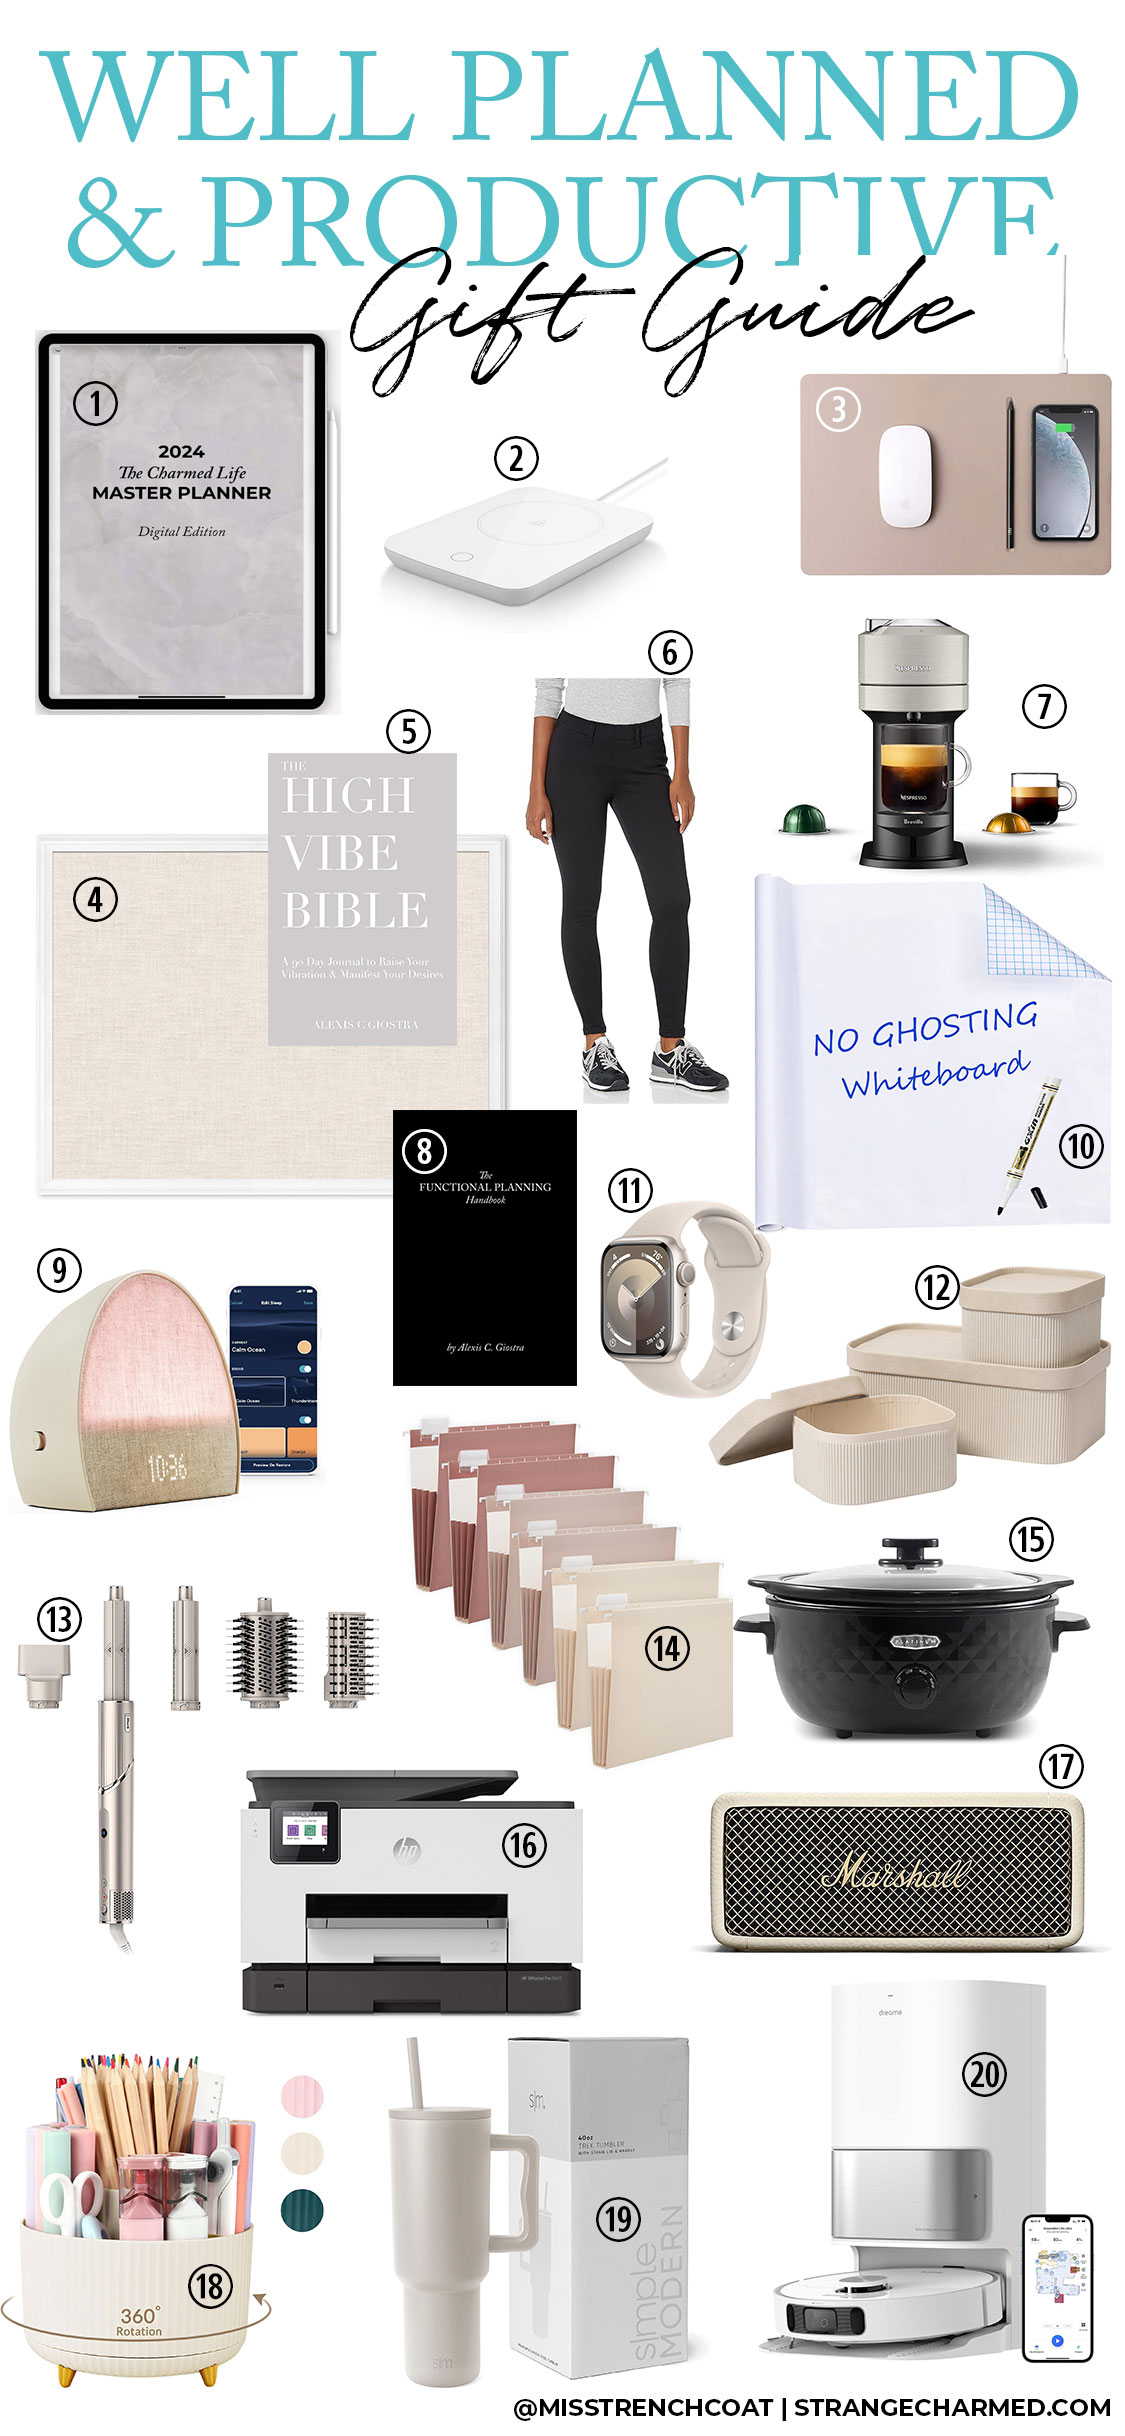
Well Planned & Productive Gift Guide for Busy and Ambitious Women: Elevate Your Productivity in Style!
The holiday season is upon us, and what better way to celebrate the ambitious, go-getter women in your life than with gifts that enhance their productivity and add a touch of elegance to their daily routines? Whether they are entrepreneurs, professionals, or simply masters of multitasking, these thoughtful presents are designed to make their lives more organized, efficient, and stylish. Here’s a handpicked selection of 20 gifts that are sure to delight the busy and ambitious women in your circle:
1. 2024 Master Planner: A digital planner system to help them plan, prioritize, and achieve their goals in the upcoming year.
2. Mug Warmer: Keep their favorite beverages warm while they conquer their tasks.
3. Wireless Charging Mouse Pad: Charge their devices seamlessly while working with this multitasking mouse pad.
4. Cork Board: A stylish cork board to pin important notes, inspirations, and goals.
5. High Vibe Bible: Give the gift of a strong mindset with this 90 day manifestation journal.
6. Amazon Jeggings: Comfortable and versatile jeggings for a chic yet relaxed style.
20. Robot Vacuum and Mop Combo: Effortlessly maintain a clean home with this intelligent robot vacuum and mop combo.
This holiday season, empower the ambitious women in your life to conquer their goals with these well-planned and productivity-boosting gifts. Wrap up the essence of productivity, style, and functionality, and make their holiday season truly exceptional!
xoxo,
Founder, Strange & Charmed 🌟
P.S. If you’re looking for more support in living your best, most organized and successful life, consider joining my inner circle private group coaching community called The Charmed Life Master Mind. Each month we meet for live classes, Q+As and monthly planning sessions, plus you have access to an on-demand resource library with dozens of classes, workbooks, planner inserts and other tools to help you craft the life you want to live. Click here to learn more and enroll today for instant access to all my best content and tools!
This article was first published on Strange & Charmed on November 10th, 2014 and is being repostedbecause every year I use this post to help me with my Thanksgiving meal planning and prep. So, I wanted to refresh the post this year with some fresh graphics.
With Thanksgiving a few days away, I thought it would be nice if I shared with you all my favorite holiday recipes for dishes I will be serving at my Thanksgiving dinner this year! If you are looking for a new recipe or some inspiration for meal planning, hopefully this will help you discover a new dish!
Appetizers
Since I am hosting Thanksgiving dinner this year for my family, I like to have snacks and appetizers out before dinner for people to munch on while they watch tv and chat! My husband has requested shrimp cocktail this year as well as a plate of his favorite cured meats to go along with the baked brie I will be making as a hot appetizer. Baked brie is one of our favorites and I love it because its super easy to make, but it presents very, very well. This is the sort of appetizer that’s great to bring along to parties because you can prepare it ahead of time and once you arrive at the party you can heat it up in the oven for a few minutes!
1/4 cup of preserves (apricot or raspberry work very nicely, but use whatever preserves you prefer, you can also omit this if you don’t like preserves!)
Directions
Preheat your oven to 425. Lightly grease a baking sheet and place your thawed puff pastry upon it. In the center, place your brie (removed from packaging) and top with preserves (optional). Wrap the pastry up around your brie working in a single direction until the brie is covered completely by the pastry, ensuring there are no holes or cracks for cheese to spill out of. Bake in oven for 20-25 minutes until the pastry is fluffy and browned. Make sure to keep an eye on the cheese to make sure it’s not melting out of the pastry excessively (a little spillage is okay, but if rivers are flowing out, remove it immediately!) Let cheese stand 5 minutes once removed from the oven and then serve with your choice of crackers!
Side Dishes
For me, a great Thanksgiving meal is made by the side dishes! Although I am hosting a small gathering of family, I still like to have lots of options! We will have the traditional mashed potatoes, a salad, rolls of course, but two of our favorite sides are always Corn Bread Pudding and Sausage Stuffing!
Combine all ingredients adding the bread mix last, into a large mixing bowl. Bake in greased bowl or pan at 350 for 1 hour to 1 hour 15 minutes. Should be a light golden brown on top. Let the pudding rest for 5-10 minutes after removing from the oven!
1 16oz package of Jimmy Dean sausage (in the log style or use equivalent in Italian sausage style of your choice. I prefer the Jimmy Dean Sage Sausage, but that is just personal preference!)
1 Tbsp Olive Oil
1 Box of Stovetop Stuffing (or whichever stuffing recipe you prefer)
Additional Ingredients on stuffing mix box or your preferred style of stuffing!
Directions
In a large pan on the stove, heat oil and distribute on the pan on medium. Place sausage in the pan of heated oil and begin to break it up with a wooden spoon or similar utensil until the sausage is in crumbled, bite size pieces. Cook sausage until browned, drain excess oil and move sausage to the side while preparing your stuffing mix. Prepare stuffing as directed. Once stuffing is cooled, incorporate the cooked sausage and transfer to the serving dish of your choice.
My Turkey via Thanksgiving 2017
The Turkey
If I had to venture a guess, I would say that Turkey is probably the most popular type of meat served on Thanksgiving, however, I have been to several Thanksgiving dinners where it was served alongside a ham or even lamb. I will only be serving one meat option on Thanksgiving, because, let’s be honest, its hard enough to get one meat right on Thanksgiving and turkey is a difficult bird to master! I, however, believe I make one of the best turkeys… ever! I’m just gonna say it, my turkeys are good! They are super moist, filled with flavor and golden browned by the time they exit the oven! I think this has to do with the awesome recipe I developed based off this Alton Brown recipe!
Ingredients
1 frozen Turkey (size doesn’t matter folks, but a rule of thumb is 2 lbs per person you’re feeding. I have made this recipe with a 16 lb turkey to a 23 lb turkey and they have all turned out great!)
1-2 Apples
1-2 Onions
Cinnamon (I prefer ground)
A few cups of water
1-2 Cups of Apple Cider or Apple Juice
Sage (packaged seasoning is fine!)
Rosemary (again, stick to the stuff you have in your cupboard unless you really want fresh!)
A bulb of garlic
1 stick of butter
Directions
Now, I just want to warn you, that for me, this is one of those recipes that is all about judgement calls. I don’t believe you can go wrong with anything except the cooking time, but just do what feels right!
2-4 Days before cooking, take your turkey out of the freezer and let it defrost in your fridge (the larger the turkey, the more time it needs, 4 days would play it safe, 3 is probably average, 2 days and I would worry about having some frozen innards still!
Day of cooking: Preheat your oven to 500 and make sure the racks of your oven are properly positioned to fit your turkey (there is nothing worse than having to mess with those once they are hot!) Remove the thawed turkey and place it in a completely clean sink (very important that your sink be as clean as possible and I would work with the turkey inside a large container of some sort as well)! Remove the turkey from the packaging and remove the neck and other misc innards from the cavity (if you have plans for those innards, put them aside, if not, toss them)! Rinse out the cavity with cool water to make sure there is no bits of ice or slush in there!
Place the turkey on a roasting rack that’s sitting inside a roasting pan. In a microwavable bowl, place an apple or two (chopped up), an onion (also chopped) mixed with a good amount of cinnamon and some apple juice/cider. This part is all eyeballing it! I like to make more than I think I need, because, trust me, this mixture will not go to waste, so maybe a good estimate is to make about 3-5 cups of this mixture! Cook it in the microwave for 5 minutes and you will start to smell all those lovely aromatics brewing together (that smell is what your turkey is going to taste like once this is all done)! Once that mixture is out of the microwave, spoon out the chunks of apple and onion into the cavity of the bird. Add additional apple and onion slices to fill the cavity if necessary!
Coat the skin of the turkey well with the canola oil. Take apart your bulb of garlic and skin each clove of garlic. Take your butter and cut it into multiple pieces. Then take a small knife and begin to cut deep slits strategically all over the bird. This part requires some thinking on your behalf as to where best to place these slits, because inside each slit you are going to place a pad of butter and a piece of garlic, which will then melt and soak into the meat of the bird. I probably make 1-2 slits on the legs, 1-2 on the wings, and 4-6 around the breast.
The last thing I do before I put the turkey into the oven is I like to put some water and a little bit of the aromatics liquid in the bottom of the pan (about an inch of liquid) along with any excess apples and onions I have chopped up already, and then I cover the turkey and the pan completely with aluminum foil!
Put this into the oven at 500 for 30 minutes.
When the 30 minutes is up, remove the turkey and the aluminum foil (gently, because you are going to put it back on loosely after this) and using the liquid from the aromatics mixture, baste the turkey! I also like to use a flavor injector to actually inject this juice mixture into the meat of the turkey as well, all over!
Lower the temperature on the oven to 350, recover the bird with foil, loosely, and put it back into the oven for the remainder of the cooking time! According to Alton Brown a 14-16 lb turkey needs 2- 2.5 hours of cooking time additional, but double-check that with the size of your turkey against this turkey cooking time-table (you can never be too careful)!
For the remainder of the time the turkey cooks, I like to remove it from the oven every 45 minutes to baste it and flavor inject it with the aromatics liquid! I do not count the time out of the oven as cooking time, I set my timer after the turkey is back in the oven! Also, as a note, during the last 30 minutes or so of cooking, I remove the foil from the bird completely, so that it can get that nice brown color and a crispy skin. You may notice that the skin of your bird may have lighter patches around areas that were sliced for the butter and garlic, and this is normal. You may also get streaking from the aromatics mixture because the skin of the turkey really only browns in areas that lack moisture, and you have been basting yours to keep the meat juicy.
Once the turkey is completely cooked and either the thermometer in the turkey has popped or your own food thermometer (always preferable) indicates an internal temperature of 161 for the turkey, you can remove it from the oven and let is rest for 15 minutes before carving.
I hope you have enjoyed reading about my favorite Thanksgiving recipes! Like I said, I will be making all these items and more this year! I would love to know what your favorite family recipes are and what you will be cooking up this Thanksgiving, so feel free to leave me a comment below! Also, if you use any of these recipes, I would love it if you took a picture and sent it to me on Instagram or Twitter! Happy cooking!
xoxo,
Founder, Strange & Charmed 🍂✨
P.S. If you’re looking for more support in living your best, most organized and successful life, consider joining my inner circle private group coaching community called The Charmed Life Master Mind. Each month we meet for live classes, Q+As and monthly planning sessions, plus you have access to an on-demand resource library with dozens of classes, workbooks, planner inserts and other tools to help you craft the life you want to live. Click here to learn more and enroll today for instant access to all my best content and tools!
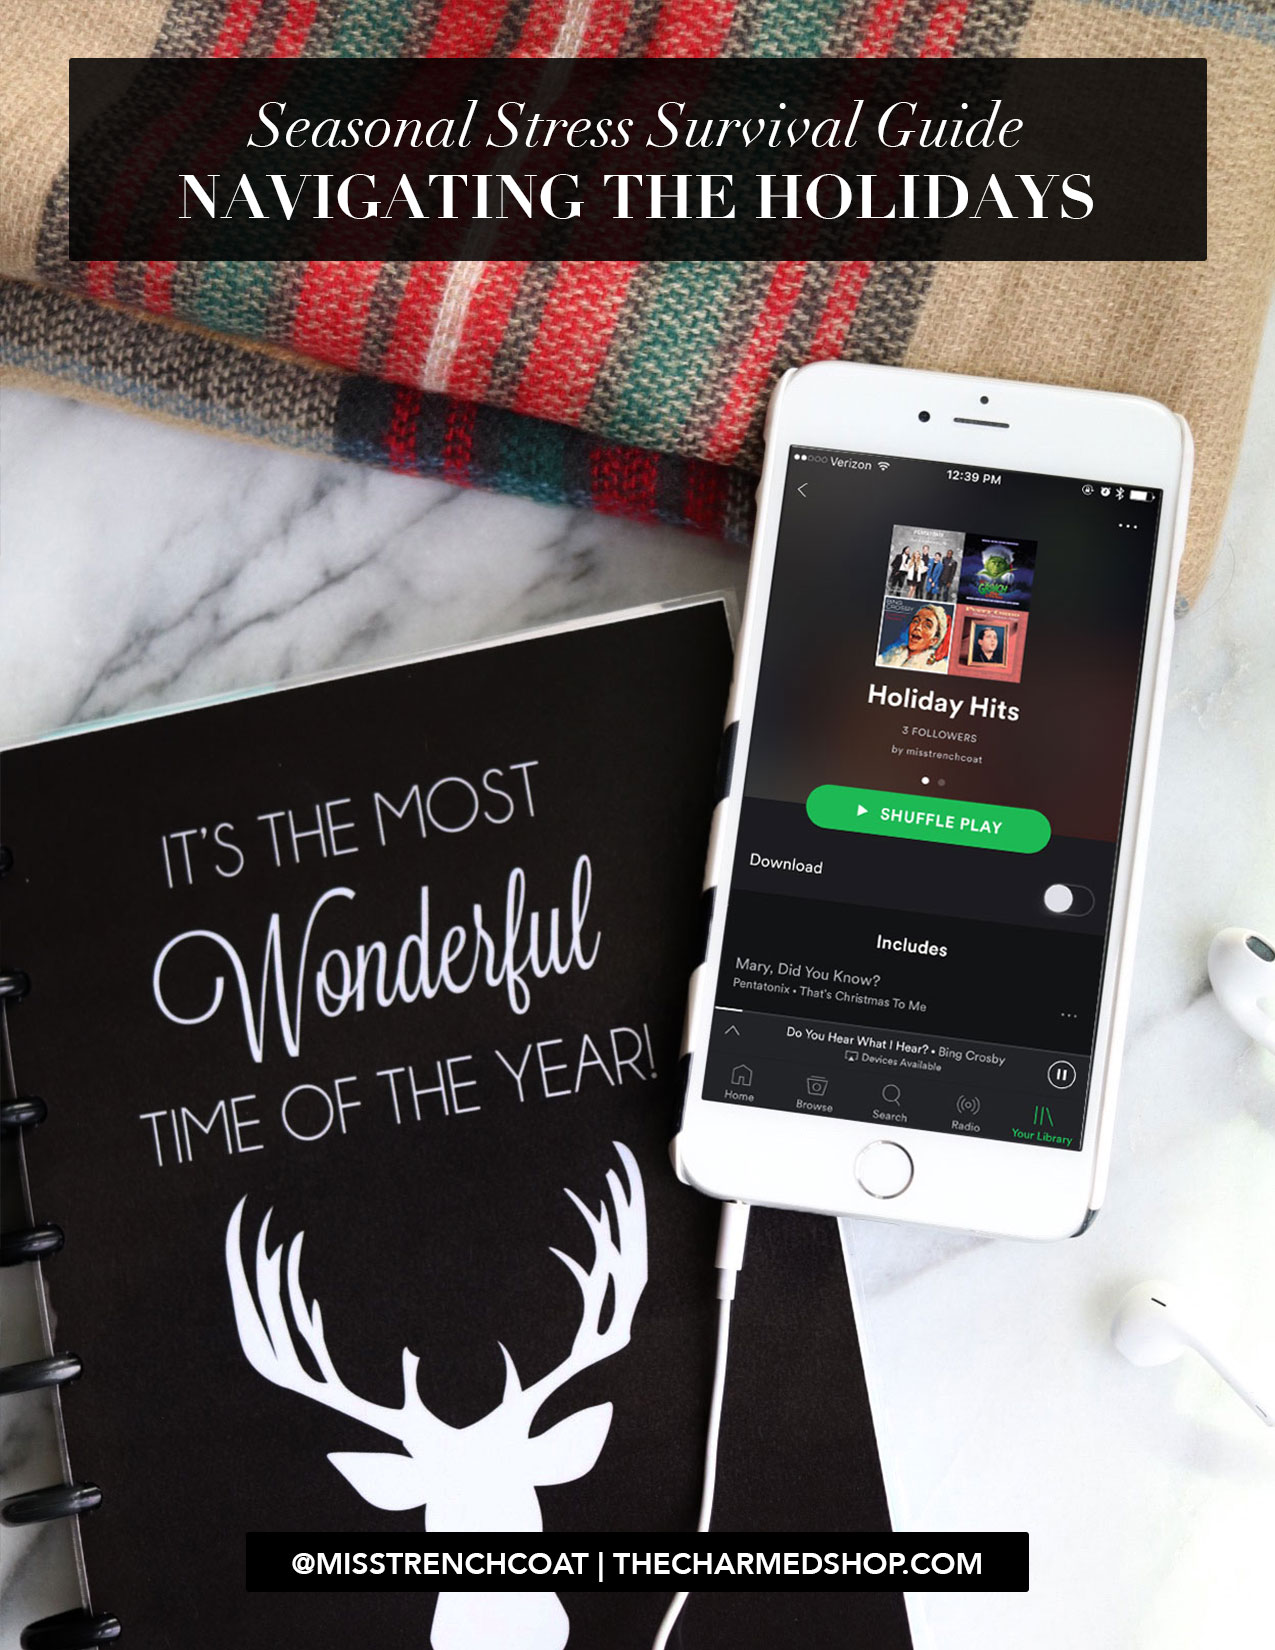
SEASONAL STRESS SURVIVAL GUIDE: Navigating the Holidays with Peace and Balance
It’s November, and as the holiday season unfolds, it’s easy to get swept up in the whirlwind of festivities, responsibilities, and obligations. But fear not, for amidst the chaos, there are strategies to find tranquility and reclaim your peace of mind. Here’s your seasonal stress survival guide, designed to bring calm to the holiday storm.
TIP 1: PRIORITIZE YOUR MENTAL PEACE OF MIND
The key to a serene holiday season lies in managing your mental capacity. Here are three strategies to help increase your mental resilience:
Strategy 1: Meditate for 30 minutes a day!
Meditation is a powerful tool for calming the mind and reducing stress. To get started, check out these meditation apps I recommend: [Top Meditation Apps for Finding Focus]
Strategy 2: Embrace Gratitude
A gratitude journal can transform your perspective. Consider using a weekly gratitude insert for your planner, available here: [Weekly Gratitude List (A5 Sized)]
Strategy 3: Brain Dump Regularly with Your Planner
The holiday season often brings joy and love, but it also invites germs and bacteria. Fortify your immune system with these simple steps:
Strategy 1: Get a Flu or Covid Shot
Consult your doctor about getting a flu or covid booster shot. Many health insurance providers cover it at low or no cost. Stay protected and keep those around you safe.
Speak to your healthcare provider about the right multivitamin for you. A daily multivitamin can fill nutritional gaps and support your overall health. I take a women’s multivitamin plus extra vitamin c each day to keep my immune system strong.
TIP 3: STOCK UP ON SHORTCUTS
Simplify your routine with these time-saving strategies:
Stay active with a quick high-intensity interval training (HIIT) workout. Here’s a routine to get you started: [HIIT Workout]
Strategy 3: Invest in Time-Saving Cleaning Tools
Efficient cleaning tools like a robo vacuum [Amazon Link] and a Swiffer Sweeper [Amazon Link] can lighten your cleaning workload. Plus, save money on Swiffer refills by using paper towel squares for quick cleanups.
By prioritizing your mental well-being, bolstering your immune system, and embracing shortcuts, you can navigate the holiday season with ease. Remember, amidst the hustle and bustle, your peace of mind is invaluable. Wishing you a stress-free and serene holiday season!
Warmly,
Founder, Strange & Charmed 🍂✨
P.S. If you’re looking for more support in living your best, most organized and successful life, consider joining my inner circle private group coaching community called The Charmed Life Master Mind. Each month we meet for live classes, Q+As and monthly planning sessions, plus you have access to an on-demand resource library with dozens of classes, workbooks, planner inserts and other tools to help you craft the life you want to live. Click here to learn more and enroll today for instant access to all my best content and tools!
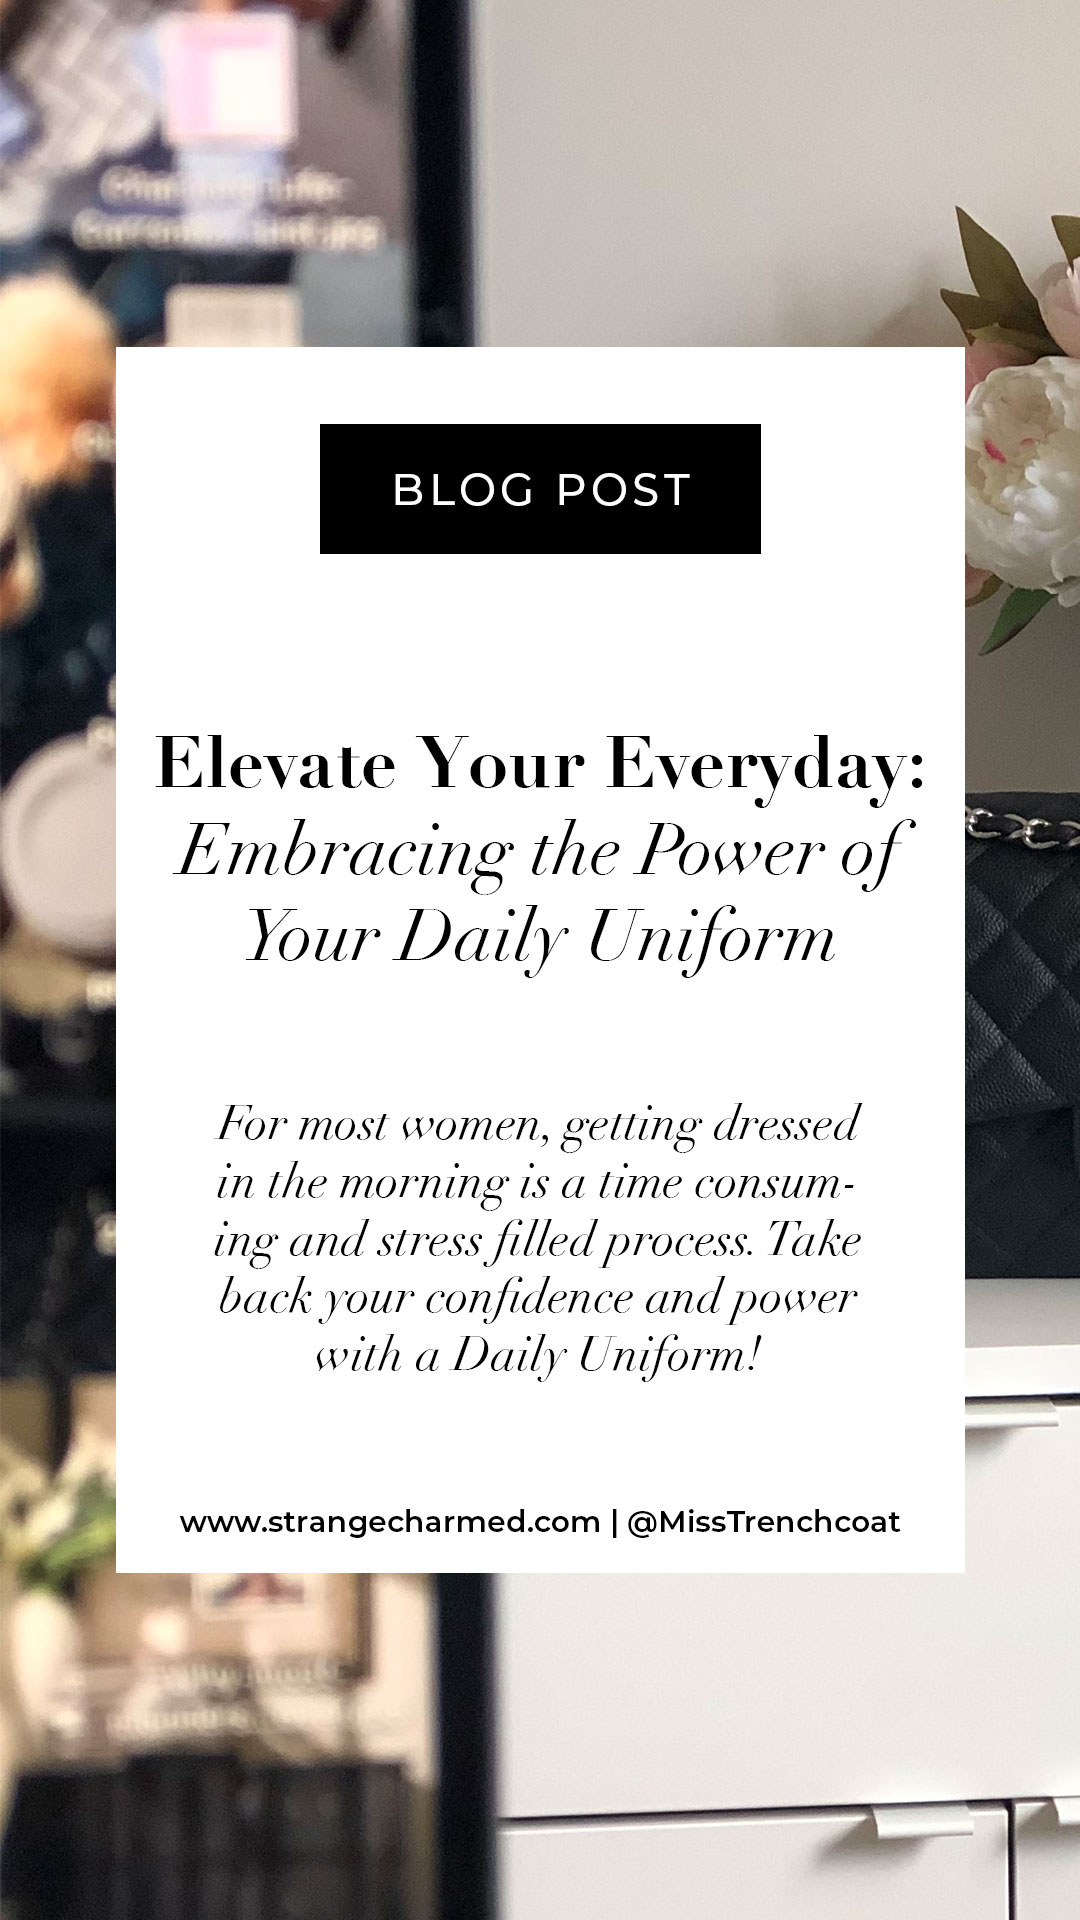
In the hustle and bustle of our daily lives, streamlining our routines can be a game-changer. One area where this simplicity truly shines is in our wardrobes. Enter the concept of the daily uniform or outfit template – a sartorial lifesaver designed to not only save time but also enhance your confidence and style effortlessly.
What is a Daily Uniform?
A daily uniform, or outfit template, is a curated set of clothing that you feel comfortable and confident wearing. It’s not about wearing the same outfit every day but having a consistent style that reflects your personality. By defining your daily uniform, you create a go-to look that aligns with your vibe, making dressing a breeze every morning.
Time-Saving Elegance
One of the primary benefits of having a daily uniform is the gift of time. Imagine waking up, knowing exactly what you’re going to wear without the stress of choosing from a multitude of options. This streamlined approach leaves you with more time for your morning rituals, setting a positive tone for the day.
Confidence in Every Stitch
Your daily uniform becomes an armor of confidence. When you consistently wear outfits that make you feel fantastic, you exude a natural confidence that can transform your entire day. Whether you’re rocking a power suit or embracing the chic simplicity of a dress, your outfit can be a source of strength and self-assurance.
Banishing Decision Fatigue
Every decision we make throughout the day, no matter how trivial, depletes our mental energy. Simplifying your wardrobe choices minimizes decision fatigue, leaving your mind clear and focused for the tasks that truly matter.
Daily Uniform Workwear Ideas
*Now, let’s explore three versatile outfit templates for the empowered working woman:*
Outfit Template 1: Sleek Professionalism
– Bottoms: Classic slacks in neutral shades (black, navy, or gray).
– Top: Crisp blouse paired with a tailored blazer or a cozy cardigan.
– Shoes: Comfortable heels or elegant loafers.
– Accessories: Statement necklace, a quality watch, and a structured handbag.
*Pro Tip:* Play with textures and patterns. A silk blouse can contrast beautifully with a textured blazer, adding depth to your ensemble.
Outfit Template 2: Cozy Elegance
– Bottoms: Fitted skirt (pencil or A-line) in a complementary color.
– Top: Chunky knit sweater in warm hues or neutral tones.
– Shoes: Knee-high boots or ankle booties.
– Accessories: Long pendant necklace, statement earrings, and a chic tote bag.
*Pro Tip:* Experiment with color blocking. Pair a bold, solid-colored sweater with a subtly patterned skirt for a sophisticated look.
Outfit Template 3: Effortless Charm
– Dress: A versatile, well-fitted dress in a style that flatters your body shape.
– Tights: Choose opaque or patterned tights depending on the season and your preference.
– Shoes: Ankle boots, flats, or heels, depending on your comfort.
– Accessories: Minimalistic bracelet, stud earrings, and a crossbody bag.
*Pro Tip:* Embrace monochromatic dressing. Opt for a dress and tights in similar shades to create a chic, elongated silhouette.
By building your wardrobe around these outfit templates, you’re not only saving time but also investing in your confidence and self-expression. Remember, your daily uniform is a canvas; accessorize, play with colors, and have fun expressing your unique style within the template. When you look and feel your best every day, the world becomes your runway.
Here’s to embracing the simplicity of a daily uniform and stepping into every day with poise and style.
With Love and Style,
Founder, Strange & Charmed 🌟
P.S. If you’re looking for more support in living your best, most organized and successful life, consider joining my inner circle private group coaching community called The Charmed Life Master Mind. Each month we meet for live classes, Q+As and monthly planning sessions, plus you have access to an on-demand resource library with dozens of classes, workbooks, planner inserts and other tools to help you craft the life you want to live. Click here to learn more and enroll today for instant access to all my best content and tools!
As the vibrant hues of autumn paint the world around us, nature whispers a profound truth: this is the season of harvest. In the same way trees gracefully shed their leaves, we too can release the burdens of the past and focus on the bountiful harvest of our efforts. The fall season serves as a poignant reminder that life operates in cycles, and now is our time to reap the results of the seeds we sowed in the earlier chapters of the year.
Embracing the Harvest
Consider this moment a pause, a chance to reflect on the journey so far. Every goal achieved, every hurdle overcome, and every lesson learned is a testament to your resilience and determination. Just like a farmer tending to their crops, you have nurtured your dreams and aspirations. Now, it’s time to acknowledge and celebrate the abundance you’ve cultivated.
Letting Go
Much like the trees gracefully release their leaves, it’s time for us to let go of what no longer serves us. Just as nature sheds its weight to prepare for renewal, we too can release the unnecessary expectations and burdens that weigh us down. Acknowledge that it’s okay to let certain things go – whether they are unattainable goals or external pressures. The true essence of autumn lies in surrender, paving the way for new growth in the future.
Prioritizing Your Focus
Autumn teaches us the art of prioritization. Just as nature sheds its leaves but retains its core strength, we too can focus on what truly matters. Take a moment to identify the key areas of your life – your relationships, your passions, your well-being. These are the roots that sustain you. Nurture them. Pour your energy into the people and pursuits that bring you genuine joy and fulfillment.
Finding Balance
In the pursuit of balance, understand that it’s okay to relinquish control over things beyond your reach. Autumn is a season of acceptance, of acknowledging the natural ebb and flow of life. As you release the need for perfection, you create space for serenity. Balance isn’t about doing everything; it’s about doing what matters most with unwavering focus and intention.
Renewal Awaits
As the days grow shorter and the nights longer, remember that within this natural cycle of life lies the promise of renewal. The energy you invest in what truly matters will bear fruit, fostering new growth and opportunities. By embracing the harvest, you not only honor your past efforts but also set the stage for a vibrant, fulfilling future.
Dear friends, as you stand amidst the golden tapestry of autumn, let this season be a gentle reminder that you are enough as you are. Your worth isn’t determined by the unrelenting pursuit of perfection, but by the love you give, the passions you pursue, and the authenticity you embody.
With a heart full of gratitude for the journey we share,
Founder, Strange & Charmed 🍂✨
P.S. If you’re looking for more support in living your best, most organized and successful life, consider joining my inner circle private group coaching community called The Charmed Life Master Mind. Each month we meet for live classes, Q+As and monthly planning sessions, plus you have access to an on-demand resource library with dozens of classes, workbooks, planner inserts and other tools to help you craft the life you want to live. Click here to learn more and enroll today for instant access to all my best content and tools!
As the crisp autumn air settles in, it’s the perfect time to revamp your lunch routine with comforting and nutritious fall-inspired meals. Say goodbye to the same old packed lunches and dive into the delightful world of easy-to-make, delicious fall lunches that will make your workdays brighter. Here are some flavorful and simple fall lunch ideas that you can meal prep, ensuring you savor every bite during your busy workweek.
1. Roasted Harvest Bowl
– Ingredients: Roasted butternut squash, Brussels sprouts, and sweet potatoes, quinoa, mixed greens, pumpkin seeds, cranberries, and a drizzle of balsamic glaze.
– Meal Prep Tip: Roast the veggies and cook the quinoa in advance. Assemble the bowl by layering the ingredients, creating a colorful and hearty lunch option.
2. Apple Pecan Salad
– Ingredients: Mixed greens, sliced apples, candied pecans, crumbled feta cheese, grilled chicken slices (optional), and a tangy apple cider vinaigrette.
– Meal Prep Tip: Wash and chop the greens, and store them separately from the toppings. Assemble the salad in the morning before heading out, ensuring a fresh and crisp meal.
3. Butternut Squash Soup
– Ingredients: Roasted butternut squash, onions, garlic, vegetable broth, a touch of cream, nutmeg, and cinnamon.
– Meal Prep Tip: Prepare a large batch of butternut squash soup over the weekend. Divide it into portions and refrigerate or freeze. Reheat a portion for a comforting and warm fall lunch at work.
4. Turkey and Cranberry Wrap
– Ingredients: Whole wheat wrap, leftover roasted turkey slices, cranberry sauce, spinach leaves, and a sprinkle of goat cheese (optional).
– Meal Prep Tip: Assemble the wraps the night before or in the morning. Wrap them tightly in parchment paper, securing with a rubber band. These wraps are easy to grab and eat on the go.
5. Maple Glazed Salmon Bowl
– Ingredients: Baked or grilled salmon fillet, roasted sweet potatoes, steamed green beans, wild rice, and a drizzle of maple glaze.
– Meal Prep Tip: Cook the salmon and roast the sweet potatoes in advance. Store the components separately and assemble the bowl right before lunch. Drizzle with the maple glaze for a burst of fall flavor.
6. Pumpkin and Sage Pasta
– Ingredients: Whole wheat pasta, roasted pumpkin cubes, fresh sage leaves, Parmesan cheese, a touch of olive oil, salt, and pepper.
– Meal Prep Tip: Cook the pasta and roast the pumpkin in advance. Sauté fresh sage leaves in olive oil just before serving. Toss everything together for a cozy and satisfying fall pasta dish.
7. Veggie and Hummus Wrap
– Ingredients: Whole grain wrap, hummus, cucumber slices, bell pepper strips, cherry tomatoes, red onion slices, and baby spinach.
– Meal Prep Tip: Spread a layer of hummus on the wrap, then add the veggies. Roll tightly and secure with toothpicks. These wraps stay fresh, making them a convenient and healthy option.
8. Autumn Fruit Salad
– Ingredients: Sliced apples, pears, grapes, dried figs, walnuts, a sprinkle of cinnamon, and a drizzle of honey or maple syrup.
– Meal Prep Tip: Slice the fruits and mix them with the other ingredients except for the honey/maple syrup. Pack them in an airtight container. Drizzle honey or maple syrup just before eating for a refreshing and sweet fall dessert-inspired salad.
These fall lunch ideas are not only delectable but also incredibly easy to prepare in advance. Embrace the flavors of fall, and let your lunch break be a delightful pause in your day. With a bit of meal prep, you can enjoy wholesome, homemade meals that fuel your body and warm your soul during the autumn season.
Happy Lunching!
With Warmth and Flavor,
Founder, Strange & Charmed 🍂🍴
P.S. If you’re looking for more support in living your best, most organized and successful life, consider joining my inner circle private group coaching community called The Charmed Life Master Mind. Each month we meet for live classes, Q+As and monthly planning sessions, plus you have access to an on-demand resource library with dozens of classes, workbooks, planner inserts and other tools to help you craft the life you want to live. Click here to learn more and enroll today for instant access to all my best content and tools!
7 Rules to Design Your Desk Setup for Maximum Productivity
How many hours a day do you spend sitting at your desk?
Six hours? Eight hours? Ten hours?
According to a study by the American Heart Association, the average American worker spends 6.4 hours a day sitting at their desk.
With stats like that, it’s more important than ever to have a productive desk setup that allows you to stay focused and get your work done efficiently. Whether you work from home or in an office, having the right tools and a well-organized workspace can make a big difference in your productivity and overall well-being. With that in mind, we’ve put together this guide to share seven essential rules for creating a productive desk setup that will help you stay on top of your game. From ergonomic considerations to organization and lighting, we’ll cover all the bases so you can optimize your workspace for maximum productivity. So if you’re ready to take your productivity to the next level, read on for our top tips and tricks.
Rule #1: Use a large enough desk (hint: your current desk may not be deep enough)
One of the most common issues with desks is that they are often not deep enough. Many standard office desks are only about 24 inches deep, which can be cramped and uncomfortable, especially if you have a lot of equipment or paperwork on your desk. If you find yourself constantly shifting things around or feeling cramped, it may be time to upgrade to a larger desk. But what if you don’t have the budget or space for a traditional office desk? Consider thinking outside the box and repurpose a dining table instead. Dining tables are often deeper than traditional office desks and can provide a more spacious and comfortable workspace. Just make sure to choose a table that is the right height for you and has enough legroom underneath. With a little creativity, you can create a productive and comfortable workspace without breaking the bank.
Rule #2: Ensure your setup us ergonomic
Another crucial factor in creating a productive desk setup is ergonomics. Ergonomics refers to designing your workspace to fit your body, so you can work comfortably and safely. One key element of ergonomic design is the height of your computer screen. Ideally, your screen should be at eye level, so you don’t have to strain your neck to look down or up at it. If your monitor is too low, you can raise it with a monitor stand or even a stack of books. Conversely, if your monitor is too high, you can lower it by adjusting the height of your desk or chair. For laptop users, a laptop stand is a great solution to ensure your screen is at the right height, and it can also help with airflow and prevent overheating. By paying attention to the ergonomics of your desk setup, you can minimize the risk of discomfort, injury, and eye strain, all of which can hamper productivity and even lead to long-term health problems.
Rule #3: Get a good chair
While it’s easy to get caught up in the latest gadgets and accessories, one of the most crucial components of a productive desk setup is a good chair. After all, you’ll be spending a significant amount of time sitting at your desk, and a poorly designed chair can lead to back pain, poor posture, and decreased productivity. When choosing a chair, prioritize comfort and support. Look for a chair with adjustable seat height, lumbar support, and armrests. A comfortable chair can help you maintain good posture, reduce stress on your back and neck, and prevent fatigue. Don’t skimp on your chair budget, as investing in a high-quality, ergonomic chair can pay off in the long run with increased comfort and productivity.
Rule #4: Make your desk a vibe
Your desk is not just a functional space; it can also be a reflection of your personality and a source of inspiration. By incorporating elements that reflect your style and energy, you can create a workspace that inspires creativity and productivity. Whether it’s a favorite plant, a motivational quote, or a cherished family photo, personalizing your desk can help create a positive and productive atmosphere. Adding a pop of color with a fun desk accessory or incorporating natural elements like a stone paperweight can also help make your workspace feel more inviting. By making your desk a vibe, you can turn a mundane workspace into a space that energizes and inspires you.
Rule #5: Use headphones to minimize distractions
Distractions are one of the biggest productivity killers in any workspace, and this is especially true in today’s open-plan offices and remote work environments. To minimize distractions and stay focused, invest in a good pair of noise-canceling headphones. These headphones can help block out background noise, whether it’s the chatter of your colleagues or the sounds of traffic outside your window. Not only can they help you concentrate, but they can also serve as a subtle signal to others that you are in the zone and should not be disturbed. If you need to listen to music or podcasts to stay focused, be mindful of the volume and choose music that won’t distract you from your work. By using headphones strategically, you can create a quieter, more productive workspace that supports your workflow.
Rule #6: Keep your desk clear with proper storage
A cluttered desk can be a major source of stress and distraction, so it’s important to have adequate storage to keep your workspace organized and tidy. Proper storage can also help you access the tools and resources you need quickly, saving you time and increasing your productivity. There are many storage options to consider, from under-desk cabinets to freestanding bookcases or credenzas. When thinking about storage, consider both horizontal and vertical space. You can use shelves or cubbies to store books, binders, and files, and use drawers or cabinets to keep smaller items out of sight. Utilizing under-desk storage, such as rolling filing cabinets, can also be a great way to maximize space and keep your desk clear. By keeping your desk clear with proper storage, you can reduce stress and distractions and create a more efficient workspace.
Rule #7: Use proper lighting
Proper lighting is essential for any workspace, as it can affect your mood, energy, and even your physical health. Poor lighting can cause eye strain, headaches, and fatigue, all of which can hamper your productivity. To optimize your workspace lighting, consider using daylight bulbs in your overhead lights and desk lamps. Daylight bulbs mimic natural light and can help reduce eye strain, improve your mood, and increase alertness. Additionally, be mindful of the placement of your lighting to avoid glare or shadows on your workspace. If you’re working in a space without access to natural light, consider investing in a light therapy lamp, which can help regulate your sleep cycle and improve your mood. By using proper lighting in your workspace, you can create a comfortable, healthy environment that supports your productivity.
Creating a productive desk setup is key to optimizing your workday and achieving your goals. By following these seven rules, including using a large enough desk, prioritizing ergonomic comfort, personalizing your workspace, minimizing distractions, keeping your desk clear with proper storage, and using proper lighting, you can create a workspace that supports your productivity, creativity, and well-being. Remember, your workspace should be tailored to your unique needs and preferences, so don’t be afraid to experiment and make adjustments until you find the setup that works best for you. With a little planning and effort, you can transform your workspace into a productive and inspiring environment that helps you achieve your goals and reach your full potential.
Just a heads up- this post is a significant departure from my usual content, but in an effort to create more content that truly brings me joy and also answers some frequently asked questions I thought I’d give it a go!
If you didn’t know, Sephora is currently holding one of their biggest sales of the year, which is a big deal because Sephora doesn’t usually have sales or offer discounts. If you are a makeup and skincare lover like me who drops a pretty penny every year on products from Sephora, you can appreciate how important it is to plan for and take advantage of a sale like this.
To be clear, the sale officially started on Friday April 26th and ends on May 6th, but was open first to Sephora VIB Rouge members, of which I am included. VIB Rouge (use code HEYROUGE) means that you spend something like $1000 or more a year in Sephora- which I absolutely do, mostly on high end skincare which can quickly add up. So, being VIB Rouge means you shop the sale first and you get the biggest discount- 20%… I’ll take it!
For those who are the standard VIB level, meaning you spend $350 a year in the store or online, the sale starts on May 2nd and ends on the 6th and this level gets 15% off with the code HEYVIB. Finally, the standard Beauty Insider level which is everyone who signs up gets 10% with the code HEYINSIDER and their sale dates are the same as VIB level.
Now, in case you have seen many, many blog, instagram and youtube posts about the Sephora sale with influencers sharing their picks and wishlist, let me explain to you why. This sale, along with the Nordstrom anniversary sale that happens during the summer are probably the biggest and most profitable periods for influencers that use affiliate marketing. Meaning, they share their picks with affiliate links and if you click on them and make a purchase, they get a cut of the sale. Now, I’m sure some people find this highly annoying, but it’s honestly a pretty fair system. When people shop online they don’t have the benefit of speaking to salespeople in store and so the influencer then becomes the salesperson, giving you recommendations and sharing their experiences with products. For their effort, they make a commission on the sale that might normally go to a sales person had you shopped in store. And, honestly, the commission isn’t as amazing as you might expect- depending on the affiliate marketing program an influencer belongs to, the commission could be something like 3%-15%. So, most influencers aren’t bringing home a full paycheck from an event like this, but would be luck to make enough commission to cover their own purchase.
Of course, I too belong to a few affiliate networks and although I don’t normally share these sorts of lifestyle picks, I do get a lot of questions about the makeup and skincare I use, so I thought I would let you all know what I purchased during the sale (I ordered on Friday morning and have already received my order) and also provide a few suggestions for products I didn’t need to purchase but would have if I was running low! Just fair warning, I am going to supply you with affiliate links and I do appreciate if you use them since it doesn’t cost you anything and it gives me credit for suggesting a product. Thanks in advance for helping me support my skincare habit!
So before I list out my purchases and suggestions, I want to let you know a little about my skin because I absolutely believe that all products do not work for all skin types and it’s important to use suggestions from people who have a similar skin type as you if you want to see similar results. I have very dry skin, it’s not super sensitive but it can be if I use too many harsh chemicals or exfoliants. I don’t get acne per se, but I do breakout hormonally around my chin mostly. I don’t have much in the way of blackheads or enlarged pores because I have dry skin, but I would categorize my breakouts as nodular (google it if you aren’t familiar) as opposed to white heads, papules or pustules (I felt gross typing that last one lol). My main skincare goals are to prevent and reduce fine lines and wrinkles, to lighten hyperpigmentation, and to brighten and even my skin complexion overall. And I certainly have found some great products that help me achieve those goals!
Facial essence waters are kind of a new thing in beauty and skincare that was introduced with the popularity of asian skincare products. You might think something like this is unnecessary or waste of money, but it’s soo good and absolutely necessary which is why I bought a new bottle during the sale even though I still have a bit of this left in my existing bottle. You use this essence water after you wash and tone by pouring a small amount in your hand and rubbing it into your skin. Since you don’t use a lot this actually last a very long time and the affects are significant. This essence softens your skin like nothing I’ve ever experienced. Literally, my skin feels as soft as a new born baby when I use this and it helps your serums you apply after it sink in and work even better. If you are familiar with the SKII facial essence water, this product is very similar, except its less expensive and I think it works better!
Since I am something of a higher end skincare lover, I tend to cycle through a number of different serums, but this serum is one I often come back to. I haven’t used this in maybe a year since my last bottle ran out, but I’ve gone through several bottles over the last few years and love it. Remember I said my skincare goals were to get rid of hyperpigmentation and brighten my complexion- this does it! It also helps me clear up breakouts as well and is not filled with harsh chemicals so I can use it night over night without having to take a break from it because it doesn’t irritate my skin. I tend to use this serum only at night, although, it can be used during the day as well. I just have other serums I prefer to use during the day!
So this happens to be one of the new items I picked up during the sale that I really wanted to try out. I’ve never used it before but I’ve tried other things from this line and it comes highly recommended. Again, this is a radiance serum, but Farsali serums double as makeup primers and that is how I intend to use this product, as a serum/primer before makeup because I have dry skin. Now, Farsali is a brand I don’t think gets enough hype overall- they have a product called Skintune Blur which I kid you not, makes your skin look like an instagram filter in real life. Now, although that is always a great look, I don’t feel like I need that product because I don’t have enlarged pores. But, if you do, you might want to try Skintune Blur instead of this Liquid Glass. For me, I am beginning to understand more and more than I actually have pretty good skin overall and that although the matte makeup look is very in right now, I actually prefer a dewier makeup look, especially for spring and summer- and that is the concept of the Liquid Glass look!
As part of my nightly skincare regime, I like to use a very moisturizing lip balm and after searching through reviews on Sephora I have decided to try this one. Again, never used it before, but the reviews are great and it’s pretty affordable. In the past I have used the Dior Creme de Rose balm which I believe is now discontinued, and I’ve also gone through a few tubes of the YSL Volupte Liquid Color Balm in the Night Rehab Mask which is okay but pricey. Now, it might seem like an extra step to put on lip balm before bed, but I assure you, if you are someone who enjoys a full lip look, this is important. I don’t have the biggest or fullest lips naturally, but I’m also not at all interested in lip fillers. Instead, I use a natural lip care process including regular exfoliation and lots of thick lip balm at night to keep my lips as plump as possible. I find that this process actually helps to make lips look bigger and more even, and in turn makes it easier for me to enhance my lips with lip liners and lipsticks. In fact, my own mother accused me of getting lip fillers recently while we were face timing, and I had to give her a side view of my mouth to show her that they weren’t filled (you can always tell from the side view), they just appeared fuller from the front because I keep them plump with moisturizers. So, I recommend a night balm and I look forward to using this new one as part of my lip routine.
As I mentioned earlier, I also want to include a few items I would have purchased if I was running low but didn’t need right now. These are more favorites that I highly recommend!
I am not the biggest collector of eyeshadow palettes, mostly because I have naturally gorgeous olive green eyes that I don’t want to overshadow (pun intended) with colorful eye makeup. So, I tend to keep my eye makeup simple and natural, and this little palette from Natasha Denona is absolutely one of the best things I have ever bought from Sephora. It is pricey for the amount of shadows you get, but the quality of the shadows and the pigmentation and blend-ability are so good, it’s worth it for me. I can do a stunning shadow look that compliments my eyes in what feels like seconds with this palette and I love that the colors are so straight forward that I don’t need to sit and think about what eye look I am going to do because the colors are just exactly what I need. The only eye shadow palettes I like even more than this are from Chanel and they are even more expensive, of course! Now that I think about it, this is the only eyeshadow palette from Sephora that I currently own. Everything else is Chanel or drugstore brands- I think that’s signifiant!
So this cream is very necessary if you are someone with very dry skin. It’s a complete skin rescue and protectant. Sometimes I use this as my daily moisturizer, especially during winter, but usually I use it as necessary to fight off dry patches on my skin or deal with a chemical burn or irritation that can occur when I use too many hard products.
This product is another of my favorite primers. I am really into primers if you couldn’t tell! I think some people overlook primers because they think they don’t do much for your skin but in my opinion, as someone with dry skin, they really go a long way to provide extra moisture and a layer of protection between your skin and the chemicals in makeup that I really would prefer not to absorb. And again, I like to try out a lot of primers, but there are only a few I come back to. For example, earlier this year I bought the Tatcha Silk Canvas primer because I love my Tatcha products, and although it is a great primer, I didn’t like how it mattified my skin. It’s a great option for those with oily skin who want that Facetune blur affect, but for someone like me with dry skin, this vitamin face base is much more moisturizing and keeps my skin dewey.
Like I mentioned, hyperpigmentation is one of my skin issues and so I have tried a number of didn’t chemical resurfacing serums and creams to even my skin tone, but this one is probably the best, especially for long term use. I firmly believe I see a difference using this serum overnight, that’s how good it is, and although I know I could use it every night, I don’t find that I truly need to. Usually, I will just use it for a few days if I have a break out and my skin tone evens out. Now, they don’t claim that this serum works for fine lines, but I think it does- I mean, it is a chemical resurfacing serum so it exfoliates the skin which means hyperpigmentation and fine lines should both be reduced and I think it does both for me. Again, this is another one of the more pricy skin care favorites of mine, but I will say a bottle lasts me at least a year so it is a good investment for my skin in my opinion.
Well, that is everything I wanted to share with you in case you are interested in shopping the Sephora sale. I realize this was mostly skincare, but that is usually what I buy from Sephora. Although I certainly love high end makeup, I actually find that when I have my skin in order, great products from the drugstore look just as good as the best makeup money can buy.
I hope you found this post helpful and again, if you are interested in shopping the sale online and learned about a new product you might want to try, I’d appreciate if you use my links to give me credit! Also- I’d love to hear about what products from Sephora you may be picking up during the sale or recommendations for other products you love that I might need to check out, so leave me a comment below!
Lately, I’ve been getting many questions from my community about sharing an updated home office tour. Although I do have this video on my “to film” list, to be completely transparent, the reason I have NOT filmed that video yet is because I’m not happy with my set up right now. Since my move last summer, I’ve been managing in my new larger home office with the furniture I had previously used, but I really want to upgrade a few things to make up for the increase in space. The image above is essentially my office- or at least half of it. The other half is pretty much empty except for a vintage storage unit that I refinished a few weeks back.
Remember, my home office went from about 70 square feet to 200 square feet, and the orientation of the room has also changed, but for now I am making due with what I have. I know I need a larger desk, for example because my current desk, while very pretty, is just too small for the room and for my needs. I have my feelers out for a larger, more antique or vintage style piece that would be more of a focal point in the room. I would love to buy something second hand and refinish it as I did the hutch unit, but, as with vintage pieces, nothing happens overnight.
Now, I do still get quite a few questions about my existing furniture, so I am going to link down below my last home office tour. Pretty much everything I use is the same from this last video so if you are looking for my desk or my credenza- this video will show you a closer look and give you some details where you can find them!
I hope that this helps those of you looking for answers, for now! I do intend to one day film a full office tour, but not until I feel pleased with the room, which I am sure you can all understand!
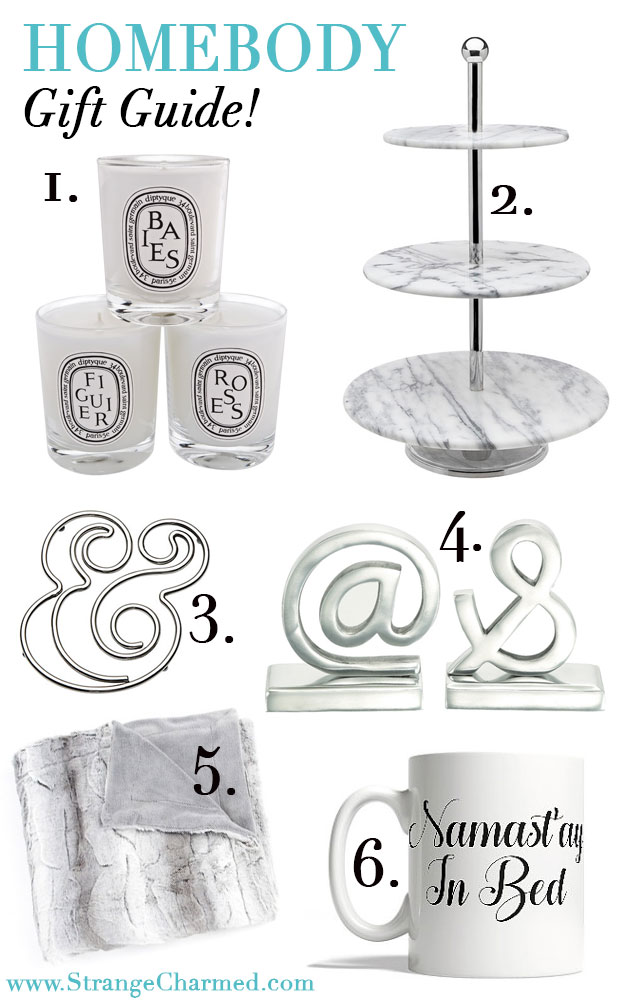
Hello My Charmed Ones! Welcome to The Strange & Charmed 2016 Holiday Gift Guide!
The Most Wonderful Time of Year is Almost Upon Us! So, I thought this would be the perfect time to do a short series of gift guides before Black Friday and the holiday rush begins. Of course, since this is a Strange & Charmed Gift Guide, my choices for 2016 will be themed into categories that pertain to my readers. The first Gift Guide is themed for the Planner Addict in your life. Whether that be you or a friend! The second Gift Guide is themed for your Business Bestie. This may be a fellow #LadyBoss or co-worker that you want to spoil this year! The third and final Gift Guide is themed for the Homebody. This could be someone who loves home decor and entertaining, or a book lover who prefers to stay in on a cold winter’s night to relax and enjoy the comforts of home. Of course, with all three of these gift guides for 2016, I will include links at the bottom of the post where you can check out these items, start making your 2016 holiday gift list and get to shopping. So, I hope you’re excited for this series!
I hope this Holiday Gift Guide gives you some great inspiration for the Homebody in your life! Feel free to leave your gift suggestions for decorista’s down below to add to the holiday gift giving goodness!