
Before you begin printing your planners or inserts, please read these directions in their entirety so you understand the process.
For best printing results, I recommend using Adobe Acrobat Reader, a free PDF viewer application that is what I will be using for the purposes of this tutorial.
DIRECTIONS FOR DUPLEX PRINTERS (PRINTERS THAT PRINT DOUBLE SIDED AUTOMATICALLY)
Open your PDF in Adobe Acrobat Reader and press the Print Icon or navigate to File > Print on the menu bar.
A box should pop up on your screen with print settings.
Set your Print Rage for the pages you want to print. If printing the full document, you can skip this step, but if you only want to print a certain number of pages, set your print range to the first odd numbered page you want to print and the last even numbered page you want to print. When using print ranges, I recommend printing odd to even, for example page 1-12.
Next, set your Page Sizing & Handling. For ALL Personal Size inserts, select the “Actual Size” option. For A5/Half Letter Inserts, choose “Fit” unless the inserts have a visible cut guide line down the center of the page. If they have the guide, select “Actual Size”.
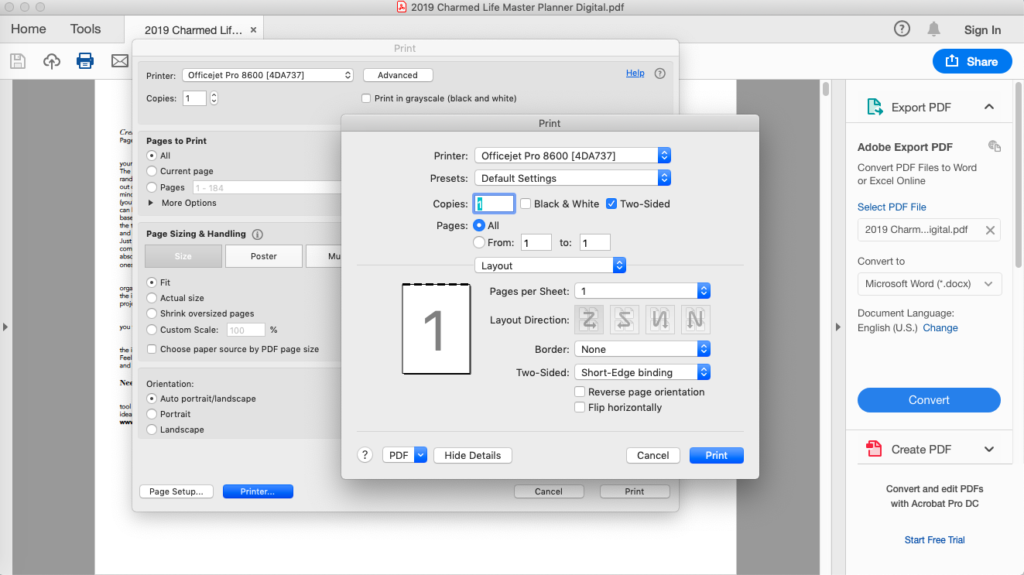
Next, press the Printer button at the bottom of the box, and a second box should appear. Here you will want to select two-sided printing and from the drop down menu at the center of the box, select Layout. Here change the Two-Sided open to “Short Edge Binding.” (Unless, you are using an older insert design from the shop in which the pages of the PDF flip as you scroll through them. If this is the case, choose “Long Edge Binding”.)
See image below for how your print settings should look, before you select Print. (Keep in mind, you may use a few variations on these settings as explained above).
DIRECTIONS FOR STANDARD PRINTERS (THAT DO NOT PRINT DOUBLE SIDED)
To begin, we are going to print a test section of your inserts so ensure this process works with your printer without you wasting paper unnecessarily.
Once your document is open in Adobe Acrobat Reader, press the Print Icon or navigate to File > Print in the menu.
A box should pop up on your screen with print settings.
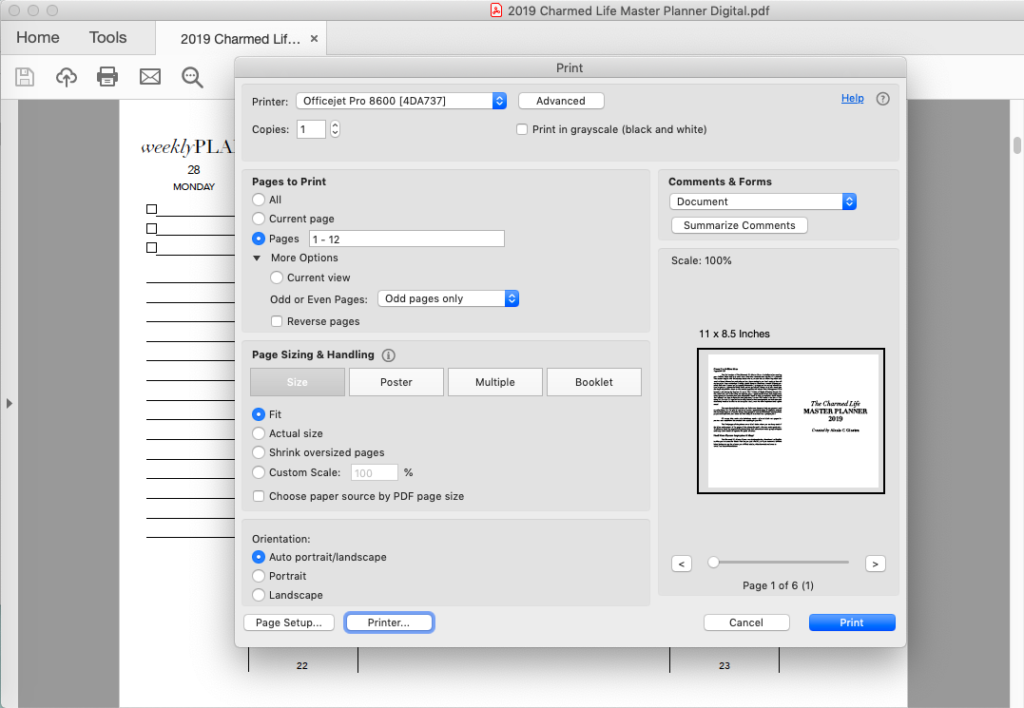
Under the section Pages to Print, we are going to select a test print range first, so select the option Pages, and in the open box type in 1-12.
Open the “More Options” Panel and next to Odd or Even Pages, select “Odd Pages Only”.
Next, set your Page Sizing & Handling. For ALL Personal Size inserts, select the “Actual Size” option. For A5/Half Letter Inserts, choose “Fit” unless the inserts have a visible cut guide line down the center of the page. If they have the guide, select “Actual Size”.
See image below for how your print settings should look, before you select Print. (Keep in mind, you may use a few variations on these settings as explained above).
Once the 6 test pages have printed out, reinsert the pages back into your print tray at the proper orientation so that the even numbered pages can be printed on the back of them. Since different printers have different paper trays, I cannot tell you exactly how to place your printed pages, but if you do not know, I recommend putting some mark on a blank paper in your print tray and doing a test print to understand how your paper feeds into your printer.
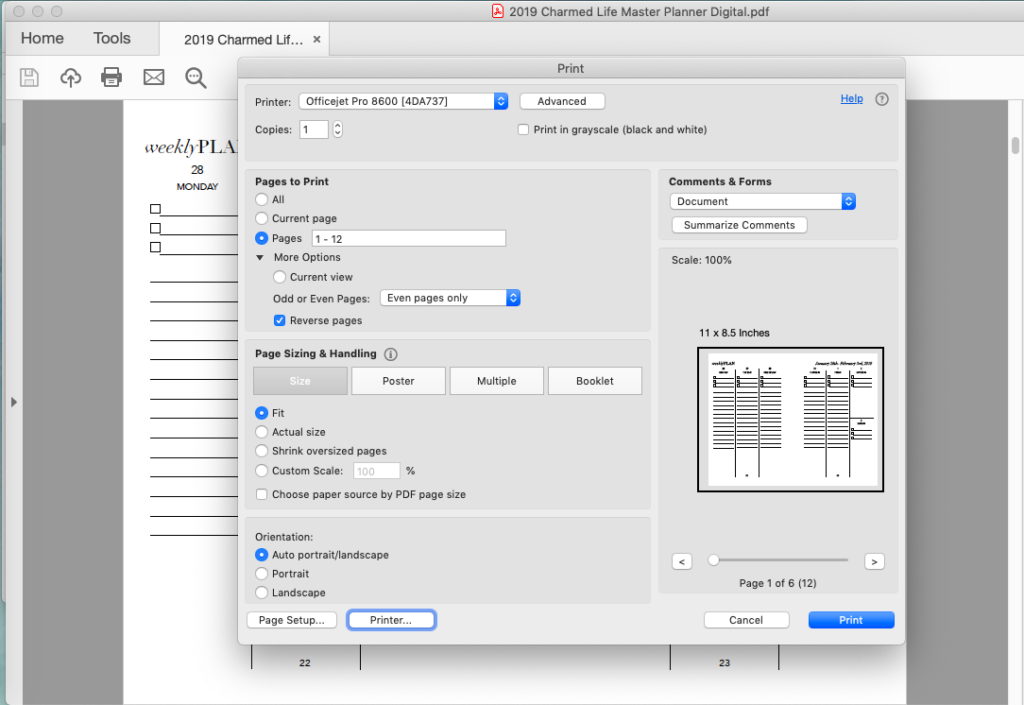
With the paper reinserted into the tray, return to the Adobe Acrobat Reader Print Settings and change the Odd or Even Pages option to “Even Pages Only.”
Next, check the box that says “Reverse Pages”.
See image below for how your print settings should look, before you select Print. (Keep in mind, you may use a few variations on these settings as explained above).
Now, you can easily check to see if the pages printed properly by checking the printed pages against the document. If Page 1 and Page 2 of the document are front and back of one of your printed pages, the order is correct.
Now all you need to do is cut the pages in half with a paper trimmer (for A5/Half Letter Inserts) or trim them according to their cut marks (for Personal Size) and put them in order before punching them to fit your binder system of choice. Some inserts from the shop are numbered which should make ordering easier, others that are dated may be a bit trickier but as long as you follow the dates you should be able to order the pages properly. Finally, some inserts are neither numbered nor dated, so you can arrange them as you see fit!
If this test printed properly, then you can print the rest of your document or the rest of the range you wish to print at one time. Remember to make sure you choose a print range that starts with an odd number page and ends with an even number page for best results.
If you have any additional questions or issues with your printing, please take a picture of your issue and email me at alexis@strangecharmed.com and I will be more than happy to help you!