
As you may already know, back in July I purchased my first DSLR camera, then of course, being the internet loving, tech savvy chic I am, I went straight to the internet to learn everything I could about photography! Now, to be completely honest, although I had never owned a DSLR before, I did know quite a bit about photography from studying the subject in college as part of my Art History major and just being a general photography geek for years. But, being a photography geek with a new DSLR, I just had to immerse myself with as much information as possible, and let me tell you, it was like being swallowed whole by a leviathan! There is a lot of information out there on the web about photography, and it ain’t all pretty. Worst of all, there isn’t much out there geared towards helping bloggers or even Instagram enthusiast take better pictures. So, being a blogger, such as I am, I thought to myself that it may be helpful if I actually went ahead and shared the information I learned with my readers.
So, the first topic I want to tackle is my all time favorite photography subject: Bokeh!
What is Bokeh?
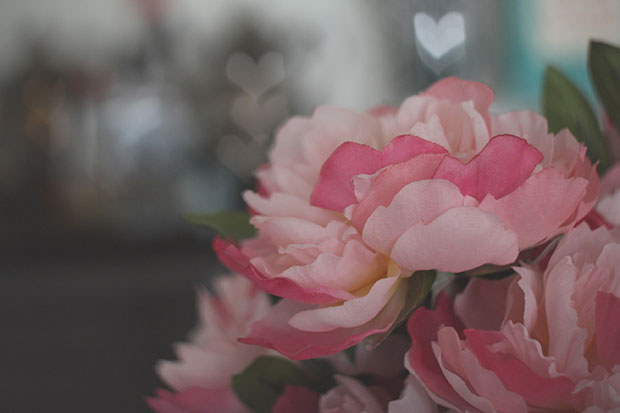
It’s just a term used in photography to describe the quality of the out of focus elements of a picture. Literally, it comes from the Japanese word ‘boke’, which means ‘blur’ or ‘haze’. If you have ever seen a picture with those little balls of light in the background, that is like the epitome of the word, but bokeh is so much more than great balls of light! So, if you would like to learn more about bokeh and how to achieve this affect in your own photography, you are in luck because this is going to be a fun little post!
Bokeh is All About Controlling Depth of Field
In order to get a good bokeh effect in your images (yes, there is good and bad bokeh, but we will discuss the difference later) you have to understand one of the major principles of photography, which is depth of field. Depth of field is the distance between the nearest and furthest objects in a scene that appear in focus. You can control depth of field three ways.
- Aperture: Apertures of 3.5 or greater (3.5-1.2) normally create desirable blur
- Focal Length: A 50mm lens is often considered a standard, but you can make do with other focal lengths thanks to the third point
- Distance between the camera and subject (and the subject and the background): You can adjust your focal length by stepping closer to or further from your subject. This will help to create a shallow depth of field, but you should also consider the distance between the subject and the foreground or background that you want out of focus. This is less important when using a DSLR with a good lens, but more important if you have a point and shoot!
Don’t Forget Composition and Light!
The composition of your image is very important when it comes to creating good bokeh. Remember, bokeh refers to the quality of the out of focus elements of the image and to a greater extent, how they interact with the in-focus elements. You may think your background doesn’t matter because it will be blurred out, but things like bright colors, lines or patterns in your background can be distracting even with a blur. The subject is always an important part of any image, and a distracting or overwhelming background can detract from your subject and create a mismatch between subject and background, thus resulting in bad bokeh! Try to think of your blurred background as a way of directing the viewer’s eye towards the subject and in turn, pointing the viewer’s eye from the subject back to the lovely blurred, bokehfull background!
And you also can’t forget the light! When it comes to creating great bokeh and especially bokeh balls, you need light in your image reflecting from your background. It’s a popular tactic in photography to use strings of fairy lights in the background of dark images to create an obvious bokeh ball effect, but you can still get great bokeh balls in broad daylight, as long as there is enough light bouncing off objects in the foreground and/or background of your subject. This is why thinking about your composition will help you find a great shot and create an image with awesome bokeh!
No DSLR, No Problem!
But what if you don’t have a DSLR? Well, good news! Although point and shoot camera’s don’t give you anywhere near the amount of control a DSLR does, they still have a few features you can use to control the depth of field! Many point and shoots come with various modes for shooting that can help you achieve a bokeh effect. Portrait modes are normally good for this because they expect for there to be a single object or person in focus and then, to help the subject stand out, the background is blurred. You may have to do some work adjusting your distance from the subject and the subject’s distance from other objects in the foreground or background of the scene, but portrait modes are generally a good place to start when trying to get bokeh from a point and shoot. A second feature of a point and shoot you can try is the toy camera or miniature effect. Canon point and shoots are notorious for having this setting, which basically blurs the top and bottom of the image for you, so that only the center plane horizontally is in-focus. This is like an instant bokeh helper because the camera goes ahead and adds a blur for you. A final trick you can try with your point and shoot is to shoot in macro mode. Macro mode is normally used when you are getting very close up to a subject and want to focus on detail, but it can also be used on a point and shoot to help you blur your background. Try taking shots with your macro option turned on and off and see what sort of difference it makes!
Software and Apps
Now, sometimes it just isn’t possible to get a nice natural bokeh effect from your camera. Either because you don’t have a DSLR with the proper lens to pull off the shot, or because you are working with a point and shoot or smartphone camera that just doesn’t allow you the control you need. So, the only way to get that awesome bokeh affect in your image is through software or apps!
Photoshop is probably the most popular way that even pro photographers edit and post process their images. But you don’t have to be a pro to own the application, and in fact, many photo and design enthusiasts already own this software. So, how can you use Photoshop to help you add bokeh to your photographs? Simple, go ahead and import the desired photo into the program. Use the Quick Selection tool to select the elements in your image that you would like to be out of focus and add a Lens Blur! Lens Blur is the preferred blur to use in Photoshop if you’re looking for a bokeh effect because it mimics the characteristics of a camera lens when creating the blur, so it seems more natural on the photo. You may also want to bump up the levels or brightness of the background as well before you add your lens blur so that you have more light to work with in your image.
For iPhone users, there is a great app that I often use to help me create the illusion of depth of field on my iPhone pics, and that is Big Lens. It’s basically a DSLR app for your iPhone that gives you the ability to select an area of your image to be in focus and then add a blur to the rest of the image. You can control settings like aperture, filter and lens to help you create an image that appears to have been taken with a DSLR!
Now, if big blurry bokeh balls are what you’re after, there are quiet a few apps available that allow you the control to add your own to an image, however, I like the app Bokehful. With this app you can load a photo and add custom colored bokeh balls to an image. One word of caution, however, if you want to go this route of adding artificial bokeh balls, is to make sure the image you are using has some bright spots and out of focus areas to begin with and then add the bokeh balls to those areas. If you don’t you will just be adding balls of fake light to your image and it will be extremely obvious (trust me, I made this mistake a lot in the early days of Instagram)! So, bokehful is definitely an app I would use as a final touch after you brighten up an image and then blur out sections with Big Lens.
Other Bokehlicious Effects
You have probably seen quite a few photos on Instagram and Tumbler where the bokeh balls aren’t actually balls, but hearts, stars or some other shape. Ever wonder how that effect is created? Well, there are two ways to add custom bokeh shapes to your images. The first is by using a custom template to cover your camera’s lens to adjust the shape of your camera’s aperture as it takes pictures. I actually found a great video on this topic on YouTube that also includes a link to some free templates you can download and make at home. Or, if you would prefer to purchase a complete die cut kit, you can purchase one here. It’s actually quite a fun little DIY for any DSLR owner, and you can create some fun and interesting portraits and even landscape photos using different designs and shapes for your bokeh!
The second, and probably easiest way to create these custom bokeh shapes is through an app! Again, Bokehful and Big Lens both give you options to adjust the shape of your bokeh, as do many other photo filter and lighting effects apps. You may already have such an app in your collection, or you could check out the apps I suggest!
I hope this has been a helpful and informational post for any bloggers or Instagram addicts out there who are as in love with bokeh as I am! If it was, please go ahead and leave me a message on Instagram or send me a Tweet to let me know what you thoughts! Although photography snobs will often say you need a full frame DSLR with a 50mm 1.2 lens to create the best bokeh, the truth is, even the best camera in the world can’t shoot photos on its own. It’s all about the photographer, their creativity and ingenuity in setting up a scene that will produce a beautiful image. So, make do with what you have and get creative. Don’t be afraid to think outside the box when you have a concept for a great pic! Your Instagram followers will thank you for it! So, what other photography topics can I help you tackle? Any burning questions I can help you address to help your photography reach it’s fullest potential? Let me know!
Great tips, I’ve just got a bridge camera and trying to get to grips with aperture etc just now
Lauren
livinginaboxx