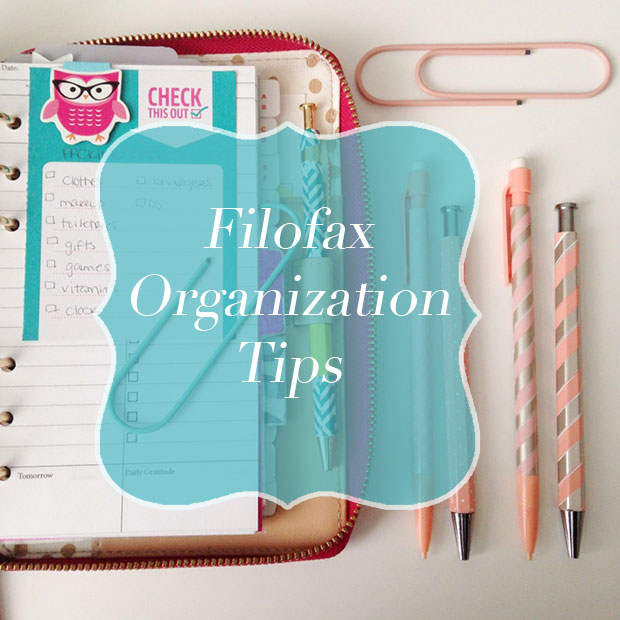
It’s no secret that I have been totally obsessed with Filofax’s for the last few weeks ever since I ordered my Kikki K Planner! In case you haven’t noticed, I call any and all of these 6 ring binder systems “Filofax’s” even though the term Filofax is a specific brand. It just helps me mentally distinguish between these 6 ring binders and other types of bound and spiral planners and agendas available. On top of my large Kikki K binder that is the equivalent to the A5 Filofax size, I also have a personal sized Kate Spade planner as well that has taken on the bulk of my day to day organization. Since I now work out of two Filo’s, I have been amassing different tips and tricks that I have found helpful as a new user. Here are some of the tips I use on a day to day basis to help keep my system organized!
Use old gift cards to easily store lengths of washi tape in the card slots of your Filofax. Simply wrap the tape around the card a few times and you can have a sample of washi with you at all times.
Use A-Z tabs to organize notes by topic for easy access. I do this in my Kate Spade planner and it helps me when filing and referring back to important notes or lists.
Use colored printer paper as scrap paper that will easily stand out against the white and creme of your regular inserts. It’s more affordable than using up Filofax or any other branded note paper.
Use sticky notes or page flags to enter in tentative plans to your calendar before committing to them in ink. This has been a lifesaver for me because my plans change all the time and I hate having to scratch things out.
Mark frequent reoccurring events with color coding dots. I tend to use them in my month on two page view, but you can use them however you see fit!
Tabs and dividers do not have to be arranged down the right side of your binder. Top and even, bottom tabs are also helpful ways to break up your sections and different information.
If you want to keep your work and personal calendars separate, try using more than one calendar style, one for each so everything has a place.
Create your own divided files for any large pockets in your Filofax using notecards or card stock. This will help to keep stickers, coupons, cash and more safety organized and contained.
Using a full sip Filofax as a wallet/planner combo is a great way to minimize the bulk in your bag! My Kate Spade planner is a full zip and sometimes I will run to the store with just my planner and a few cards stashed inside along with any shopping lists or reminders!
Using a multicolor pen can help you color code without having to carry around multiple pens. The Pilot Hi-Tec C Coleto Pens even have pencil inserts.
Use a magnetic paperclip or binder clip to hold together past calendar pages to keep them contained. This also makes it easy to flip to the first clear page.
Wrangle loose or small items in a clear zip lock pocket (usually sold separately).
If you don’t decorate on the go, leave stickers and excess supplies at home. Don’t feel the need to carry around excess stationary just because its pretty.
If you have handwritten notes that you refer back to often, type them up to save space and punch them into your Filofax (you can print smaller than you write).
Archive notes and calendar pages often if you don’t need them with you. You can use a secondary Filofax to store archived pages or even a box.
I hope you have learned something new from some of these tips. Which tips are your favorite and which other tips do you rely on to keep your Filofax planner system organized? Please feel free to share them in the comments below!
True story– for the past week, I have not been feeling too hot. I’ve been hit with a wave of migraines out of left field and it has me feeling pretty down. So, what’s a girl to do? Well, for me the answer is turn my frown upside down and do whatever I can to make myself feel fabulous! So, I gave it some thought and decided on a few things that I can do to make myself feel like a million bucks. Here is my list, short and sweet!
1. Get dolled up: Sometimes just the act of doing my hair and makeup and putting on a nice outfit makes me feel fabulous because I look fabulous.
2. Wear a fashionable turban: I am completely sure that turban style head wraps are the most fabulous accessory a woman can wear (think Greta Garbo or Elizabeth Taylor). To me it screams old hollywood, full on globetrotting glamour and worldly elegance.
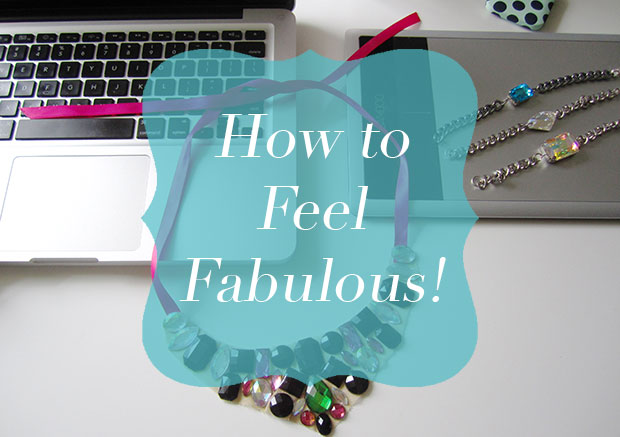
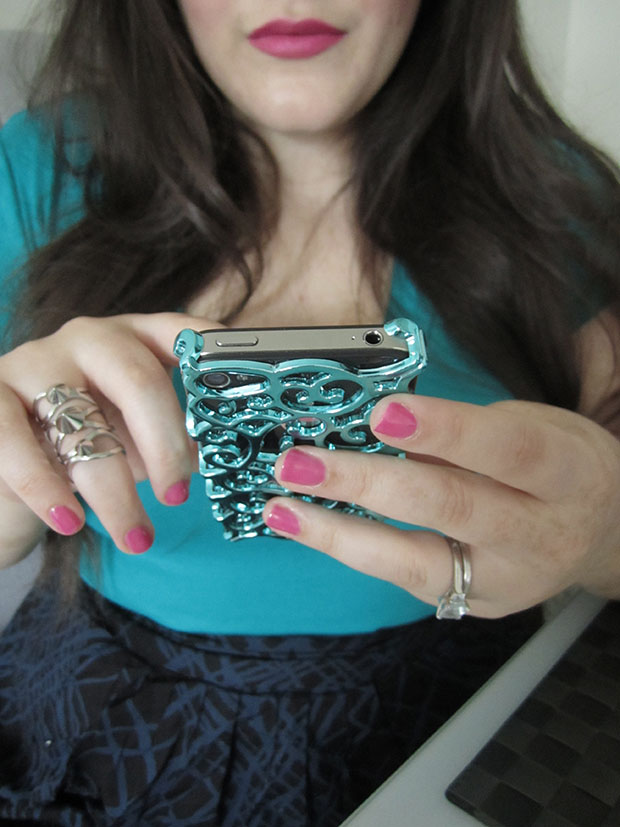
3. Use an obnoxious phone case:Any one of these should do! Look, if you want to feel fabulous, you need to exude fabulousness (is that a word?) and extravagance in every detail!
4. Put on some heels and learn to strut: I take this one from old hollywood starlets as well! Start walking around slow and steady like you own the room. Try it out in front of a mirror and start putting it into practice. Having a distinct walk is completely fabulous!
5. Stand tall, sit up tall, rest with your hands on your hips: Nothing says you mean business like the hands on your hips pose! Actually, this tip is something that’s been scientifically proven to make you feel more confident, and to me, confidence=fabulous! So, stand up tall, sit up tall, like you’re bigger than your actual body, and you will start to notice some fabulous positive vibes soon enough!
So, what do you like to do to make yourself feel fabulous when you need it most? Do you practice these sorts of techniques daily or only when you feel like you need a mood booster? Tell me what you think in the comments!
Nearly as soon as Apple released its recent iOS update, 7.1, complaints began rolling in that the iPhone’s battery life was being depleted to quickly. This is a common theme with iOS updates recently, and while we as the end users cannot control the way the operating system manages battery life, there are a few things we can do to help keep battery drain from usage to a minimum.
1. Keep your iPhone’s brightness at a third or less: Although there are times when we need to up our brightness (like in full sunlight), for the most part we can function pretty well with our iPhone’s screen turned down to the lower third of the spectrum, which will also help to keep our battery full longer.
2. Reduce motion in your system preferences: If you go to system> general> accessibility, you will find an option to “Reduce Motion.” This controls the iPhone’s visual animations and 3D effect of the app icons, known as the parallax effect. If you turn this option “on” the visual effects will be turned down thus saving precious battery life.
3. Turn off Bluetooth if you aren’t using it: Many of us use Bluetooth enabled devices in conjunction with our iPhone’s, but get in the habit of turning your Bluetooth off when you are not. Leaving the Bluetooth function on, even when devices are not connected, can drain the battery.
4. Shut down apps that are running in the background: I know most of us use tons of apps on our iPhones, but its important to shut down apps when they are not in use to cut down on battery drain. If you do not know how to do this, double-click on your home button with the iPhone screen on and you will be able to scroll left and right through your open apps. Swipe the app preview up to turn it off completely so it is not running in the background.
5. Keep a backup charger or portable external battery with you in case of emergency: iOS updates are frequently being released and issues with the iPhone’s battery drain issues are pretty much never-ending. Make sure you keep a charging solution or external battery with you for those emergency situations when your battery is getting dangerously low while you are out and about. I love these backup battery solutions from ban.do!
Do you have issues with the battery life of your iPhone? Do you already use some or all of these battery saving tips, and yet still have problems keeping your battery alive? Let me know in the comments below!
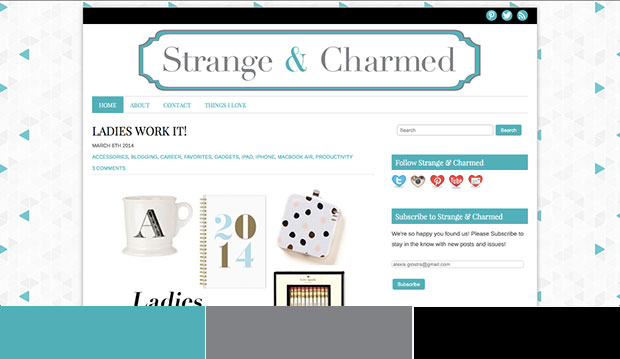
Since this week’s installment of my Blogging 101 series was all about Choosing a Platform and Identity for your blog, I decided that I should probably talk to you today about my blog color scheme and what it means and conveys for my blog and its “brand.” Look, I am by no means a branding expert, but one thing I do know about branding is that you can do all you can to produce a certain image to your audience, but ultimately your brand is decided by them! It’s sort of a funny thing, trying to control other people’s opinions, but that is where consistency comes into play. Having a consistent look and feel to your blog and social media posts really helps to establish the vision of your brand that you want to convey to your audience. As you can tell by looking around, I have a pretty specific color scheme for my blog and the colors I have chosen are significant for a reason.
So, take a look around. What colors do you see as being most prevalent in my blog? If you said teal & grey, than hooray for me, because those are the colors I want to stand out to you on my blog! I have chosen the colors teal & grey for a reason. Not only are they some of my favorite colors, but they also mean specific things that I hope transfer to your minds when you visit or think about my blog. But, how do these colors affect the way you feel about my blog?
It all has to do with, wait for it… Color Theory! Now, don’t be afraid, I am not going to go all Art and Design 101 on you, but basically in society certain colors convey certain meanings and for me, teal & grey convey a specific message to you (hopefully!) whether you realize it or not. Teal or turquoise, as the case may be, supposedly conveys an image of femininity and sophistication. Grey, on the other hand, conveys a sense of security, reliability and intelligence. Since I write about lifestyle, career advice and issues that are geared towards women, I want my readers to feel a sense of reliability and intelligence in my writing. I also want them (you) to feel like this is a safe place as a sophisticated woman to share opinions with other like-minded women. These colors don’t just convey a message that I want to portray to the internet, but they also help me to attract the right reader to my site. After all, if I am writing for women but attracting only men, my message is lost!
Okay, so I have gone and explained to you what my blog color scheme means, but what good does that do you if your blog is blue and peach? Well, I can’t go into each and every color and what they all mean here, but I have a very handy one pager with the basic meanings behind colors pinned for you to review here. If you are still deciding on your color scheme for your blog, use this resource to help you design a blog that conveys a message that reflects your blog and your ideal reader! If you already have a blog, use this resource to see if your current color scheme is saying what you need it to say and attracting who you need it to attract! You may find that you need to make some adjustments to your color scheme if you aren’t projecting exactly what you desire to the internet!
So, did the colors work? You tell me? Are you a woman, either in college or with an advanced education who considers themselves to be sophisticated, intelligent and career minded? If you don’t fit that demographic specifically, don’t worry, it doesn’t mean you are in the wrong place! Although I write for a specific ideal of a reader, that doesn’t mean that someone outside that sphere wouldn’t also find my blog useful. Remember, none of this is an exact science. So, let me know in the comments below if you fit my mold or if you’re outside the box a little! Either way I’m glad you’re here adding value to this community!
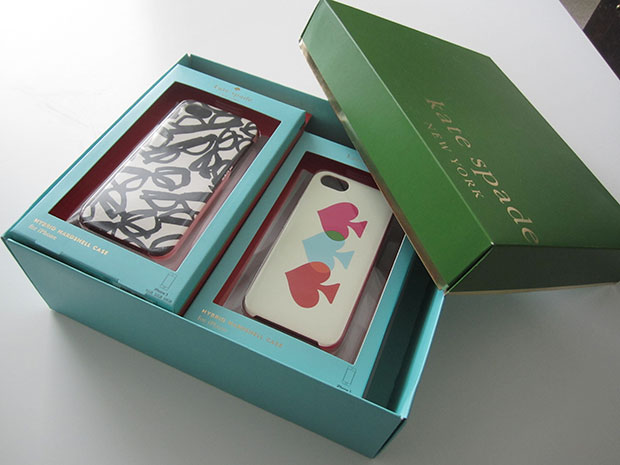
It’s no secret that I am a little obsessed with iPhone cases and I have quite a few. Since I happen to own a lot of Kate Spade cases, I like to store my cases in a way that helps me to keep them safe, but also displays them in a stylish way! Right now I store my iPhone cases in a Kate Spade gift box that fits my cases two wide in their original boxes.
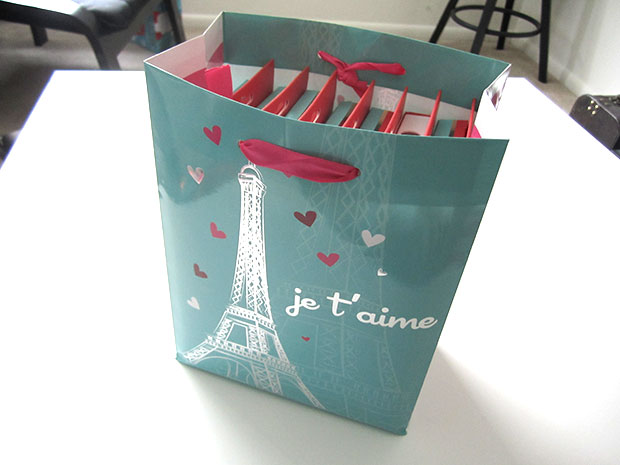
Another way that I like to store my cases is in pretty gift bags! I found this lovely bag in the Target Dollar Spot back before Valentine’s Day! This is an inexpensive and cute way to keep all my cases in one place and it looks rather lovely out on my shelf!
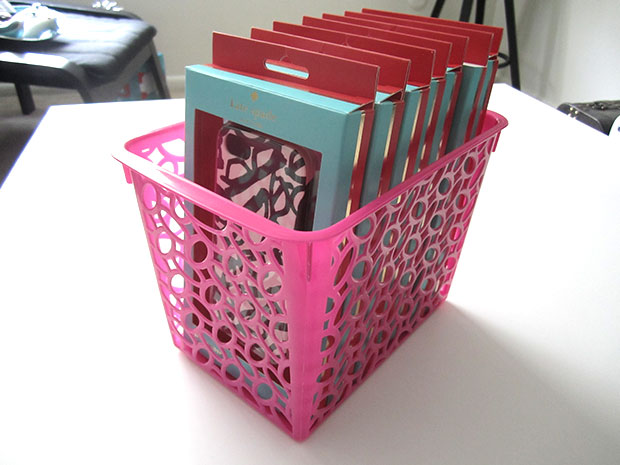
This final storage solution also comes from the Target Dollar Spot! I love this bright storage bin because its cheery to look at and is the perfect width to store my cases standing up right! Again, this bin is another great one to keep out on display and it was only $1! Hopefully, these three solutions will give you some ideas on how to store and display your iPhone cases as well! You don’t have to own a collection of designer cases to want to keep them on display. These storage options are protective and attractive, but also incredibly inexpensive. If you have a few extra iPhone cases laying around, wrangle them up using one of these methods and keep ’em safe and sound!
Did this post give you some new storage inspiration? How do you store your iPhone cases? Let us know in the comments below!
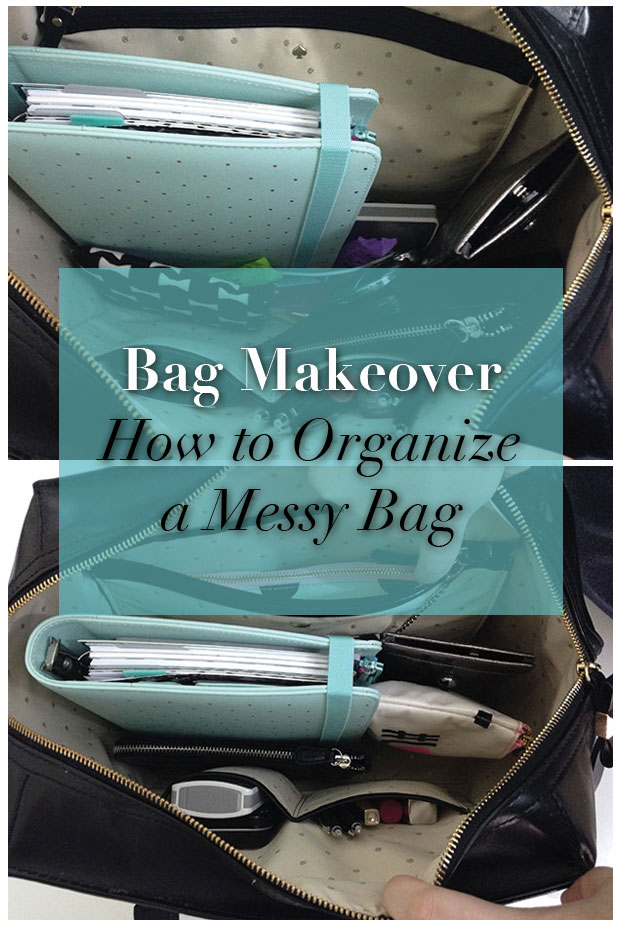
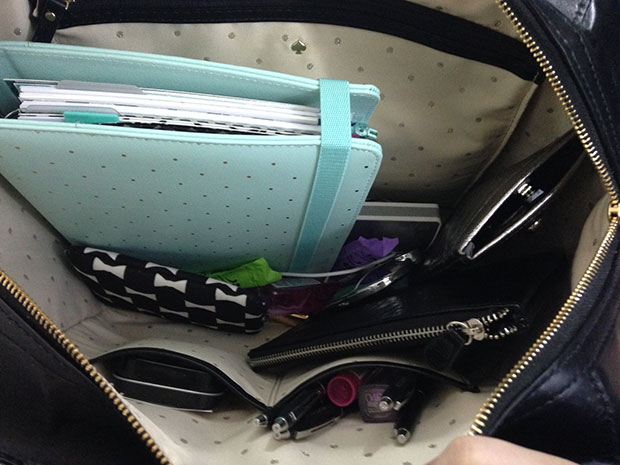
Today, I thought I would give you guys a peek into my very large and very disorganized bag! This isn’t a what’s in my bag, that may come later, but for now, I just wanted to show you guys how I like to organize my bag! This is a great method for anyone who has a large purse or tote that they use on a daily basis that does not have very many interior pockets!
As you can see from this before shot, my Kate Spade Beau bag has one large bucket style compartment, flanked on one side by some small accessory pockets and a large “iPad” pocket on the other! This bag is great because it holds so much stuff, but it’s not great at keeping organized (and this shot shows the bag without my work stuff inside)! This sort of set up can be a dangerous one for people like me who tend to just drop things into my bag like it’s a bottomless pit, but that behavior can ultimately lead to issues with the stuff in your bag. When things are just free-floating, chords can tangle or break, papers can become crushed, lip products can melt into wallets and onto cell phones– it can be a disaster!
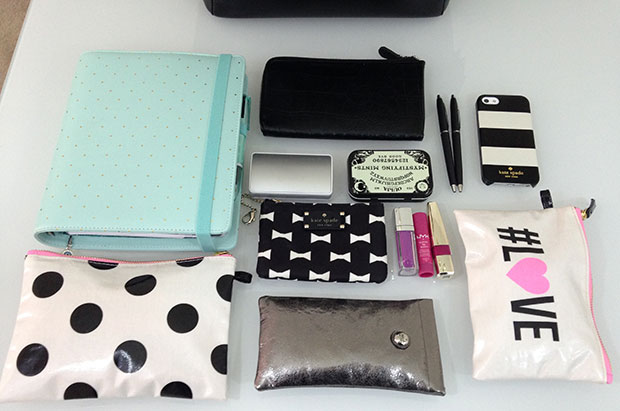
So, to contain the mess in this bag, I have to institute the use of extra pouches to wrangle my loose items together! Once I pulled everything out of my bag, I found that I really didn’t have as much stuff as I thought, but there were just a lot of little items hanging out at the bottom of the bag. Using some extra makeup bags, I was able to put like items together– toilettes and beauty products in one, and extra wires and gadget goodies in another. This way I have a system!
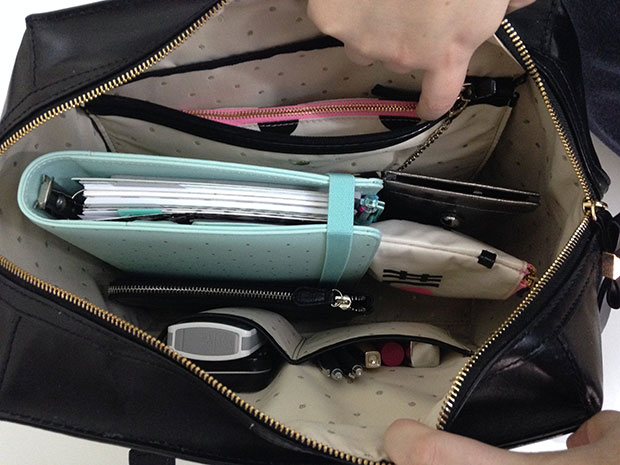
Now, when you look in my bag, you can see everything laid out neatly! To save space in the main compartment of the bag, I tucked away my larger pouch with toiletries and beauty products into the large zip pocket in the back, this way I can just pull the whole thing out when I need it, instead of digging through the whole section. Everything else in the main compartment is either large enough to be seen and grabbed easily, or housed in one of the two accessory pockets. So much better, right?!?
What other tips and tricks do you use to organize your bag? Have you given your bag a makeover recently? Let us know in the comments below!
So, in case you haven’t noticed or you don’t read here that often, I finally caved and bought a Filofax! I feel like this decision was an inevitable one as I have been eyeing them for quite a while and actually used to use one before the age of the Palm Pilot (I swear I am not that old, but I did have a Palm Pilot at age 14)! Back then I had a Franklin Covey binder, and before that I had whatever cute ring-bound planners were available from Fashion Bug (if you are my age, I think you know what I am talking about… faux animal fur and psychedelic rainbow prints were my thing). It took me a while to feel like it was time to return to a full-blown paper planner system, though. I had been seriously testing the waters last year with a variety of different paper planners ranging from inexpensive Target planners, to Gallery Leather planners to a more stylish and coveted Kate Spade planner! All of these were nice, but inevitably only helped organize one area of my life; my schedule! I really needed something that would keep my calendar, to-do’s, random notes, my blog’s editorial calendar and so on! Truthfully, all these other planners were fated for extinction because they all had one thing in common, a binding, which meant I couldn’t move things around or add pages or sections as needed.
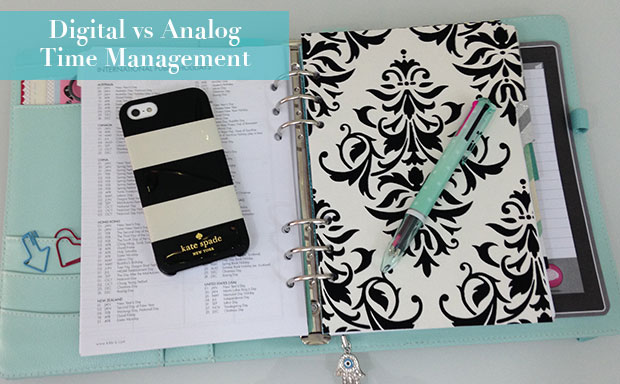
Now, I get it, I didn’t really have to get a Filofax to get that sort of customization. I could have used any number of apps that I already own to keep track of everything in one place, my phone! The problem with a digital system like a phone, however, is that it seriously lacks a sense of accomplishment. This is totally a personal opinion, but no matter how many lists I would make on my iPhone, or how many events I scheduled, or how many to-do boxes I tapped, I never felt like I did anything. Once you tap those check boxes and close the app, those old items go away, you can’t see them anymore! Yes, your calendar events usually stick around (unless you have to wipe your phone and you failed to back up or sync) and you can still read your old notes, but it’s just not as gratifying! The endless digital paper doesn’t feel like it amounts to much because it’s all inside your phone. It doesn’t matter if you have 1 list or 10 lists, 100 to-dos or 0, it’s all equal inside the phone!
Don’t get me wrong, I do love my iPhone and I think it does some very important things very well and things that my Filofax could never do! For instance, my iPhone is great at reminding me! It dings, vibrates, and does everything in its power to let me know when an event it coming up or to remind me about something I have to do! My Filofax, for all its wonderful goodness, will never be able to get my attention when I have lost track of time! My iPhone is also great for taking notes while I am driving through dictation which I do often! Wow, to think how wonderful the world would be if my Filofax could do that, it would be like having my own personal secretary! My iPhone also is the place I like to take quick notes when I am out and about and either (a) did not bring my Filofax, or (b) cannot pull out my Filofax because of the situation. IPhone’s are nice and discreet like this, but if the note I took is something that belongs in my Filofax, I will eventually transcribe it to its proper place!
Look, the advantages and disadvantages of digital and paper planning systems are really endless and to each their own when it comes to managing your own time. For me, for now, my Filofax and its trusty friend, my iPhone will be living and working together in tandem to help keep me and my life together!
What sort of planning system do you use? Do you use a mix of digital and analog like me, or are you all one or the other? Let me know in the comments and feel free to share any apps or planner tips that you find especially helpful!
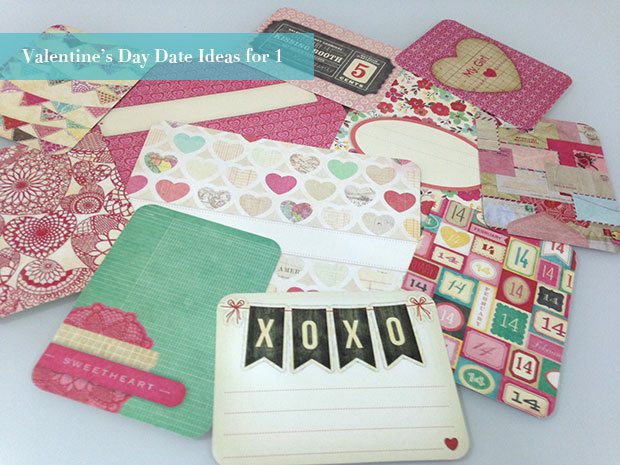
I know Valentine’s Day gets a lot of slack for being a couples only type of holiday. I never really had a problem with the holiday because I always sort of thought of it as a time to celebrate those you love, romantically and even platonically! But I get it, not everyone has a significant other and not everyone goes out with a group of single friends to mock the holiday. For many, I’m sure its just another day. If this sounds like you, I suggest celebrating the holiday by yourself and for yourself! So, show yourself a little self love and try one of these Valentine’s Day date ideas for 1!
Order our your favorite meal from your favorite restaurant and eat it at home in the comfiest pajamas you own!
Take a seriously luxurious bubble bath, including Lush Bath Bombs, bath salts, bubbles and champagne!
Schedule yourself a message!
Take yourself out to your favorite store and buy yourself a splurge worthy gift, and make sure they wrap it up with all the trimmings!
Order yourself a bouquet of flowers or an edible arrangement and have it delivered to your work or home. Tell no one who it’s from and just enjoy a beautiful treat to yourself!
So, how will you be spending your Valentine’s Day? Let me know in the comments!
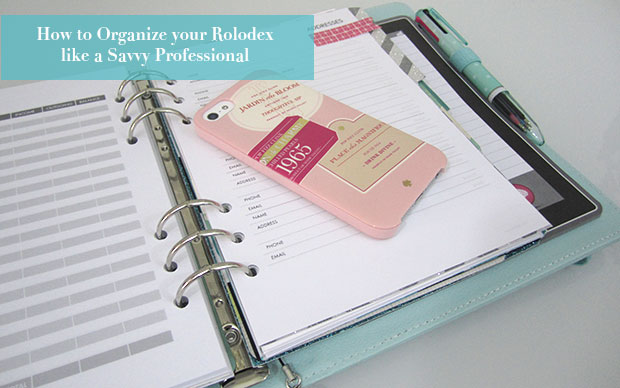
Okay, so I know Rolodex is a really dated term, but I think you still get the idea of the post! Since I interact with a large number of people in my day-to-day work, it is really crucial for me to set up my contacts list on my phone in a way that will help me remember everyone in a professional way! People love it when you truly recognize and remember them, even if you have only met once a month or two ago! It really helps develop strong ties with your customers, colleges and basically any other person in your life that you may run into regularly! So, I thought I would review with you all my process for setting up my contacts list that helps me to be more of a savvy business professional!
1. Confirm the spelling of all names, never assume: You have no idea how many ways a name can be spelt, and after meeting with someone briefly you may not know that their name is spelt with an “i” instead of a “y” and so on! I try to make it a point to have my contacts spell their names out for me (or to give me a business card with their info) so that I can track them properly. It may not mean much to you, but think about how annoying it can be to deal with someone who can’t spell your name right! Bonus points if you can also include a phonetic spelling if the name is a harder one to pronounce!
2. Take a picture or grab one-off Facebook or LinkedIn: Since most of us store contacts in our phones and have the ability to assign a picture to a contact, USE THAT FEATURE! It may feel awkward the first few times you have to ask for a photo, but get over that and get it put into your phone! Most people won’t mind that your taking their pic after you explain that it helps you associate names to faces to have the picture in your contacts. Heck! They might even ask the same of you! If worse comes to worse and you miss the opportunity to snap a pic, do a quick google search and see if you can grab one from Facebook or LinkedIn. You have no idea how helpful it can be to have photos of people you interact with on an infrequent basis. It can save you from an embarrassing moment in the future!
3. Make a personal note: Most contact lists include a section for extra notes. Use it! Store 2-3 personal facts about your contact in this area so that the next time you meet with them, you have something personal you can refer back to. This may be your contacts favorite sports team, the college their kid goes to, or the name of their dog, but remembering these facts can help you look really organized and thoughtful to others!
4. Edit and Update: Contacts change frequently in any business! Make sure you keep the most up to date information and contacts in your Rolodex to ensure you are organized. Remove old contacts that have moved on, update personal facts in your notes section, and edit emails or phone numbers that may have changed on a frequent basis!
5. Use it or lose it: The most important part of having a contacts list or Rolodex is that you actually make use of it! If you aren’t referring back to the information you have stored, there is really no reason to keep the info to begin with. Your contacts list can be a treasure trove of information and a professionals dream or nightmare! Decide how you want to use yours and get to it!
What other tips and tricks to you use in your contacts list or Rolodex? Do you use a digital list on your phone or do you prefer a paper system of business cards and hand written contacts? Let us know in the comments below!
The thing that will never cease to amaze me about my Filofax, is the sheer size and scope of the community that revolves around planners. Weeks ago, when my curiosity was piqued yet again by Filofax and planner systems, I fell head first down the proverbial rabbit hole which is the universe of Filofax. Worldwide, these planners are a phenomena with endless websites, forums, Pinterest boards, Instagram accounts and even Facebook interest groups, all revolving around the topic of planners! The more I dug into the planners themselves, the array of inserts, accessories and yes, even planner charms (!), the more I felt an uncontrollable urge to join the club. So, I fell in love with a planner, and the rest as they say is history.
Since my planner arrived, and admittedly, even before it shipped, I was knee-deep in these sites and forums learning about the available means to customize my Filofax experience to my own needs and desires. I searched through hundreds (if not thousands) of pictures of Filofax set ups, analyzing how people arranged their tabs, how they set up their “dashboard” and how they decorated their planner. Remember, this isn’t just any leather-bound book filled with scribbles and scraps, this is MY LIFE inside these pages, so it was important that my Filofax reflect me and my tastes!
As my planner itself, I ended up buying the Large 2014 Kikki K Time Planner which is the equivalent of an A5 Filofax. It’s a beautiful mint/aqua color with gold polka dots. What drew me to this planner, other than the beautiful color and design, is that the planner closes via an elastic band which I really liked! I have a problem with planners that close with a zipper or have a button/magnetic closure because I feel like you have to be mindful of what you stuff inside or else the planner won’t close! With this elastic strap, I am confident that my planner will always be secure no matter how thick I stuff it! Now, I also went ahead and purchased some different supplies like stickers, page flags, a new matching pen (the Pilot Coleto 4 color pen in Mint with Black, Aqua, Pink, and Violet ink refills), washi tape, cute post-its, journaling cards, and pretty paper to make some new dividers! I also decided that I was crafty enough to try to create my own custom inserts and since my Kikki K didn’t come with a traditional fly-leaf, I made my own with some screen printed acrylic scrapbook paper! I recently also purchased a A5 6 Hole Punch from a seller overseas, and once that comes in, I won’t have to use my single hole punch that I am currently using! It does the job right now, but lining up the holes is a challenging task that I hope the 6 Hole Punch will simplify for me!
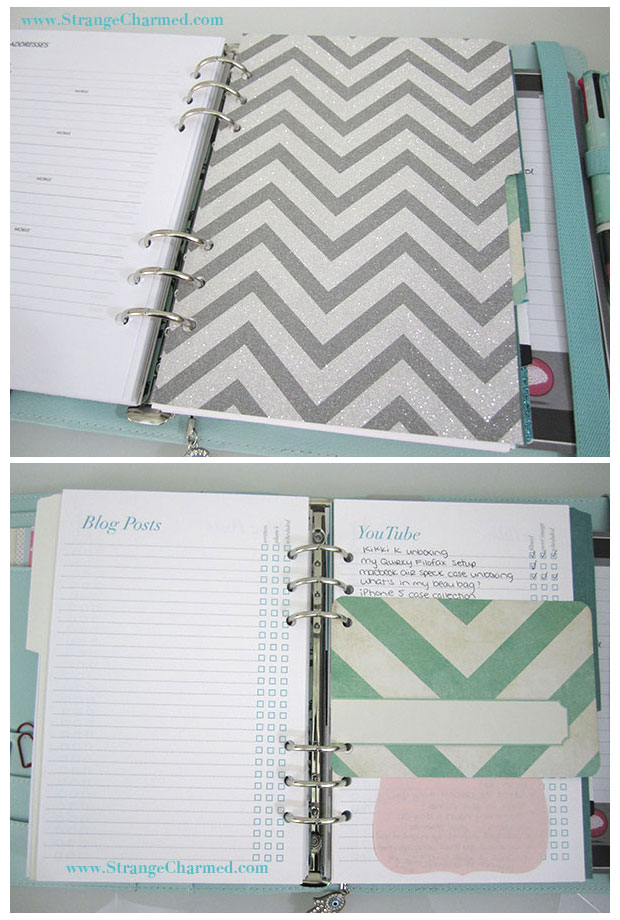
To give you an overview of my Filofax and how I choose to use it, let’s start with the different sections. I have my Filofax broken down by 6 dividers. The first is for my blog because my blog is probably the most important project in my life. I used to keep a loose printed editorial calendar, but now I have moved this into my planner. I use a month on 2 day spread that came with my Kikki K planner because I like the way it looks!
The next section is for my day job, and for this I use a week on two pages spread that came with the planner. Here I am able to list out meetings, events and reminders for work as well as other general life tasks. I also keep a few Expense and Address sheets within this section (marked off by Target page flags) for work!
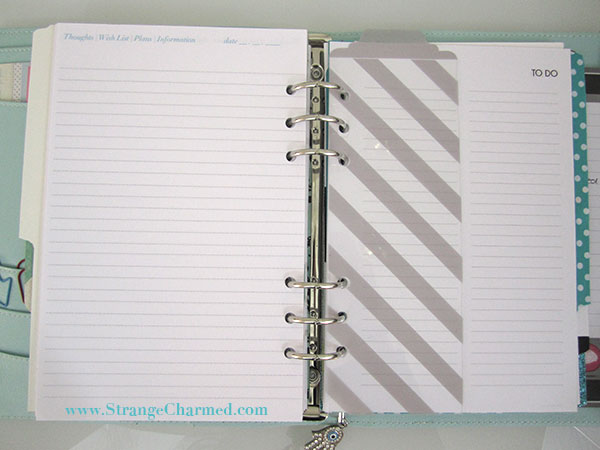
The fourth divider is called my “Capture” section, and here I am using some more custom-made inserts that help me keep track of my Thoughts, Wish Lists, Plans and any Information I may need to keep. I love these pages because I have a Date section and can circle the type of note I am entering so I can keep a variety of info in this section without it feeling out-of-place! This section also has another vertical divider that I got from Project Life and cut to size for my planner. It separates my custom capture pages from my person To Do lists (these pages came with the planner).
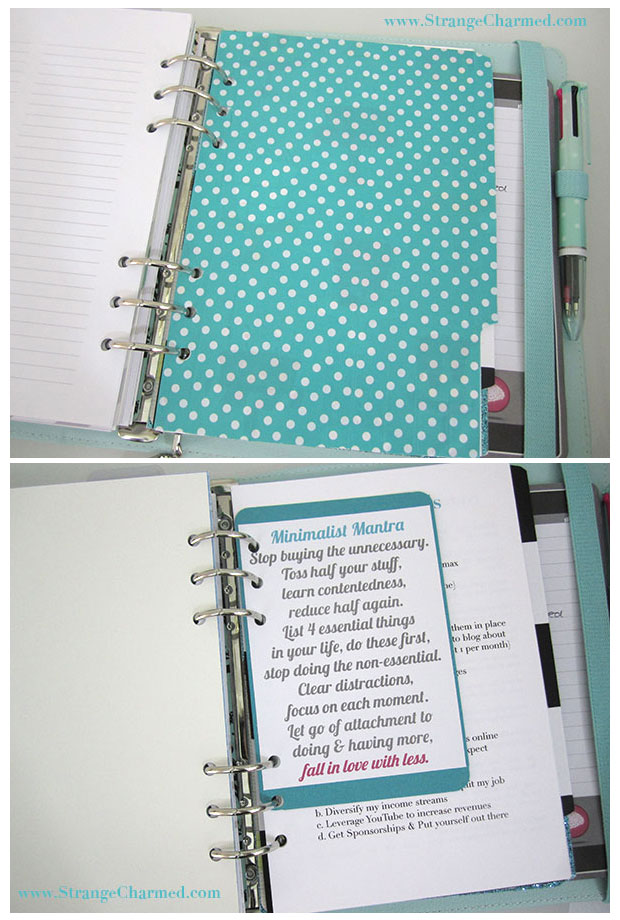
The fifth divider is for all my Inspiration! Here I keep any printed bits that keep me motivated, including my 2014 Goals, some Bible verses, prayers and even a Mini Workout!
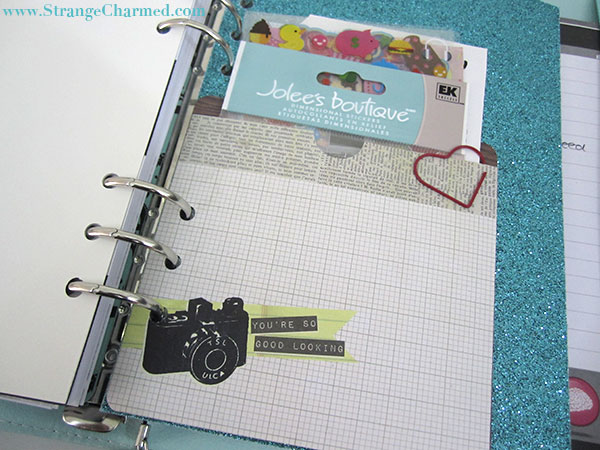
The final divided section is for miscellaneous items and right now it just has a punched pocket that holds all my decoration stickers! More items may find their way here eventually so this section is meant to grow!
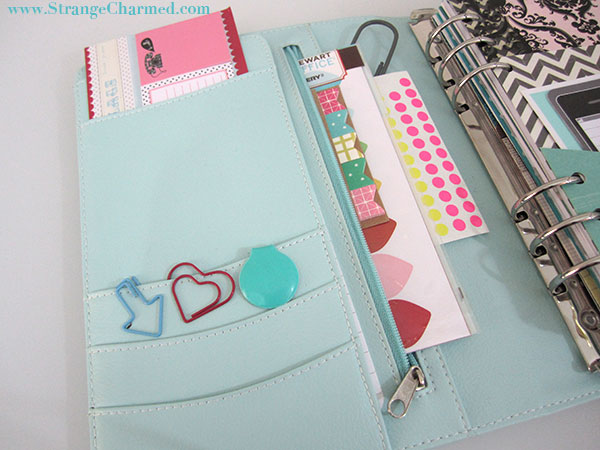
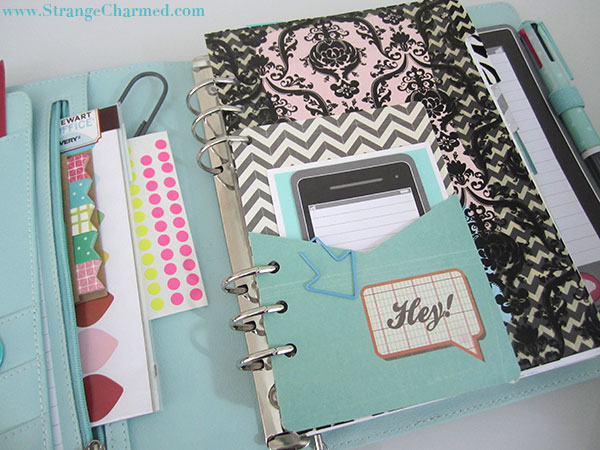
So, now that you have a general idea as to how I organize my Filofax, let’s get into the accessories and juicy details that I know you are all dying to hear! The front inner cover of my planner has a bunch of slots and pockets where I like to keep post its, paper clips, as well as some frequently used stickers. I love the interior zippered pocket of my planner because this is a great place to store page flags and anything that is loose and I don’t want to fall out!
Also in the front of the planner, other than my custom fly-leaf, I have added a paper pocket where I keep my iPhone sticky notes. It came in a pack with the other pocket I mentioned above that stores my decoration stickers and I just love the personal touch these add to the planner. I originally wanted to use a zippered clear pocket, but the one I purchased from Staples did not fit my binder (so sad). So, these pockets are simple and custom punched and definitely hold all the bits that I need!
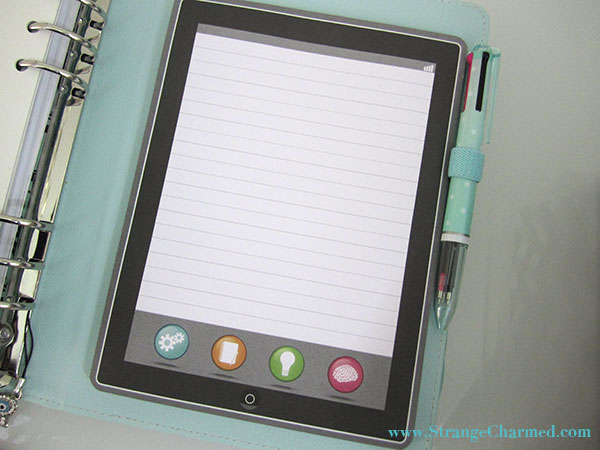
Finally, in the rear inner cover, my planner came with a nice sized notebook where I can jot quick notes and such. I ended up swapping this simple notepaper for my “iPad” style note tablet from Wal-Mart and I love the look of this so much! Of course, there is also a pen loop where I keep my mint Pilot Coleto 4 color pen as I mentioned above. I bought this from JetPens as it came highly recommended by other Filofax users. The 4 colors of ink that I chose make it easy for me to do a bit of color coding in my planner without having to carry lots of pens with me!
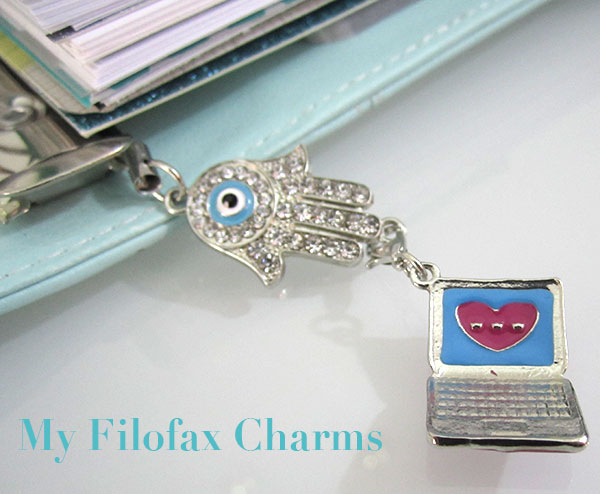
And, the final personal touch in my planner is my little planner charm which I love! Through my research online, I found that it was very common for people to put charms and such on their planners to decorate them and give them more personality. I decorated my Filofax with this custom charm I made using a Hand of Hamsa charm as well as a little laptop charm that I think screams ME!
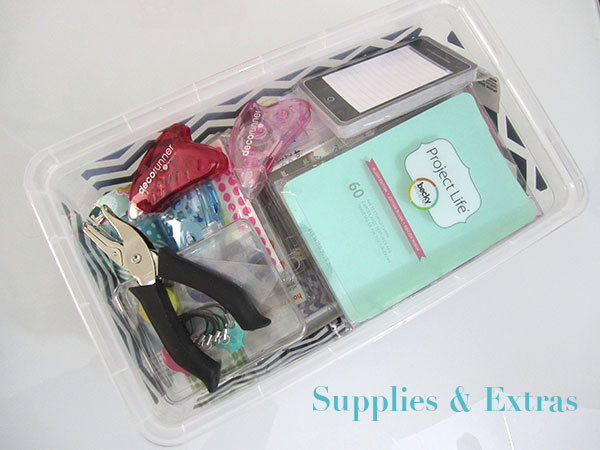
Outside of my planner itself, I also have a few rolls of cute washi tape, more stickers and extra journaling cards that I keep at home in a bin filled with extra goodies for my Filofax. As you can see, I have quite a bit of extras, some of which I purchased for my planner and some of which I have had in my personal stock for a while, but I find that having everything in one place makes finding refills and such much easier for me!
If any of you, my lovely readers, have a Filofax set up post or video or pictures out there on the internet, please please PLEASE link it below! I am obsessed with these things now (and if you’re here, I bet you are too) and I want this post to be almost like a reference of sorts for those who read it! Thanks!